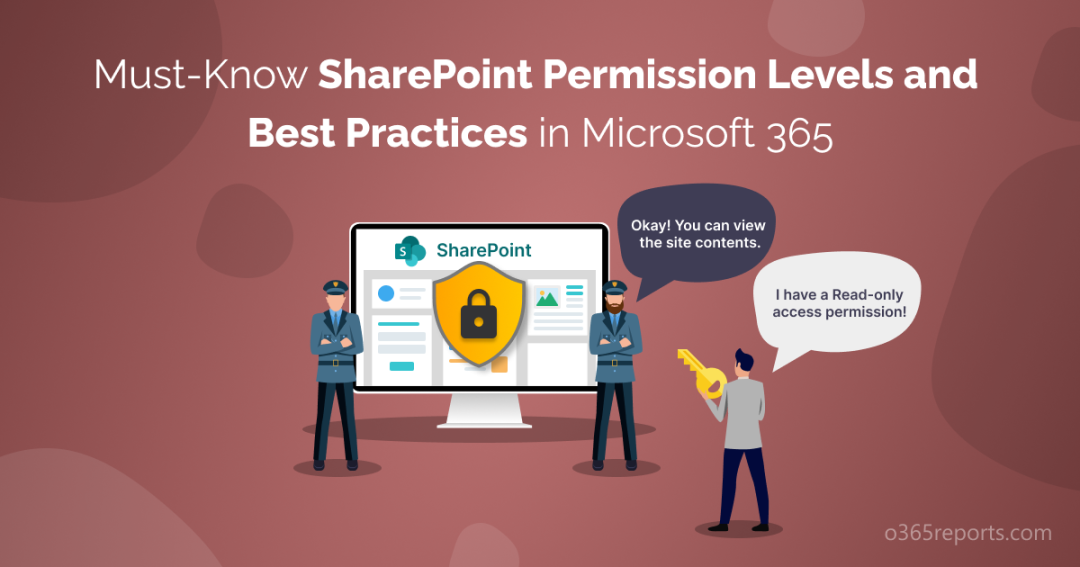
SharePoint, a widely used collaboration platform developed by Microsoft, allows users to store, and share sensitive information within an organization. However, without proper permissions, unauthorized users may gain access to confidential data that causes data breaches. Therefore, it is essential for organizations to establish and enforce appropriate SharePoint permission levels to ensure data security, maintain data integrity, and manage access to sensitive information.
In this blog, we’ll explore the levels and SharePoint permission best practices to help you take control of your SharePoint experience and streamline your workflows.
SharePoint Permission Levels in Office 365
SharePoint Online permission levels are a set of consents that determine what actions users can perform within SharePoint.
Permission levels in SharePoint offer flexibility in managing permissions, allowing administrators to easily modify and customize access rights as per changing business requirements. By setting up permission levels, you can ensure that users are granted the appropriate level of access to the organization’s sensitive information. Also, SharePoint Online provides a way to assign permissions for site, document, and list levels.
Multiple permissions options are available in SharePoint Online. They are
- Default permission levels
- O365 SharePoint security groups
- Custom permission levels
- SharePoint permissions on document library
- Permissions for SharePoint lists
- User SharePoint permissions
Set Default Permission Levels in SharePoint Online
SharePoint provides default permission levels that consist of a preconfigured set of permissions, which can be assigned to users, groups, and security groups.
By implementing these permission levels, you can strike a balance between granting users the necessary access for their tasks and safeguarding the security of your SharePoint environment.
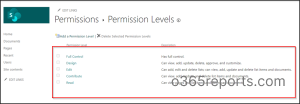
The 5 predefined SharePoint permission levels are,
Full Control: Full Control is a default permission level that provides users with complete control over a SharePoint site. With this permission, users can perform any action like creating, deleting, modifying sites, etc.
Edit: With the Edit permission level, users can add, edit and delete lists. Also, they can view, add, update, and delete SharePoint documents & list items.
Read: Users with the default Read permission level in SharePoint can view SharePoint pages and list items, but they cannot modify or add new content. They can also download documents stored on the SharePoint site, but they cannot upload or delete documents.
Contribute: You shall use this Contribute SharePoint permission to allow users to gain full access to the SharePoint lists and documents. However, they can’t make any changes to the site pages and looks.
Design: You can use this permission to provide users with the ability to customize and other predefined consents for the sites in a SharePoint Online.
Default Group Permissions for SharePoint Online Site
In SharePoint Online, when a new team site or communication site is created, default groups are automatically generated. These groups are designed to facilitate permission management and access control for the site and its contents. Users can be added to these groups depending on the permissions that need to be granted. Alongside managing permissions, it is equally important to configure SharePoint site privacy settings to control who can discover or access the site.
The default groups in SharePoint Online are,
Owners: This group has complete authority over the SharePoint site and its content. Users in this group can add or remove users, set permissions, and make other modifications to the site. Along with this, they can also be able to view the SharePoint usage reports to track site activities.
Members: This group has the privilege to make contributions to the site, which may include adding and editing content, creating lists and libraries, and managing permissions for their own documents and items.
Visitors: This group offers only read-only access to the added users. They can’t be able to edit or delete the contents like the users in the Owners and Members groups.
For these default groups, users, Microsoft 365 groups, and security groups can be added as members to simplify access management. Moreover, special security groups like “Everyone except external users” or “Everyone” can be used to add everyone to a SharePoint site for broader accessibility without manual intervention.
Create New Permission Level in SharePoint
The default permission levels are often too broad in scope and may not offer the necessary level of granularity to fully meet the specific requirements of an organization. However, you can make your customized permission levels based on your requirements.
You can create a custom permission level by following the steps below.
- First, open SharePoint Online.
- Then, click Settings at the top right corner.
- After that click the Site permissions option.
- Now, select Advanced permission settings at the bottom.
- Then, click on the Permission Levels at the top of the page.
- Now, to create your custom permission level, click Add a Permission Level.
- Give a suitable name and description to your new custom permission level.
- After that, you can select List Permissions, Site Permissions, Personal Permissions based on your requirement.
- Finally, scroll down the page and click Create to set your custom permission level.
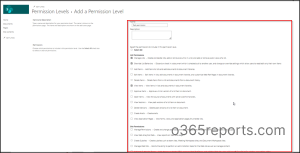
After creating, you have the flexibility to assign custom permission levels to users or security groups according to your requirements.
If permissions are configured at the parent site level, those changes will also apply to all child lists, and libraries unless their permissions have been customized. However, it is possible to break inheritance and customize permissions at any level to meet specific security and access requirements.
We can configure custom permissions for the following.
- SharePoint Document Library
- SharePoint Lists
Note: Before configuring permissions for the above items, you have to stop the inheritance of site-level permissions on those above items. You can stop inheriting permissions for your document library under Permissions and Management section by following the path below.
Respective site library>Settings>Library settings> More library settings>Permissions for this document library> Stop Inheriting Permissions>Ok.
Moreover, you can also manage SharePoint permission levels using PowerShell right from creation to cloning.
SPO Permissions for Document Library
This level of customization enables organizations to configure permissions, control access to sensitive documents, and manage unique permissions for designated users or groups in SharePoint Online.
Create Folder Level Permission in Microsoft SharePoint
It is possible to create custom permissions for individual folders in SharePoint. However, it is advised to use those custom folder permissions only when it is necessary.
To manage permissions for the SharePoint library and files, follow the steps below.
Respective site> Document library>Respective folder > (…)> Manage access
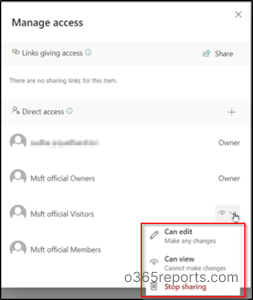
By referring to the above screenshot, you can assign granular permissions to users to access the folders in your library.
Manage File-level Permission in SharePoint Online
Organizations can precisely control item-level access permission in SharePoint, allowing for unique permissions on specific items within a list or library. This permission is beneficial when specific items in a list or library require specific permissions that differ from the rest of the items.
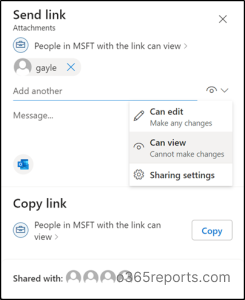
To set a file-level permissions in SharePoint, follow the steps below.
- First, locate the file for which you wish to configure permissions.
- Then, choose the file and select the “Share” button.
- Now, enter the email address of the person or group for whom you want to set permissions in the “To” field.
- Select the desired level of access (view or edit) from the dropdown menu.
- Then, click on the “Send” button to send invitation to the respective users after applying the designated permission.
Note: You can monitor the file sharing activities using inbuilt SharePoint Online Sharing reports.
Configure Lists Permissions in Office 365 SharePoint Online
In SharePoint Online, you can set permissions for specific lists within a site, in addition to setting site-level permissions. Here’s how to set list-level permissions,
- Navigate to the list or library that you want to set permissions for.
- Now, click on the gear icon in the top right corner, and select “List settings”.
- Then, under the “Permissions and Management” section, click on “Permissions for this list“.
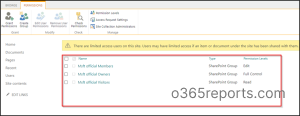
Now you can grant permission levels such as, Read, Edit, Full Control to users according to your requirements.
Check User Permission in SharePoint Online
To ensure proper access management, regularly checking the SharePoint permissions of users is crucial, particularly when dealing with numerous users with varying roles.
To check user permission in SharePoint Online, you can follow the steps below.
- First, navigate to the SharePoint site that you want to check permissions for.
- Now, click on the “Settings” icon in the top-right corner of the page, and then click on “Site permissions”.
Here, you will see a list of all the users and security groups that have been granted permissions to the site, along with the permission levels.

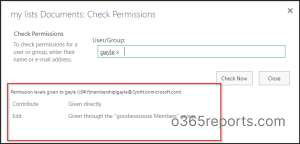
Note: You can also verify the permissions granted to individual users or groups by using the ‘Check Permissions’ option found in the Site permissions settings, by providing the user’s email address.
Generate SharePoint Online Permission Reports
SharePoint Online offers multiple methods to generate reports on granted permissions. They are,
- Built-in Permissions Report: To generate the inbuilt SharePoint Permissions reports, navigate to the respective site settings and click the Site Permissions option. You will get a list of users and permissions assigned to them.
- SharePoint Online Management Shell: An alternative way to generate a report on permissions in SharePoint Online is by utilizing the Management Shell, where a script can be executed to retrieve permissions for a specific SharePoint site, list, or library and export the results to a CSV file. Before that make sure to connect SharePoint Online PowerShell.
- Third-party tools: Multiple external tools can be utilized to create SharePoint usage reports. We can use the same third-party tool to get reports on permissions in SharePoint Online.
Let’s see the SharePoint permission best practices now!
SharePoint Permission Best Practices
Following best practices for SharePoint permissions settings helps organizations minimize the risk of security incidents and ensure that users have access only to the information they need to complete their task.
Do’s in SharePoint Permission Best Practices
- Follow the principle of least privilege: Avoid giving high privileges to the SharePoint Online users. Provide individuals with the minimum level of authorization required to perform their designated duties.
- Centralized secure repository: Create a separate SharePoint site or library for sensitive documents instead of scattering them throughout a larger library and using specific permissions to protect them.
- Limited use of item-level permissions: It is the best practice to limit the use of item-level permissions. You can apply them, when necessary, as they can complicate overall permission management.
- Optimizing access control: It is recommended to create groups for managing permissions, which is a best practice instead of assigning permissions directly to individual users.
- Confidentiality: Don’t give SharePoint permissions to unauthorized users to access your confidential information if it is not necessary.
- Secure access to subsites: If you are having subsites in your SharePoint Online, then it is advised to have site level permissions to provide same control access to your subsites as that of the parent site.
- Optimum use of permission inheritance: Establish a clear and understandable permission structure by utilizing permission inheritance through SharePoint groups.
- Be careful about choosing your sharing method: Understanding the difference between share and copy link is necessary to properly enforce the Principle of Least Privilege (POLP). This knowledge ensures you can precisely control permissions over the file and prevent accidental over-sharing.
When needed, consider features like Limited-access user permission lockdown mode to further restrict access on specific pages and libraries, but be mindful that it may cause unexpected permission errors.
Don’ts in SharePoint Permission Best Practices
- More members in Owners group: Limit the number of users in the Owners group and assign most users as Members or Visitors for better permission management.
- Failed to review permissions regularly: Don’t forget to review and update permissions regularly, as users join or leave the organization to ensure that they have appropriate access to SharePoint resources.
- Breaking permission inheritance: You can stop inheriting permissions for your site contents. But try to reduce breaking permission inheritance in SharePoint, as it can lead to complex permission structures that are difficult to manage and maintain unless it is necessary.
- Excessive use of custom permission levels: Don’t use custom permissions enormously, use them limitedly and only when necessary. Keeping permissions as simple as possible can make it easier to manage and maintain the site.
Make sure to follow the above SharePoint permission best practices for enhanced security across your collaboration platform.
A Doorstep Supervision of SharePoint Permission Levels with AdminDroid
Got fatigued with the above long steps to manage your SharePoint Online permissions? Drop your worries! We came up with a one-stop solution provider to analyze, report and monitor SharePoint permission levels of the Microsoft 365 site users and groups at your fingertips.
AdminDroid audits SharePoint Online to help you monitor and track permission-related activities in SharePoint Online from member permission to site level permissions in one place.
Below are the AdminDroid’s SharePoint Online auditing reports on SharePoint permission levels.
- Newly Created Permission Levels
- Deleted Permission Levels
- Modified Permission Levels
- Disable Member Permission Using Scripts Report
- Members Sharing Permission Audit
- Sharing Inheritance Broken Report
- Sharing Inheritance Reset Report
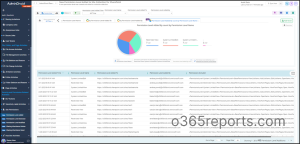
Moreover, AdminDroid’s SharePoint Online reporting tool overcomes the drawbacks of the native reporting tool, by providing in-depth insights of SharePoint lists and sites permissions, thereby making SharePoint Online environment secure.
Moreover, here are some of the SharePoint Online custom permissions reports by AdminDroid.
- Custom permission configured Sites
- SharePoint Lists with Custom permissions
In addition to monitoring SharePoint Online permissions, AdminDroid enables you to get control over the entire SharePoint Online by offering eye catching SharePoint Online dashboard.
With bird’s eye view dashboard, you can analyze site collections, sites, lists, and document libraries for effective SharePoint Online management.
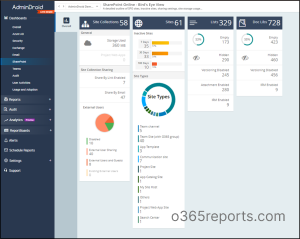
Also, you can utilize AdminDroid features such as advanced scheduling, alerts, granular delegation, exporting, etc.
Do you feel like it would be very useful if AdminDroid provides reports for all other Microsoft 365 resources same as SharePoint Online? Yes, AdminDroid does. It offers effort-free monitoring of your entire Microsoft 365 environment including resources such as Exchange, Teams, Yammer, etc. Hurry up! Explore AdminDroid now for efficient management of SharePoint Online.
Follow SharePoint Permission Best Practices!
In conclusion, SharePoint permission levels provide granular access controls to organization sensitive data. This enables you to effectively manage user permissions and restrict access to confidential content, thereby reducing the risk of data breaches or unauthorized activities.
Furthermore, you can tighten your SharePoint Online security by monitoring SharePoint Online permissions and access, external user activities, and more with dedicated SPO PowerShell scripts. So, follow the best practices and configure SharePoint permission levels to protect your sensitive information within the SharePoint environment.
We hope this blog will help you to learn more about SharePoint permission levels. Share your ideas and suggestions on SharePoint permission levels and best practices in the comments section.
