Permissions are the key to controlling who can access what in SharePoint Online. It’s crucial to get them right to ensure security and streamline collaboration. Not every employee requires the same level of access to organization data, and giving too much can create unnecessary risks and clutter.
While SharePoint Online provides default permission levels as a starting point, they often provide broad access. They might not fit your organization’s specific needs and workflows perfectly. That’s where custom permission levels in SPO take the stage.
What are SharePoint Online Permission Levels?
Before delving into custom permission levels in SharePoint Online, it’s essential to grasp the fundamental concepts of SharePoint permissions, permission levels, and groups. Here’s a brief overview:
Individual Permissions: Individual permissions refer to the specific actions a user can perform within a SharePoint site. These actions may include viewing pages, editing site content, or managing permissions.
Permission Levels: SharePoint permission levels are predefined sets of permissions grouped together. Each permission level gives you different levels of control over site resources.
Groups: Groups serve as containers for users within SharePoint. Users are assigned to groups and each group is associated with a particular permission level. SharePoint provides three default groups with pre-assigned permission levels such as site owners, site members, and site visitors.
What are the Different Site Permission Levels in SharePoint?
There are seven types of default permission levels in SharePoint such as,
- Full Access
- Design
- Contribute
- Read
- Edit
- View Only
- Limited Access
Each of these permission levels in SharePoint provides different degrees of access, allowing admins to balance usability with security depending on the site’s purpose. While custom permission levels let you fine-tune what actions users can perform, site privacy settings decide whether the site itself is open to everyone in the organization or restricted to selected audiences. So, it’s suggested to configure site privacy settings alongside site permission levels to ensure both granular control and overall site visibility are managed effectively. Now, let’s delve into understanding the custom permission levels within SharePoint.
What are the Custom Permission Levels in SharePoint?
Custom permission levels allow you to define specific sets of permissions that can be assigned to users or security groups at the site, list, or library level. These custom permission levels give you more flexibility and granularity in controlling access to SharePoint resources. Instead of relying solely on the default permission levels, you can create custom permission levels tailored to your organization’s needs.
When to Use Custom Permission Levels in SharePoint?
For example, the default “edit” permission level allows users to add, edit, and delete content in SharePoint. What if you need the members only to add/edit the content but not delete? For this, we use the custom permission levels.
You can either customize the default permission levels or create a new permission level based on your requirements. But when adjusting permission levels, it’s crucial to keep a record of changes and ensure they function properly across all relevant groups and sites. Also, be cautious not to provide excessive access, as it may be misused. You can leverage the built-in SharePoint Online change history reports to keep a check on these activities.
Consider the following scenarios for customizing the default permission levels:
- Grant additional access to users for specific tasks.
- Remove permissions that are not essential for users’ job responsibilities.
Consider the following scenarios for creating a new SharePoint permission level:
- To refine a specific permission level by excluding certain permissions.
- You want to make a new permission level with its own customized permissions.
Tip:
You can efficiently manage SharePoint permission levels using PowerShell especially for bulk creation, modification, deletion, and cloning.
How to Create a Custom Permission Level in SharePoint?
To add custom permission levels in SharePoint, follow the steps given below.
Step 1: Navigate to the site you want to customize the permission levels.
Step 2: Click on the gear icon ⚙️ in the top right corner -> Site permissions.
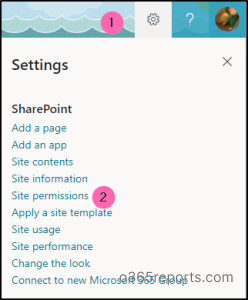
Step 3: Select Advanced permission settings.
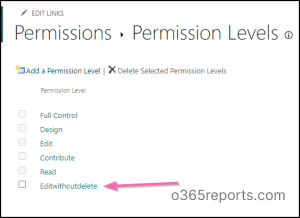
Step 4: Click on Permission levels in the command bar. You can see the list of default permission levels for the site based on the site type.
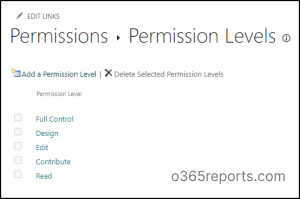
Step 5: For customizing the existing permission level,
- Click on any of the permission levels -> scroll down and select Copy Permission Level.
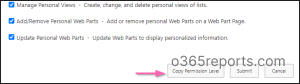
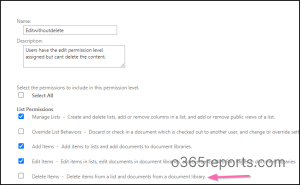
- Give a suitable name for your new permission level. Uncheck the unwanted permissions in the list. Then select Create. Here, I have unchecked the Delete Items permission.
- You will find the newly created permission level in the list of default out–of–the-box permission levels.
Create a New Custom Permission Level in SharePoint
To grant granular access using custom permission levels, follow the steps given below.
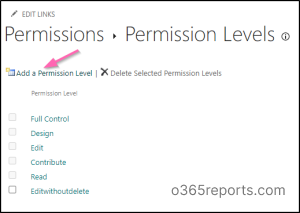
Step 1: Click on the Add a Permission Level option on the Permission Levels page.
Step 2: Enter the name and description.
Step 3: Select the permissions to include in the permission level -> Create.
Assign SharePoint Custom Permission Levels to Users
After configuring custom permission levels in SharePoint, the next step is to assign it to the respective users. To do that,
For non-Microsoft 365 groups connected sites:
Step 1: Navigate to Advanced permission settings -> select the Site members check box.
Step 2: On the command bar, select, Edit user permissions.
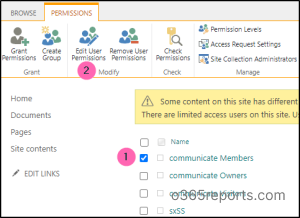
Step 3: From the list of permissions, uncheck the edit permission and check the newly created permission level -> Click OK.
Here, the site members (communication members) group gets assigned with the new permission level.
For Microsoft 365 group-connected sites:
For this type of site, the ‘Edit user permissions’ option will be greyed out, as permission changes will affect the group memberships across Microsoft 365. To apply custom permissions to SharePoint groups in Microsoft 365 group connected sites, admins should use the PowerShell method. However, admins can still grant custom permission level to desired users/security groups in Microsoft 365 group connected sites.
Step 1: Navigate to ‘Site permissions’ on the required site.
Step 2: Select the user (Alex) under “Site members” and change the “Edit” permission to “Read”. Now that the user will get shifted to the “Site visitors” group.
Step 3: Click on “Advanced permission settings” -> “Grant permission”.
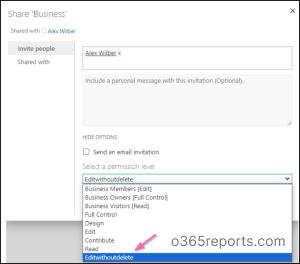
Step 4: In the Invite people section, select the name of the user (Alex) -> Show options -> Select the newly created permission level -> Click “Share”. Now the newly created permission level gets assigned to the user.
When assigning a new permission level, it’s important to ensure that the user’s current permission level isn’t higher than the new one. If the new permission level is lower than the existing one, the customization won’t function correctly.
That’s why we changed Alex’s permission level from ‘edit’ to ‘read’. Without this adjustment, even if you assign a new permission level, Alex would still be able to delete content as usual.
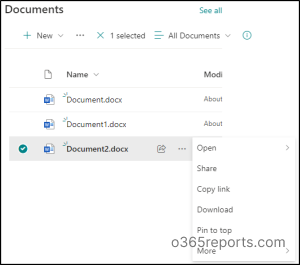
Thus, Alex can now add and edit the content within the SharePoint site but not delete it.
Result
In the site “Business”, I have customized the “Edit” permission level to not allow the members to delete content within the site. Therefore, the selected member ‘Alex’ cannot delete content within that site anymore. Alex can still add or edit content, but he won’t see the option to delete anything within the site. This highlights how custom permission levels function in SharePoint!
Handy Tip: Just like the SPO site, you can also manage SharePoint Online subsites permission to create and add custom permission levels.
Frequently Asked Questions and Answers
1. Can we customize the default permission levels in SharePoint?
You’re unable to modify the default permission levels “Full control” and “Limited Access”. There’s also a stricter extension of Limited Access that cannot be customized called Limited-access user permission lockdown mode.
It’s automatically applied when a user is granted unique permissions to a specific item (like a list, library, or document) within a site.
Still, you can customize other default permission levels. However, it’s not recommended to modify default permissions levels. Instead, you can create customized levels by copying the permissions from existing ones in SharePoint Online.
2. Edit vs contribute permission levels in SharePoint Online – what’s the difference?
The difference between ‘Edit’ and ‘Contribute’ permission levels in SharePoint Online lies in the ability of the ‘Edit’ permission level to add, edit, and delete lists, in addition to the functionalities provided by the ‘Contribute’ level.

3. What is SharePoint permission inheritance?
In SharePoint, permission levels flow from the top to the bottom of the site structure, affecting all sub-sites. Similarly, lists, libraries, folders, and files automatically adopt the permission settings of their parent site. This is called permission inheritance.
4. How to stop permission inheritance in SharePoint?
Permission inheritance in SharePoint Online can be stopped by assigning explicit unique permission for a specific document library, list, or folder within a SharePoint site. When you stop permission inheritance, the selected item (library, list, or folder) will no longer inherit permissions from its parent site, allowing you to define custom permissions exclusively for that item.
5. What are custom folder permissions in SharePoint?
Custom folder permissions in SharePoint refer to the ability to set unique permissions for specific folders within a document library or list. Custom folder permissions allow to define finer control over who can view, edit, or delete content within specific folders, even if the parent library or list has different permissions. After configuring custom permissions for folders in SharePoint, managing shared folders is also vital.
I hope that this blog will help you gain a comprehensive understanding of how to set up permission levels in SharePoint Online. However, it’s not just about creation; effectively managing custom permission levels is equally crucial. Keep your SharePoint secure by following the SharePoint Online best practices. Thanks for reading! If you have further queries, contact us through the comments section for further help.


