Collaboration and communication are critical components for organizational survival in the current business landscape. There are a million reasons behind the need for collaboration; for example, if two organizations have become partners, then there is a need for collaboration of users, resources, and data between the two organizations. Of course, you can’t be nodding no to such collaboration after becoming authorized or legal partners! Thus, to take away the hassle of collaborating with multiple tenants through the native method of B2B collaboration, Microsoft introduced cross-tenant synchronization in Azure AD.
As the name suggests, cross-tenant synchronization is an option available in Azure AD to synchronize multiple tenants flexibly! This feature comes with advanced automation and overcomes the old method of invitation & redemption in B2B collaboration. Cross-tenant synchronization, which was initially introduced in the public preview phase in January 2023 (Microsoft roadmap ID 109568), has now reached the general availability stage in June 2023. So, without wasting a second, let us dive deeper into cross-tenant synchronization and its characteristics in this blog.
What is Cross-Tenant Synchronization in Azure AD?
Unfortunately, the frequent consent prompts and redemption process in Azure AD B2B collaboration have highly affected the end-user experience while trying to access company resources. These processes can be time-consuming and may undermine the purpose of access, causing frustration for users.
Cross-tenant synchronization, the new preview method of collaboration basically surpasses the traditional invitation and redemption method through automation.
Cross-tenant synchronization in Azure AD is a mechanism that facilitates the automated creation, modification, and removal of Azure AD B2B collaboration users across multiple tenants in an organization. Its primary objective is to ensure seamless collaboration between tenants while streamlining the management of B2B user accounts in a multi-tenant environment.
Through automation, cross-tenant synchronization reduces the likelihood of security threats and administrative errors that may arise due to multiple tenant management. Thereby, it allows users to access the contents and resources across the tenants effortlessly without affecting their individual functioning or development.
Structure of Microsoft Cross-Tenant Synchronization
Cross-tenant synchronization can be broadly configured in four ways as below mentioned. But you can synchronize only in one-way for each cross-tenant synchronization between two Azure AD tenants.
- One-to-one synchronization– The simplest configuration of cross-tenant synchronization where a single target tenant collaborates and accesses applications from a source tenant.
- A single source with multiple targets – Here multiple target tenants of Office 365 altogether access the resources from a single source tenant.
- Multiple sources with a single target – A single target Azure AD tenant use resources from multiple source tenants.
- Mesh peer-to-peer – Complex configurations in multiple directions are achieved from the mesh peer-to-peer configuration of Microsoft cross-tenant sync.
Highlights of Using Azure AD Cross-Tenant Synchronization
Apart from escaping time-intensive consent prompts, there are many more benefits to using this cross-tenant synchronization feature in Microsoft 365. Let us discuss them in detail in this part of the blog.
- Collaborate Seamlessly with Automation – The major benefit of cross-tenant sync is it enables smooth collaboration between multiple tenants. It makes it smooth only by streamlining the entire lifecycle of B2B collaboration users through fully automated processes. Hence, the manual creation of users with custom scripts is no longer needed as it automatically manages and optimizes the B2B accounts of synchronization.
- Unlimited access without consent prompts – With no need for consent prompts, this feature allows users to seamlessly access Microsoft apps such as Teams and SharePoint, as well as non-Microsoft apps like Adobe, even when integrated with Office 365. This significantly improves the user experience by eliminating the need for invitation emails, notifications, and consent prompts.
- Security is not compromised– With all these benefits of cross-tenant synchronization, security is not compromised in this preview feature. Admins can further enhance security measures by leveraging Azure AD conditional access and cross-tenant access settings. These features allow for access to be granted based on specific conditions or limited to a particular group of users within the organization, ensuring optimal security.
Characteristics of Cross-Tenant Synchronization
As we are now clear about the types of cross-tenant synchronization configurations, let us dig into their properties in this section.
- Ultimately, cross-tenant synchronization is a push process from the source tenant, and it is not pulled by the target tenant. Thus, it pushes only the internal members from the source tenant and does not support the pulling of external members from the source tenant.
- Scope for provisioning and attribute mapping is performed in the source tenant. Also, make a note that the cross-tenant synchronization supports extension attributes. Extension attributes are a way to store additional information about user objects, groups, tenant details, and service principals. These directory extension attributes are always associated with an application.
- Only the target tenant admins have the authority to halt the sync at any instance.
- Also, cross-tenant synchronization grants access to your applications for users from other tenants.
- A unified global address list is created enlisting all the users across the multiple tenants under this cross-tenant sync feature.
- Previously, when tenants were invited, their userType attribute was set to “Guest” by default. Now, when these tenants are synced via Cross-tenant synchronization, their userType attribute will be set to “Member” by default.
- Apart from these, it enables collaboration for other tenant users in your organization.
Pre-requisites to Enable Cross-Tenant Synchronization
Following are the prerequisites to view and configure cross-tenant synchronization in their respective tenants.
1. To access cross-tenant synchronization as a source tenant, you need to have an Azure AD Premium P1 or P2 license and be assigned one of the following roles.
-
- Security administrator – For configuring cross-tenant access settings
- Hybrid Identity administrator – To enable cross-tenant synchronization
- Cloud Application administrator or Application administrator – For assigning the users to a specific configuration and deleting a particular configuration.
2. Now, accessing the cross-tenant synchronization as a target tenant requires the role of Security administrator in the organization and licenses of external identities billing model.
How to Configure Cross-Tenant Synchronization in Azure AD?
Experience the seamless and advanced collaboration of multiple tenants along with the B2B collaboration by configuring cross-tenant synchronization. Configure them now by following the steps below which are elaborated in detail.
- Enable Cross-Tenant Synchronization in the Target Tenants
- Configuring the Trust Settings in Source and Target Tenants
- Enable Cross-Tenant Sync in the Source Tenants
- Check the Connection to Target Tenant using the Test connection option
- Set the Scope for Users or Groups to be Provisioned
- Define Attribute Mapping in the Source Tenant
- Start the Provisioning Job in Azure Active Directory
- Monitor Provisioning and Audit logs in Azure AD
- Test the On-demand Provisioning in Azure AD
Enable Cross-Tenant Synchronization in the Target Tenants
- Firstly, decide the most suitable configuration for your intra-organizational synchronization. Select the way you want to structure cross-tenant synchronization from the four types of configurations discussed above.
- Next, add the desired tenant by following the path below.
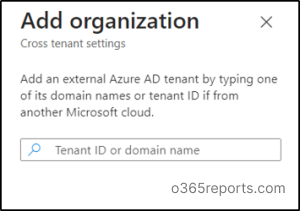
Microsoft Entra admin center 🡢External Identities 🡢 Cross-tenant access settings🡢 Organizational settings 🡢 Add organization
3.Enter the tenant ID or domain name of the source tenant and then select Add.
4. Then, follow the path below to configure the cross-tenant synchronization setting in the target tenant.
Microsoft Entra admin center 🡢External Identities 🡢 Cross-tenant access settings🡢 Inbound access (Added organization) 🡢 Cross-tenant sync
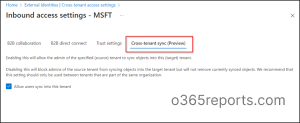
5. Moreover, cross-tenant synchronization is a setting that applies only to inbound access and thereby allows the source tenant to sync objects into the target tenant. Thus, only a checkbox of “Allow users sync into this tenant” must be ticked and saved to enable this setting.
Overall, the enabled cross-tenant synchronization in the target tenant doesn’t have any impacts or effects on B2B collaboration created manually or via Azure AD entitlement management.
Configuring the Trust Settings in Source and Target Tenants
In order to configure the cross-tenant sync in your organization, the trust setting of both inbound and outbound access must be enabled. So, you can follow the below path to enable them.
Microsoft Entra admin center 🡢External Identities 🡢 Cross-tenant access settings 🡢Inbound access or Outbound access 🡢 Trust settings
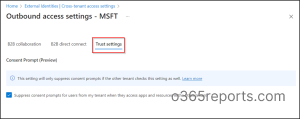
- Basically, this trust setting is also called the automatic redemption setting and redeems invitations automatically so that users are not prompted to accept the request. Administrators can enable this by checking the box, “Suppress consent prompts for users from the other tenant when they access apps and resources in my tenant”.
IMPORTANT: This consent prompt is suppressed only when the source tenant (outbound access) and target tenant (inbound access) have enabled this setting. Otherwise, the consent prompts are not suppressed for any other configurations.
Enable Cross-Tenant Sync in the Source Tenants
1.Add the organization in the source tenant as we did for target tenants by using the below path after entering the tenant id or domain name.
Microsoft Entra admin center 🡢External Identities 🡢 Cross-tenant access settings🡢 Organizational settings 🡢 Add organization
2.After that select cross-tenant synchronization in External identities of Azure AD to add a ‘New configuration’ in the source tenant.
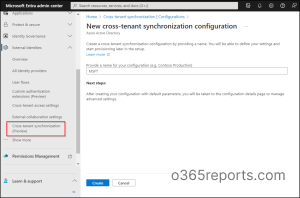
3. Then give a name to the configuration and select Create. A duration of 15 seconds might be required to add the name to the list of configurations. And this is the place where you can define the users who should be synchronized, the attributes that must be included, and any kind of transformations that you want to perform regarding synchronization.
Check the Cross-Tenant Sync Using Test connection option
Microsoft allows you to test the connection from the source tenant to check whether the synchronization has been properly configured before assigning the users.
- Go to the ‘Cross-tenant synchronization’ page and select the ‘Configurations’. Now, just select your configuration from the configurations list.
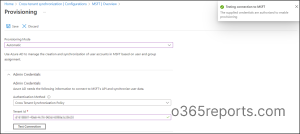
- Then click the Get Started button and change the Provisioning Mode to Automatic.
- After that, switch the Authentication method to the Cross-tenant synchronization policy under Admin credentials.
- Now, enter the tenant id of the target tenant and select Test connection.
If the target tenant was properly connected to the source tenant, the result will be successful with a message saying that “The supplied credentials are authorized to enable provisioning”.
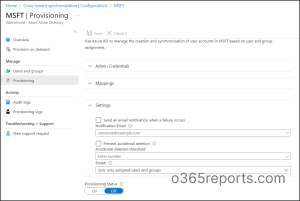
5. Select Save and then the Mappings and Settings will appear.
Set the Scope for Users or Groups to be Provisioned
With the simple steps provided below, set the scope for provisioning based on the assignment to the configuration or based on the attributes of the user in Azure AD.
Cross-tenant synchronization 🡢 Configurations 🡢 Select your configuration 🡢Manage 🡢 Provisioning 🡢 Settings 🡢 Scope
- To improve system performance and sync with fewer users, select “Sync only assigned users and groups” in the scope. Or choose to sync with all users and save the changes.
- To synchronize groups using cross-tenant synchronization, you must select “Sync only assigned users and groups“.
NOTE: Additionally, you can send a failure notification via email by selecting the check box and defining the recipient. Also, to prevent accidental deletions, enable accidental deletions in the provisioning mode.
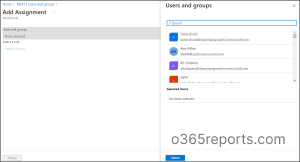
2.Now, you can follow the path below to add and assign a user or group.
Configurations 🡢Select your configuration 🡢 Manage 🡢 Users and Groups 🡢Add user/group 🡢Users and Groups – None Selected 🡢Select the users 🡢Assign
3.In order to restrict user access despite the scope you have set, create scoping filters based on attributes.
Define Attribute Mapping in the Source Tenant
Defining attribute mapping helps admins to structure the data flow between the source and target tenant. To prevent duplicate user accounts from being created in your tenant, certain attributes known as “matching properties” are selected for the purpose of identifying and matching existing user accounts. Therefore, this helps to ensure a smooth and accurate data flow between the two tenants. So, to review attribute mappings, use the below path to land on the attribute mapping page.
Provisioning 🡢 Mappings 🡢Provisioning Azure Active Directory Users 🡢Attribute Mapping
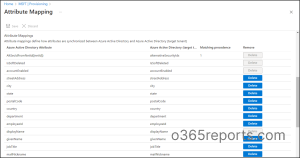
Review Attribute Mapping in Azure AD
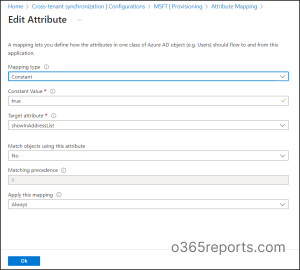
As a sample reference for defining attribute mappings, let’s discuss how to review and edit attributes like Member(userType) and showlnAddressList.
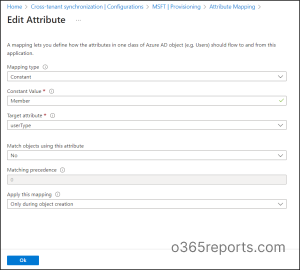
- To get started, navigate to the attribute mappings page and select the Member(userType) attribute. In the target tenant, review the Constant value setting, which defines the userType. By default, the userType value is Guest in B2B collaboration, but with cross-tenant synchronization, it’s set to Member by default.
- If necessary, you can modify the Constant value setting to apply the desired attribute mapping in the target tenant. This allows you to tailor attribute mappings to your specific needs and collaborate seamlessly across multiple tenants. A recent update (MC695501) introduces support for the manager attribute in cross-tenant synchronization for provisioning. This enhancement, scheduled for completion by late January 2024, streamlines collaboration.
- For existing configurations using the default schema, the manager will automatically provision for new users. If you’ve customized mappings or scoping rules, simply add the manager attribute to your mappings for existing configurations.
- Navigate to the attribute mappings section and select showInAddressList. Change the Mapping Type to Constant, and set the constant value to True. This will add the synchronized users to the global address list of the target tenant.
- By adding users to the global address list, it becomes easier for administrators to search for specific users and manage their accounts.
- This customization option makes cross-tenant synchronization even more powerful for streamlining collaboration across multiple tenants.
Further, if you want to perform any transformations in attribute mapping, select the specific attribute and set the Mapping type to the Expression of that attribute. And then define the transformation expression for attribute mappings in the expression box. For example, splitting the display name with a comma or adding a domain name at the end of the display name can be done using this type of expression functions.
Note:
Cross-tenant synchronization currently does not support custom security attributes. Ensure you’re only using supported attributes in your mappings to avoid configuration issues.
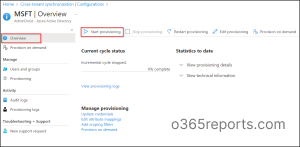
Start the Provisioning Job in Azure Active Directory
- To initialize the synchronization cycle, start the provisioning by selecting Start provisioning under the Overview page of your configuration in cross-tenant synchronization.
Monitor Provisioning and Audit logs in Azure AD
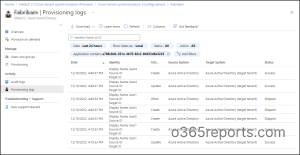
To monitor the health of your Azure AD tenant, it’s important to regularly monitor the provisioning logs and audit logs. These logs provide valuable information about unhealthy provisions that have been quarantined, enabling quick troubleshooting of any issues, and more. Therefore, to stay informed about the status of your provisioning and synchronization activities, admins can access and monitor these logs under the ‘Activity’ section of your configuration.
- Provisioning logs – Monitor the provisioning logs deliberately to identify the users who have been provisioned and these logs are utterly filtered based on the service principal ID of the configuration by default.
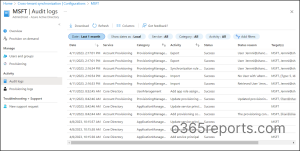
- Audit logs in the Source tenant – To monitor all the logged events in Azure AD, admins can check the Audit logs under ‘Activity’ in the source tenant. These logs provide information about activities such as adding provisioning configuration, deleting provisioning configuration, import, export, etc. with details like date and time, status, status reason, service, category, and targets. This helps to keep track of the provisioning and synchronization activities happening in the source tenant.
- Audit logs in the Target tenant – To ensure secure and efficient user management in the target tenant, it’s important to regularly review Audit logs. By navigating to Microsoft Entra admin center 🡢 Users 🡢 Audit logs, administrators can easily monitor activities like updating user profiles, redeeming external user invitations, and other important actions.
Test the On-demand Provisioning in Azure AD
To ensure successful on-demand provisioning of users or groups, it is important to thoroughly analyze configuration issues, validate defined expressions, and test deployed scoping filters. Now as the configuration has been setup, admins can test the on-demand provisioning by utilizing the Provision on Demand option.
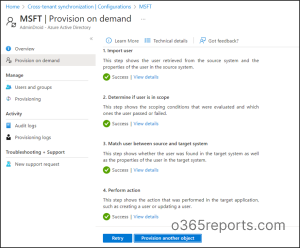
Cross-tenant Synchronization 🡢 Configurations 🡢 Provision on demand 🡢 Select a user/group 🡢Provision
Now, you will witness the Perform action page with modified attributes of that specific user. Then get back to the Provision on demand page to have a magnified view of the provision details where it briefly states about the imported user, validated scoping conditions, matching properties, and the actions performed in the target application. Also, you will find a retry option to run the provision again.
Finally, verify the test user was provisioned in the target tenant, if it’s found successful proceed in assigning the users in configuration.
Overall, cross-tenant synchronization offers a streamlined solution for B2B collaboration and aids heavily by eliminating the need for invitation emails, notification emails, and user consent. Though this ensures a smooth and seamless collaboration for all parties involved, it doesn’t restrict or have an impact on application consent prompts across the tenants.
User Experience in Microsoft 365 With Cross-Tenant Sync
The users synchronized through cross-tenant synchronization have a similar experience to the users integrated through B2B collaboration.
- For various Microsoft 365 services, the end-user experience is not different based on the UserType property such as guest or member. But Microsoft has stated that the end user experiences are about to be changed over time based on the UserType property.
- In the past, B2B collaboration was used to access the Microsoft resources across tenants and B2B direct connect was used solely for the purpose of MS Teams shared channels. Now, related to B2B direct connect for Teams shared channels, cross-tenant synchronization can only co-exist for a wide range of capabilities in the Office 365 environment such as accessing Teams shared channels along with the various services of Microsoft 365.
Limitations of Cross-Tenant Synchronization
Although being a huge breakthrough in collaboration, cross-tenant synchronization has its own limitations which are listed below.
- For now, Microsoft cross-tenant synchronizations are not supported across organizational boundaries. Also, cross-tenant synchronization is not implemented within the clouds of Azure Government and Azure China.
- Synchronization between tenants of different clouds(cross-cloud) is currently not supported in Office 365 environment.
- Cross-tenant synchronization does not synchronize object types of devices, contacts and the attributes including managers, photos, custom security attributes, and user attributes.
- Existing B2B collaboration users will be updated based on the match of users. But the userType will not be updated by default during this process.
Wisely utilize the cross-tenant sync feature in your organization for enhanced collaboration despite considering its limitations in mind.
Synchronize with ease: Cross-Tenant Synchronization!
Coming to an end, put a pause on the primitive features of B2B collaboration and continue with the new cross-tenant synchronization. Carefully configure the cross-tenant synchronization with our comprehensive guide to enjoy all the automation and extensive capabilities. Save all your manual efforts and enjoy the automatic creation, deletion, and modification of B2B collaboration users. Work comfortably by having all your resources at your fingertips now! You can also use Microsoft365DSC to automatically cross-tenant access policy.
I hope this blog has made you familiar with the concepts of cross-tenant synchronization and its benefits. Share your experience and thoughts in the comments section.