
SharePoint Online is an incredible tool under Microsoft 365 that lets you organize, share, and manage information. But did you know that you can make it even more powerful by adding special features? These additional features come in the form of add-ins which are essentially small programs designed to enhance what SharePoint can do.
There are two main kinds of SharePoint add-ins: SharePoint-hosted and provider-hosted. The SharePoint-hosted ones are simpler and focus on basic tasks, all within SharePoint itself. On the other hand, provider-hosted SharePoint add-ins are much more flexible and can be customized to your specific needs.
Thus, to harness the power of provider-hosted SharePoint add-ins, you need to know how to register an app in SharePoint Online and grant the necessary permissions. Registering the app with Azure Access Control (ACS) and SharePoint App Management Service allows it to securely connect and interact with your SharePoint setup. Whereas SharePoint-hosted add-ins don’t require this registration. In this blog, we’ll walk you through registering and configuring app permissions in SharePoint Online.
SharePoint App Registration
To begin with, there are three main options for registering an app in SharePoint. These include using Visual Studio and Microsoft Office Developer Tools, utilizing the Seller Dashboard, or going through the AppRegNew.aspx page. Now, let’s take a closer look at each of the methods to create a register in SharePoint Online for apps.
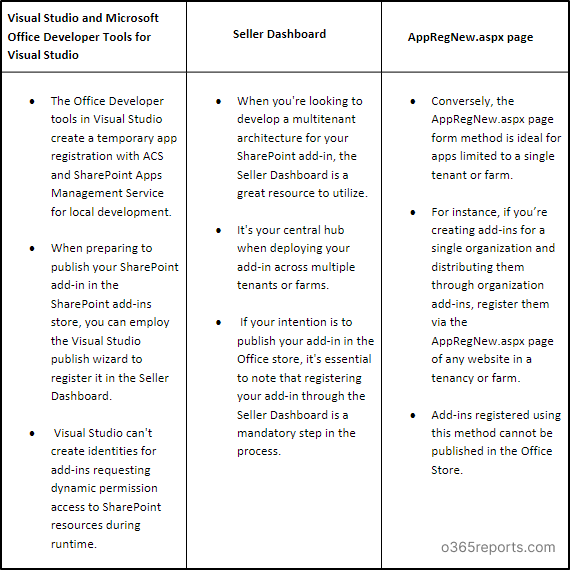
However, this blog primarily concentrates on the straightforward registration approach using the AppRegNew.aspx page form method among the three methods mentioned earlier.
Use AppRegNew.aspx to Register an App in SharePoint
Register the SharePoint add-in/app using the AppRegNew.aspx page when the app is exclusively used within a single tenant or farm.
This approach is ideal when creating add-ins that are meant for single organizational use or distribution through the organization’s catalog.
Point to Remember:
The site collection admin can’t register an app or grant SharePoint add-in permissions by default using the AppRegNew.aspx or AppInv.aspx page as per MC660075. Thus, the SharePoint tenant admin should allow the site collection admin to register an app or assign permissions with SiteOwnerManageLegacyServicePrincipalEnabled.
If the site collection admin attempts to modify app permissions without the necessary consent from the tenant admin, they will see a message that says, “Your SharePoint tenant admin doesn’t allow site collection admins to update app permissions. Please contact your SharePoint tenant administrator.”
How to Register an App in SharePoint Using AppRegNew.aspx?
Let’s see how to register an app in SharePoint Online with the AppRegNew.aspx page.
1. Use the following SharePoint app registration URL to navigate to the AppRegNew page.
|
1 |
<Site Collection URL>/_layouts/15/AppRegNew.aspx |
NOTE: Replace <site collection url> with your SharePoint site collection URL.
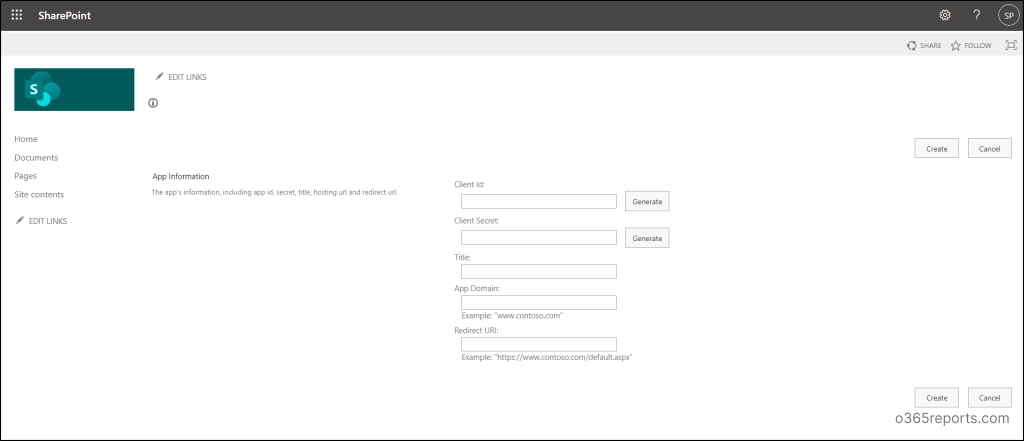
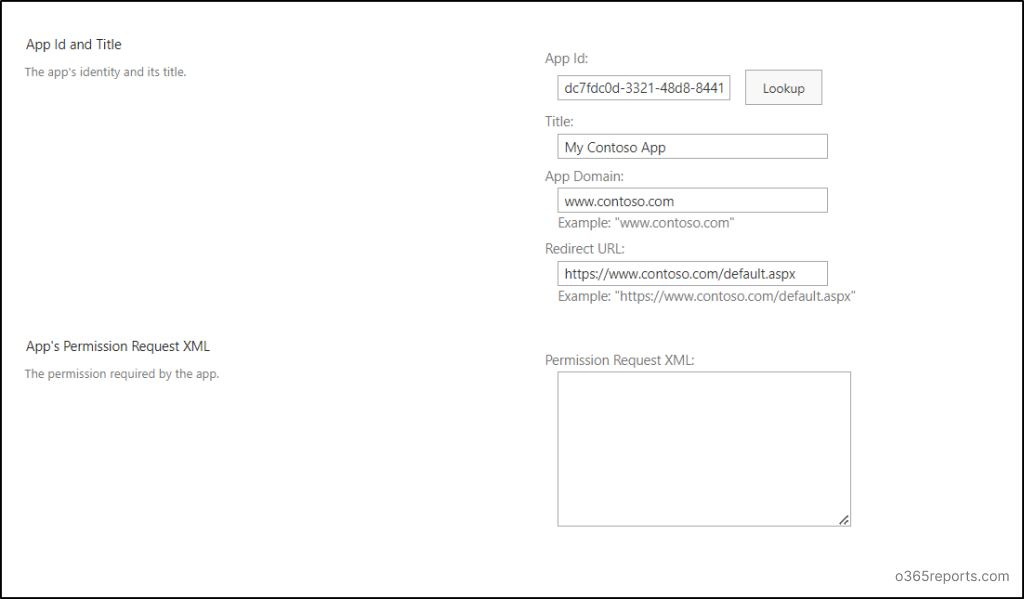
2. After accessing the AppRegNew page, you’ll be required to input specific values to use an app in SharePoint which are listed below.
- Client ID – The Client ID, also referred to as the app or add-in ID, serves as a globally unique identifier (GUID) for an application. You can either paste an existing ID or generate one using the ‘Generate’ button. Remember, this ID must be in lowercase and is unique to each add-in.
- Client Secret – The Client Secret, also known as the add-in secret, is a string value that can be generated using the ‘Generate’ button. It’s important to note that these add-in secrets registered via the AppRegNew.aspx page have a one-year expiration period. Therefore, it’s essential to understand how to replace an expiring client secret in a SharePoint add-in once it reaches its expiration date.
- Title – Provide a clear and easily recognizable name for your add-in, as it will be displayed consistently in consent prompts when requesting SharePoint add-in permissions.
- App Domain – In the “App domain” field, input the hostname of the remote component for your SharePoint app registration. Exclude any protocols like “https” or slashes (“/”). If the remote app is operating on a port other than 443, ensure the add-in domain includes the port number. Additionally, if your web application host employs a DNS CNAME alias, make use of the alias. For a better understanding, consider the following example values below.
-
- www.contoso.com:3333
- www.fabrikam.co
- Redirect URI – The redirect URI is essential for web applications launched externally to SharePoint. These applications employ the Authentication code flow to gain authorized access to SharePoint data.
The value you enter in this field must be an entire endpoint URL including https protocol value. Check out the examples below to know the correct value types to be entered in this field.
-
- https://www.contoso.com/Default.aspx
- https://www.fabrikam.com/RedirectAccept.aspx
- https://www.northwindtraders.com/home/index
- https://adventureworks.com/
NOTE: SharePoint add-ins launched within SharePoint and utilizing the Context token flow do not rely on this value.
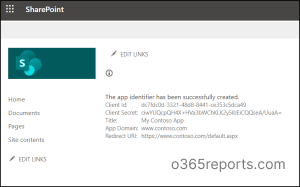
3. Finally, hit the ‘Create’ button to complete your SharePoint add-in registrations using the AppRegNew.aspx page form. Next, a confirmation page displays, presenting all the details you’ve entered on the AppRegNew.aspx page.
IMPORTANT: Be sure to copy and securely store the values needed for granting permissions and deploying the add-in in staging or production environments.
Grant SharePoint Add-in Permissions
Assigning app registration permissions is vital as it grants or blocks the user consent to apps and governs the access control for apps within your environment. It’s important to note that even the site collection admins or owners cannot assign permissions unless they have been granted access by the SharePoint tenant administrator. Now, let’s explore the process of granting add-in permissions in SharePoint through the AppInv.aspx page.
1.Access the AppInv.aspx page by substituting the site collection URL in the following link.
|
1 |
<Site Collection URL>/_layouts/15/AppInv.aspx |
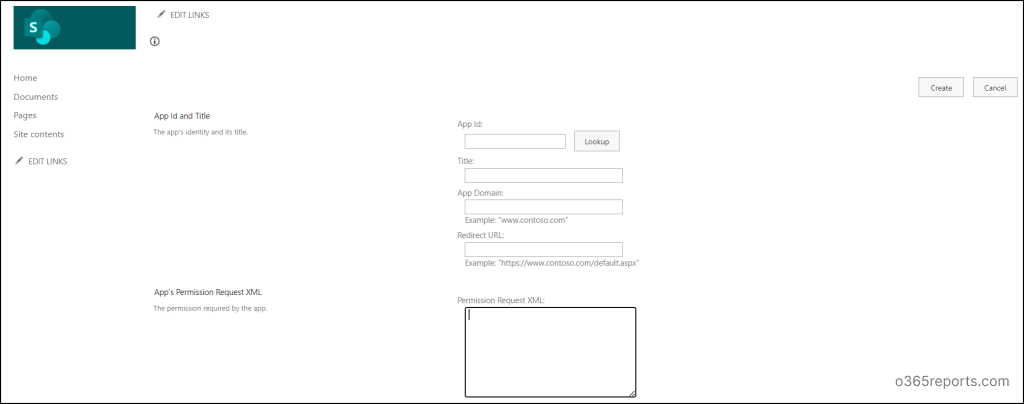
2. Enter your client ID and hit the ‘Lookup’ button. The details of your registered SharePoint add-in will be displayed automatically.
3. A crucial aspect of setting up SharePoint add-in permissions involves crafting XML code within the ‘Permission Request XML.’ Here’s an example of XML code that grants full control permission, enabling the application to access all sites and utilize app-only search.
|
1 2 3 4 5 |
<AppPermissionRequests AllowAppOnlyPolicy="true"> <AppPermissionRequest Scope="http://sharepoint/content/tenant" Right="FullControl" /> </AppPermissionRequests> |
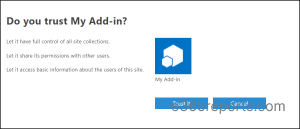
4. After clicking the ‘Create’ button and adding permissions, you’ll encounter a consent dialog asking, “Do you trust (Your Add-in Title)?” Choose the ‘Trust It’ option to complete the configuration of add-in permissions in SharePoint.
Retrieve SharePoint Add-in Registration and Add-in Principal Information
It is always crucial to review app permissions and consents in Microsoft 365 to ensure that they are configured correctly. You can access and review your add-in registration details using the Client ID or add-in ID generated during the SharePoint add-in registration process. Simply use the provided URL for retrieving your SharePoint app registration information. This will provide you with the listed values upon request for a specific app (Client ID).
|
1 |
http://<SharePointWebsite>/_layouts/15/AppInv.aspx |
- Title
- Add-in domain
- Redirect URL
NOTE: The lookup doesn’t return the client secret value of your requested application.
Then, you can retrieve the registered add-in principals using the following URL.
|
1 |
http://<SharePointWebsite>/_layouts/15/AppPrincipals.aspx |
Elevating the security of your SharePoint Online environment goes beyond just registering add-ins and implementing OAuth. Thus, utilize SharePoint Data Loss Prevention (DLP) rules, your guardians against data breaches. SharePoint security requires constant vigilance over DLP rules, their actions, and file activities within your Microsoft 365.
Here is where AdminDroid Microsoft 365 Reporter steps in to simplify your SharePoint Online monitoring journey! Skip native methods and PowerShell scripts, draining your precious time for even the tiniest detail.
Advance your SharePoint Security with AdminDroid Reports!
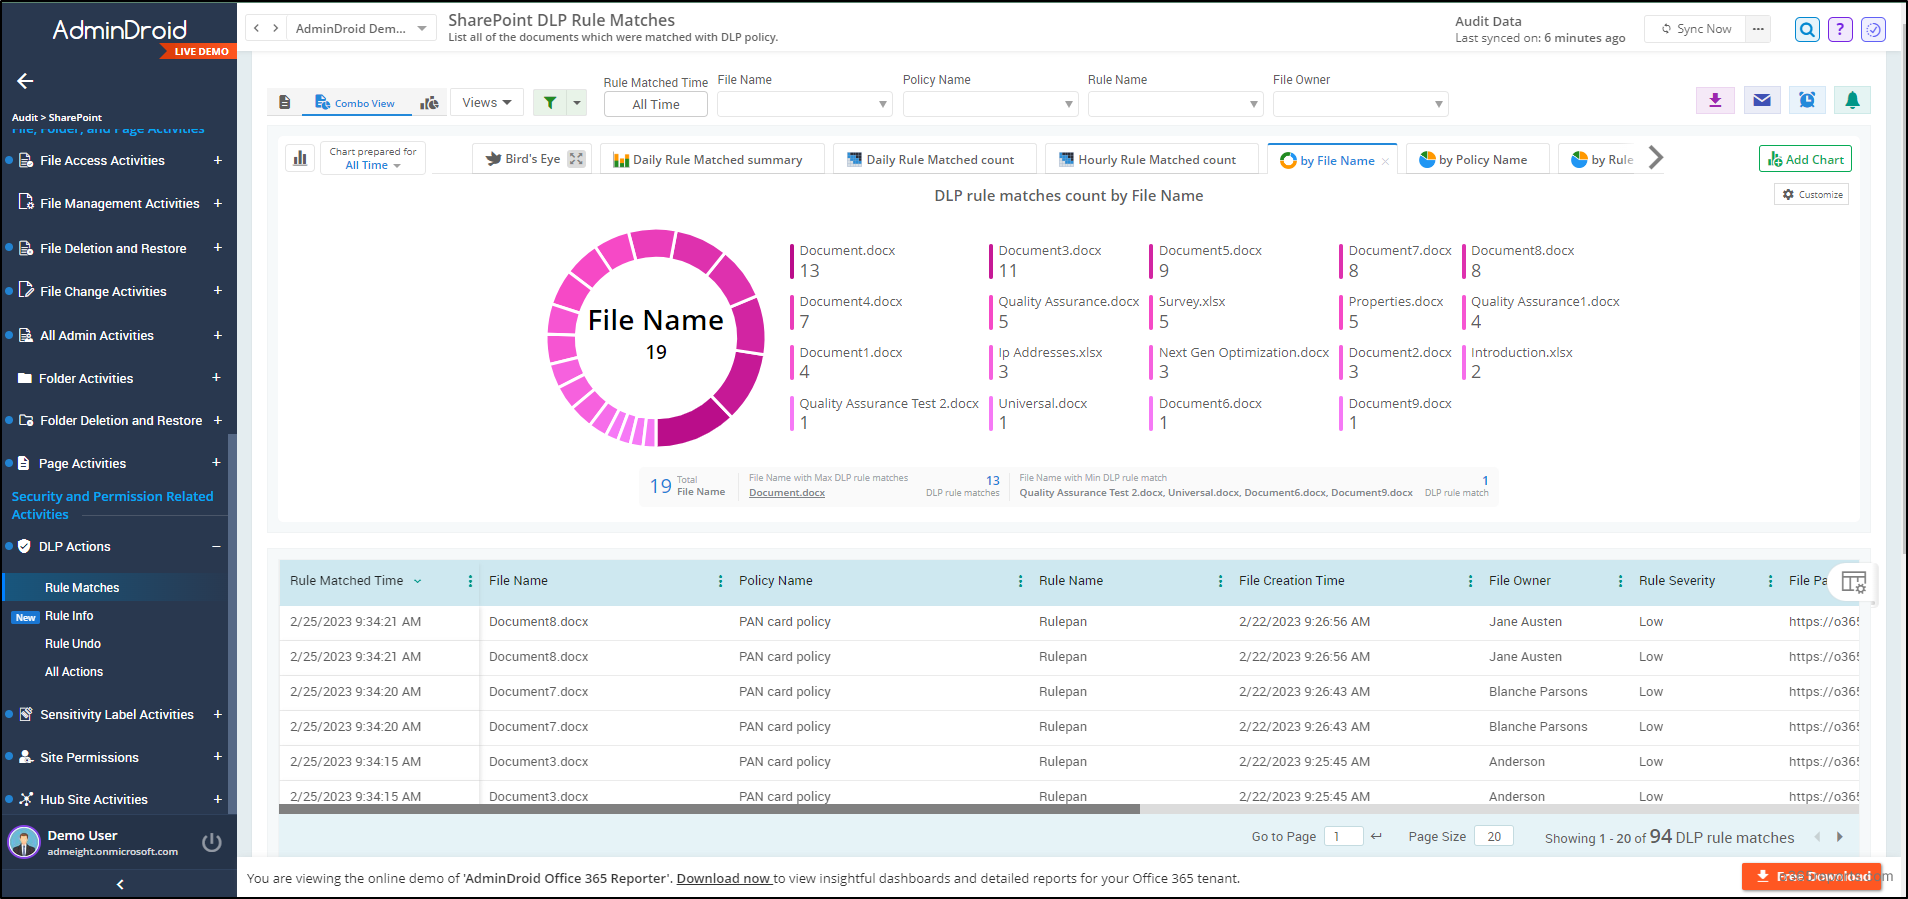
AdminDroid provides granular reports of your Microsoft 365 SharePoint DLP actions that includes rule matches, rules undoes, DLP actions, etc., helping you gain a comprehensive understanding of each DLP policy. But AdminDroid doesn’t stop there. Our SharePoint auditing tool lets you track changes within SharePoint, such as external sharing links, access requests, file and folder activities, and page actions.
Furthermore, you can enhance your security strategy with AdminDroid’s extensive collection of 180+ advanced SharePoint Online reports. These are not just reports, but lenses to look into your SharePoint. Want to know why? AdminDroid SharePoint Online reporting tool monitors all activities and actions within your SharePoint such as site collections, site users, SharePoint lists, document libraries, SPO site usage, etc., to achieve enhanced SharePoint Online management.
AdminDroid offers 1800+ comprehensive reports and 30+ AI-powered dashboards covering various Microsoft 365 services like Microsoft Entra ID, Exchange Online, MS Teams, OneDrive, Power BI, Stream, and Viva Engage.
AdminDroid is a compact and complete Microsoft 365 reporting and auditing solution!
Moreover, you can enhance your reporting and monitoring experience with AdminDroid’s spectacular features like quick alerting, scheduling, granular access delegation, and advanced customization filters. So, without further delay, put your hands on the download button of AdminDroid to explore and experience the sophisticated world of Microsoft 365 administration with a 15-day trial.
Final Thoughts
Thus, register an app in SharePoint Online for enhanced OAuth authentication, streamlined single sign-on, and secure API access, thereby extending SharePoint’s capabilities. Additionally, by configuring SharePoint Online DLP policies and conditional access, you can ensure the security of your SharePoint Online. Also, registering the Azure App for SharePoint Online allows you to effectively manage sharing and access in your SharePoint Online environment through apps.
We trust that this blog has equipped you with the knowledge needed to register an app in SharePoint Online and configure SharePoint add-in permissions. If you have any questions or suggestions, please don’t hesitate to reach out via the comments section.


