In the fast-paced business landscape, Microsoft 365 has become a must-have for companies to supercharge their productivity and modernize their digital workspace. Additionally, organizations are integrating various apps into their Microsoft 365 setup to manage the environment and handle complex tasks smoothly.
Moreover, the integration of these apps simplifies authentication with single sign-on convenience, boosts user experiences, and securely connects to multiple APIs.
At the core of this integration lies the crucial step of application registration in Azure AD (Microsoft Entra ID). Registering applications in Azure AD acts as the bridge to connect your apps with Microsoft 365 seamlessly. A trustworthy relationship is established between Microsoft and the application when you register the application in Azure AD, extending more granular control over your apps. In this blog, we present a comprehensive guide that navigates you on how to register Azure AD application from the Azure portal.
Pre-requisites for an App Registration in Azure
Some permissions are required to create an Azure AD application registration directly from the Azure portal. Permissions include,
- A Microsoft Entra subscription or free trial account is required.
- Then, the Azure account should have adequate permissions to manage Azure AD applications. Along with permissions, the following Azure AD aka Microsoft Entra ID roles are required.
- Global administrator
- Application administrator
- Application developer
- Cloud application administrator
- And ensure the configuration of the set-up tenant process.
App Registration in Azure AD
Using the steps below, you can register applications in MS Entra ID. Through Azure app registrations, deploy OAuth authorization services, define Role-based access control (RBAC), and avail many more advanced services of Microsoft 365.
- New Application Registration in Azure AD
- Configure Application Registration Permissions in Azure
- Configure Azure App Registration Authentication
- Add Azure AD Client Secret for App Authentication
1. New Application Registration in Azure AD
Without further delay, let’s get started with how to create an Azure app registration via the Azure portal.
- Take your first step by signing into the
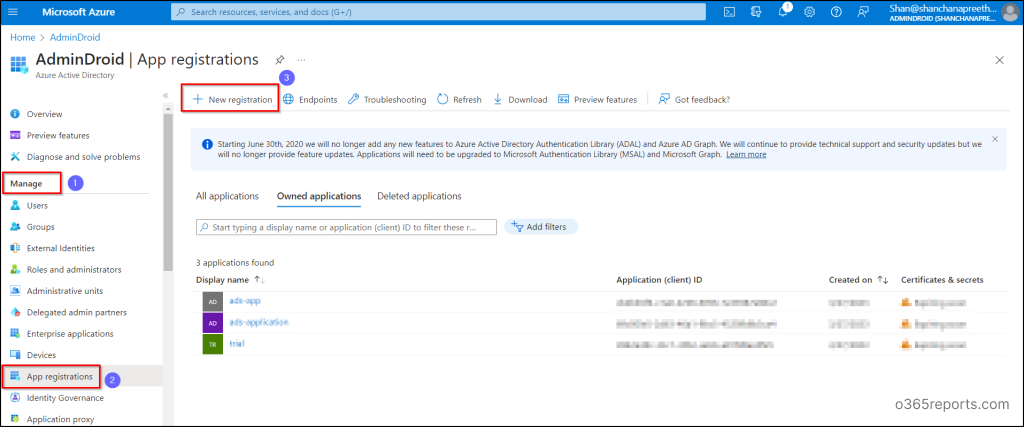
- Then, navigate to the new registration page by following the path below.
Azure Active Directory 🡢Manage 🡢 App registrations 🡢 New registration
- Enter the desired name for the application and select any of the following supported account types.
- Accounts in the organizational directory only (Single tenant) – Go with this option if you want your application to be accessed by only your tenant users and guest users. This single-tenant application is also known as a line-of-business application (LOB) in the Microsoft identity platform.
- Accounts in the organizational directory (Multitenant) – Choose this alternative to provide access only to Azure AD tenants. For instance, when you create SaaS applications, a multitenant application intended to reach more organizations.
- Accounts in any organizational directory (Multitenant) and personal Microsoft accounts (e.g., Skype, Xbox) – Widen your range of customers by selecting this option. It allows multitenant users having personal Microsoft accounts, including Skype, Xbox, Live, and Hotmail accounts to access this type of application.
- Personal Microsoft accounts only – In case you are building an application for users of personal Microsoft accounts (including Skype, Xbox, Live, and Hotmail accounts), then choose this option.
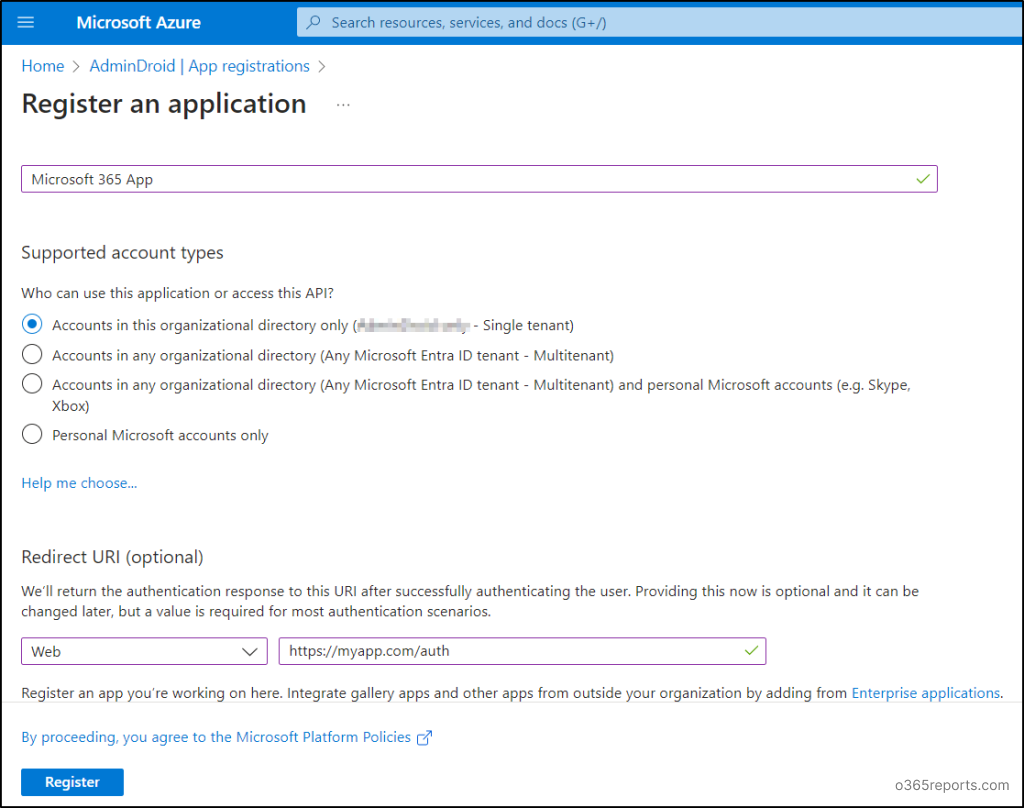
4. Mention the Azure app registration redirect URI (Uniform Resource Identifier) along with the platform to deliver the authentication response after providentially authenticating the user. You can choose any one of the platforms from the options listed below.
-
- Public client/native (mobile & desktop)
- Web
- Single-page application (SPA)
5. Finally, hit the Register button to register an app with Azure Active Directory. Then it navigates to the Overview page of the registered application in Microsoft Entra ID.
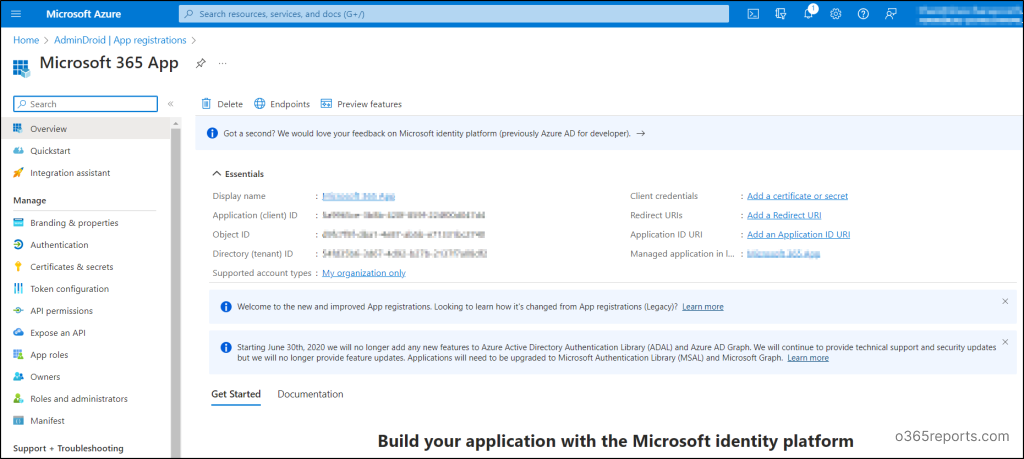
Make sure to make note of the Application (Client) ID and Tenant ID for later use. Since this Client ID uniquely identifies your registered application, you have to specify it in your application’s authentication code or the appropriate app.config file.
NOTE: Creating an Azure AD application registration via the portal results in the automatic generation of application and service principal objects. However, when you register an application using Entra PowerShell or Microsoft Graph API, you need to create the service principal object manually.

By the way, did you encounter the above message that appeared right after registering an application in Microsoft Entra ID? That message signals the end of support for Azure Active Directory Authentication Library (ADAL) and Azure AD Graph API by Microsoft. Microsoft is now transitioning towards Microsoft Authentication Library (MSAL) and Microsoft Graph API, offering a more streamlined and advanced authentication workflow.
2. Configure Application Registration Permissions in Azure
Setting up permissions for apps is a vital aspect of Azure AD application registration, as it grants and restricts access to essential Azure resources. This process of configuring app permissions plays a pivotal role in establishing a well-organized and secure environment with controlled accessibility. Furthermore, you can delegate app registration permissions in MS Entra by configuring these app permissions.
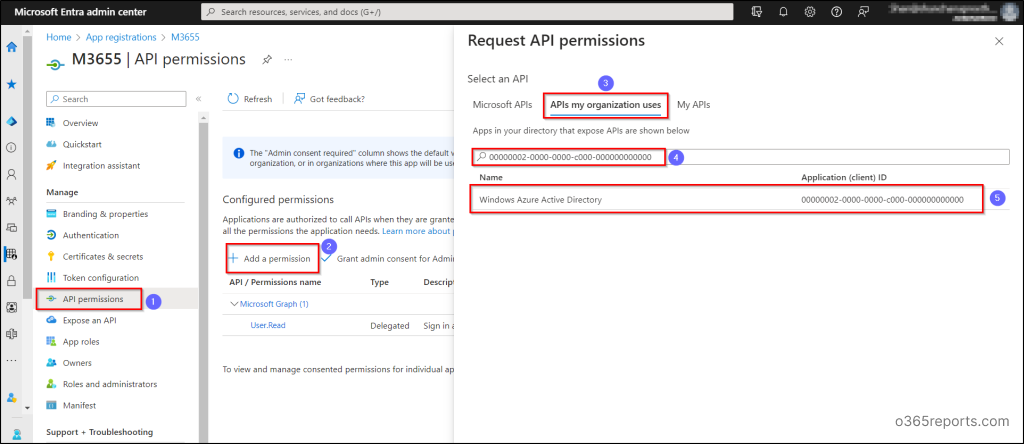
- Assign permissions to Azure app registration by following the pathway provided
App registrations 🡢 All applications 🡢 Select your application 🡢Manage 🡢 API permissions 🡢 Add a permission
- Once you click on “Add a permission,” a page titled “Request API permissions” will appear on your screen
- Next, navigate to the “APIs my organization” tab and search for Windows Azure Active Directory or 00000002-0000-0000-c000-000000000000.
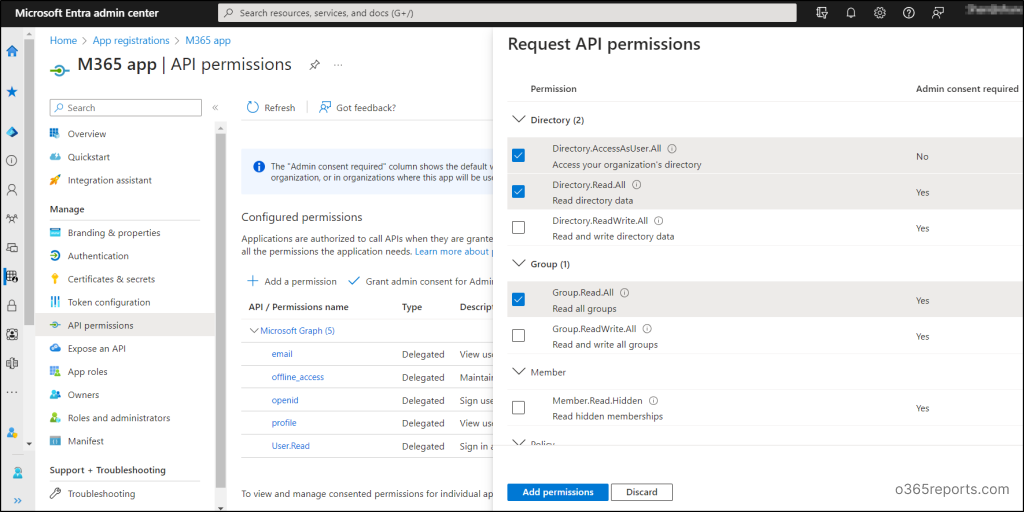
4. Then, add necessary delegated or application permissions depending on your requirements.
When it comes to security, delegated permissions are superior. Their restrictive nature ensures that applications can only access resources and perform tasks that the user is authorized to. Also, you can easily manage Entra delegated permissions for specific users based on your needs.
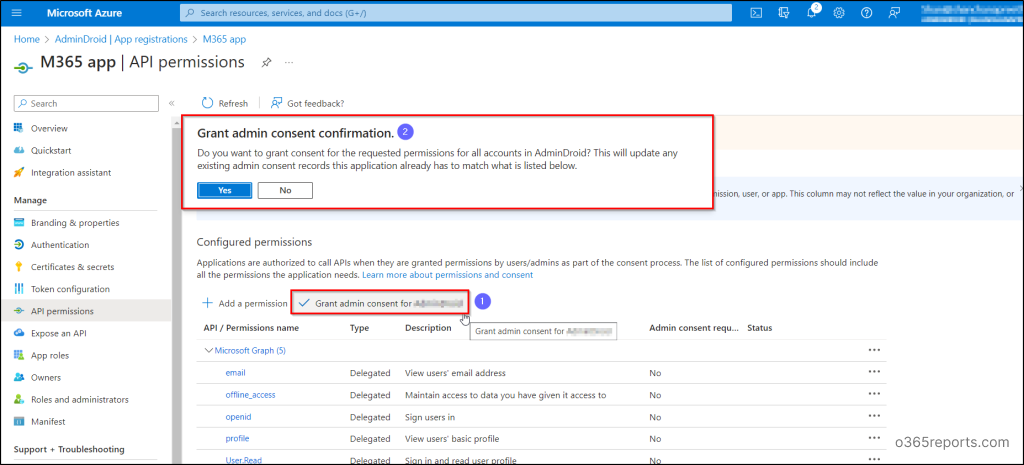
- Now, return to the “Configured permissions” window to update any existing consent records. From there, choose “Grant admin consent for” to provide the necessary Azure AD Graph permissions for your app registration.
- By selecting this option, you can eliminate specific user consent for the requested permissions and restrict access to Azure AD app registrations.
- Immediately, a fly-out page appears for your confirmation with a Yes button.
Similarly, you can also restrict users from accessing Entra ID applications, if required.
Important:
Microsoft has deprecated the Azure AD Graph API in favor of Microsoft Graph. Migrating to Microsoft Graph is recommended to ensure you receive ongoing support as well as the latest features and security enhancements.
3. Configure Azure App Registration Authentication
Based on the application you’re developing, you must enable the capability for applications to directly request tokens from the respective endpoints.
- Navigate using the path below to reach the app Overview page.
App registrations 🡢 All applications 🡢 Select your application
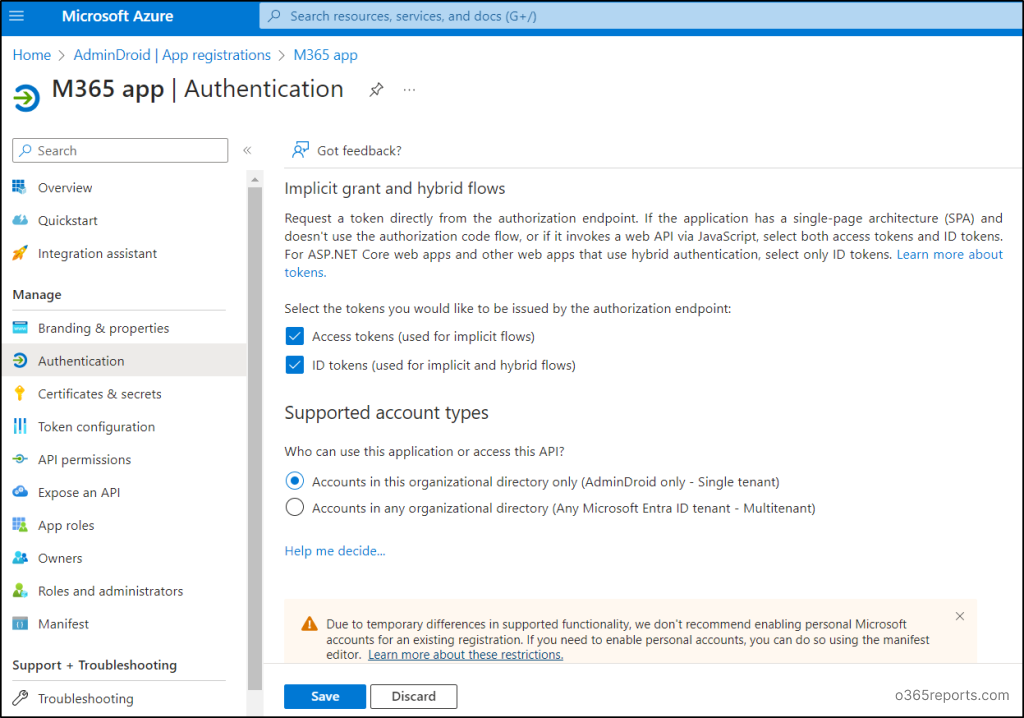
- From the left pane of the app Overview page, select Authentication under Manage.
- Then, tick the checkboxes Access tokens (used for implicit flows) and ID tokens (used for implicit flows and hybrid flows) under implicit grant and hybrid flows.
- Click Save to configure the app authentication successfully.
4. Add Azure AD Client Secret for App Authentication
The Azure AD client secret also referred to as an application password, is a string that an app uses to authenticate itself. While client secrets are not as secure as certificate-based authentication, they are favored by developers for local app development due to their simplicity. Thus, let’s see how to add a client secret in this part of the blog.
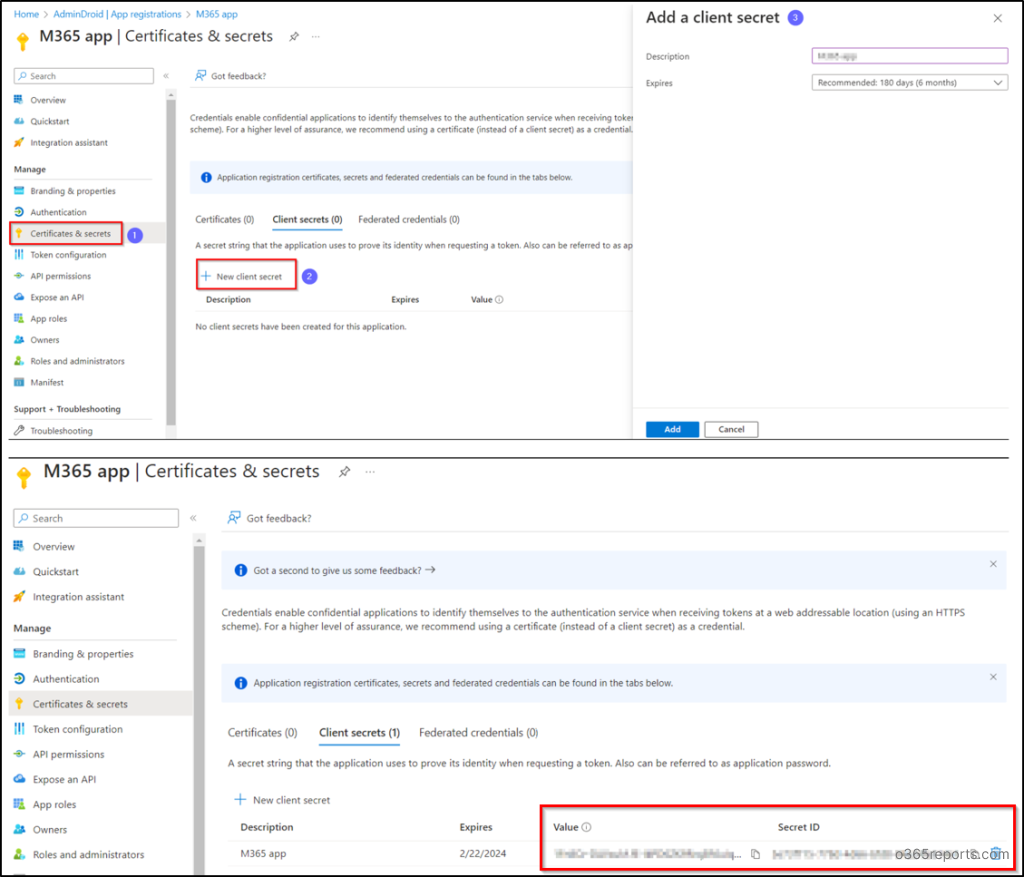
1. Follow the path below to add MS Entra ID client secret.
App registrations 🡢 Select your application 🡢 Certificates & secrets 🡢 Client secrets 🡢 New Client secret
2. Next, add a description for your client secret and set an expiration for it.
-
- Importantly, the longest period for which a client secret can remain valid is 24 months. Consequently, it’s not possible to set an expiration that goes beyond this two-year timeframe.
- It’s worth noting that Microsoft strongly recommends a maximum client secret expiration of 6 months, underlining the importance of staying within this boundary.
3. Select Add and save the client secret value for future use. Remember, this value will not be visible again once you navigate away from this page.
Note:
When registering an application, it’s crucial to keep Microsoft Entra recommendations in mind like removing unused credentials from apps to minimize attack surfaces and improve overall security. Also, you can retrieve entra app registrations with expiring client secrets and certificates to take actions before they expire.
On the other hand, Microsoft also recommends blocking users from registering third-party applications to prevent unauthorized or risky app access. This action is also a Secure Score recommendation, earning you up to 5 points for improving security.
Automate Azure App Registration
Still feeling Azure app registration is a tedious task? Then we got an easy solution too! Here is our PowerShell script to automate the Azure app registration process for you!
With this script, you can
- Automate Azure app registration and create certificate authentication.
- Register Azure app with existing certificate
- Add certificate to an existing app
- Connect MS Graph PowerShell using certificate
- And revoke certificate from the app
At last, we’ve learned the process of creating Azure app registrations in Microsoft 365. However, in some scenarios, organizations may want to block users from registering third-party applications to prevent unauthorized or potentially risky app access.
With more applications being added, tracking Entra app operations like additions, deletions, and configuration updates becomes increasingly difficult to manage effectively. If you accidentally remove any application in Entra ID, you can restore the deleted app in seconds using PowerShell.
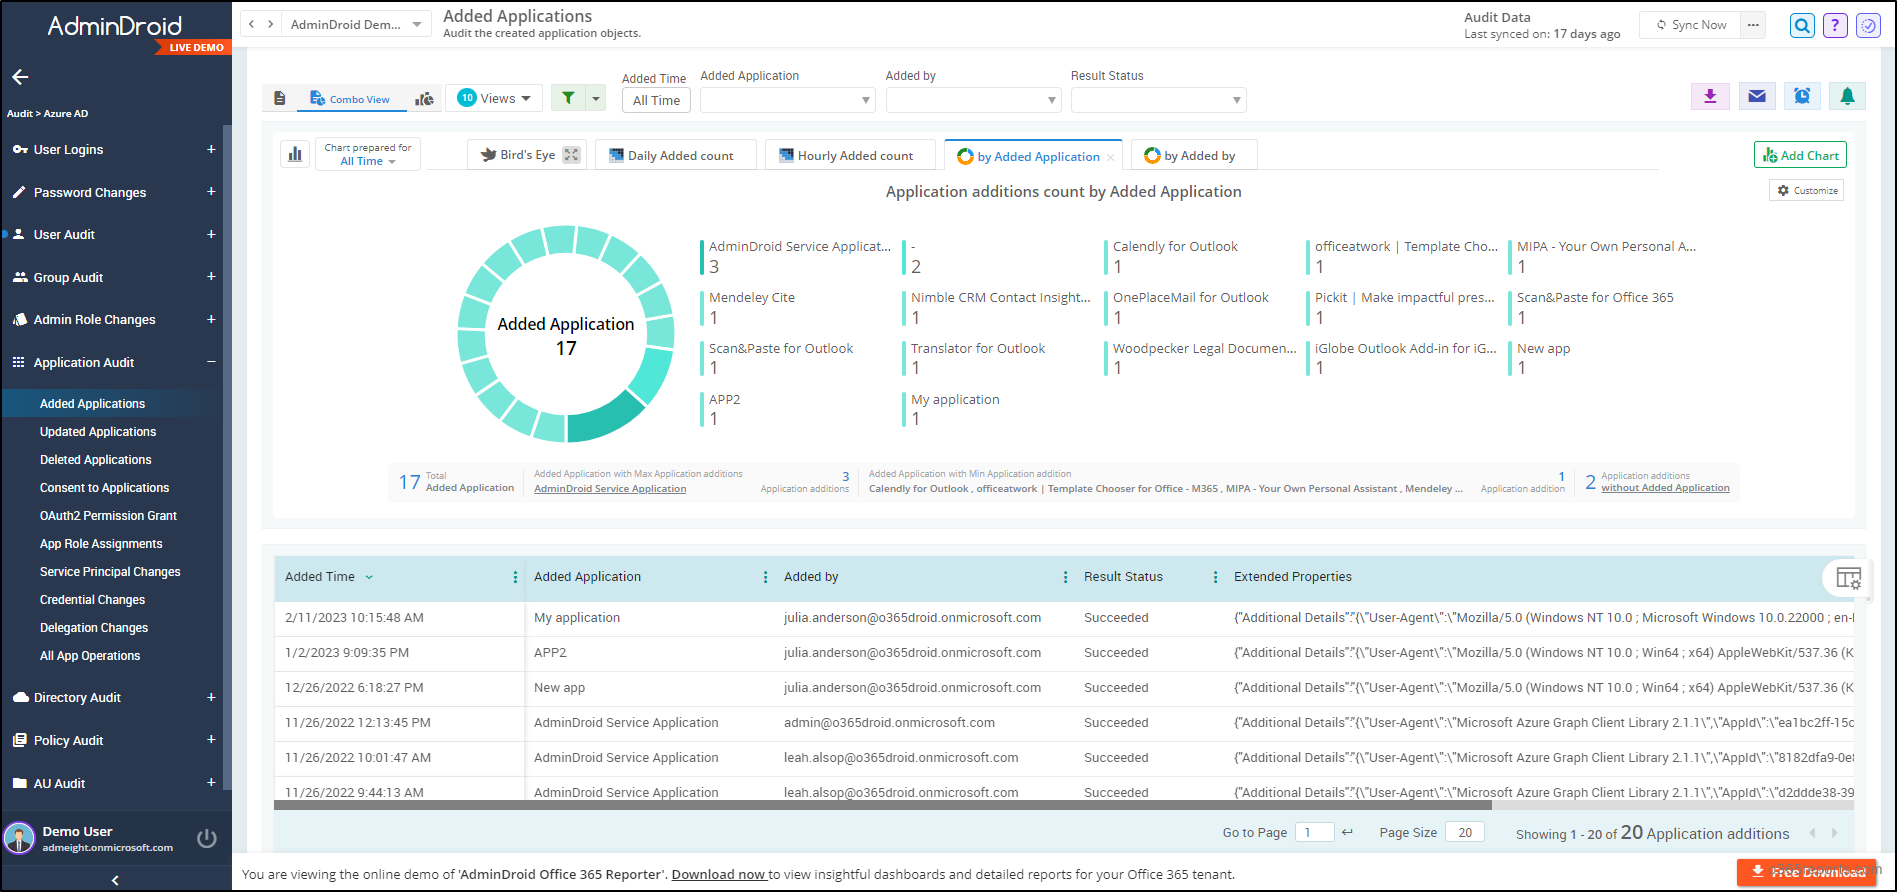
But fear not, here enters the AdminDroid Microsoft 365 Reporter, your ultimate solution to simplify the Azure AD application monitoring with its comprehensive and detailed reports.
Elevate Azure Application Monitoring with AdminDroid’s Free Reports!
It’s essential to closely monitor Azure application activities in your Microsoft 365 ecosystem to stay away from emerging risks. With AdminDroid’s Free Azure application auditing tool, analyze Azure application activities to revoke suspicious app permissions, restrict liberal user access to data, and many more in your Microsoft 365 environment. Azure AD app registration audit reports include,
- Added applications
- Updated applications
- Deleted applications
- Consent to Applications
- OAuth2PermissionGrant
- App Role Assignments
Also, get to know Azure app service principal changes, credential changes, delegation changes, and app operations in the blink of an eye with AdminDroid’s 190+ free reports on Azure AD.
Apart from applications audit, the AdminDroid Azure AD auditing tool paves the way for auditing Microsoft 365 users, groups, user logins, admin role changes, setting changing auditing, etc., for free.
Thus, have a 360-degree view of your Microsoft 365 Azure Active Directory environment with the AdminDroid Azure AD dashboards. In addition to this, unlock enhanced Azure AD management capabilities with the tools and features it offers.
Besides, AdminDroid provides 1800+ comprehensive reports and 30+ smart dashboards to look into your entire Microsoft 365 environment covering various services such as Microsoft Entra ID, Exchange Online, Microsoft Teams, SharePoint Online, OneDrive, Power BI, MS Stream, and Viva Engage.
Moreover, the features of AdminDroid like quick alerting, scheduling, granular access delegation, and advanced customization filters will lighten the load of Microsoft 365 management.
Try using AdminDroid now with a 15-day trial to have a hands-on experience on the vast realm of Microsoft 365 reporting!
In conclusion, Azure AD application registration stands as a pivotal step to empower Azure AD with identity and access management capabilities. This involves API permissions, secret clients, and monitoring app activities, boosting security and productivity. Through Azure app registrations, a reliable synergy is fostered between your applications and Microsoft 365, establishing a trustworthy partnership.
With these insights at hand, you are well-equipped to seamlessly embark on your journey of leveraging Azure AD’s protected resources and capabilities through application registration in Azure AD.
I hope this blog presented the simple way of application registration in Microsoft Entra ID. Don’t hesitate to share your thoughts in the comments section.