Azure AD and Azure AD B2C are the dynamic duos of identity management for the Office 365 environment. Misconfiguring these Azure settings is like a loophole for cyber attackers and external users to walk in and steal your data. To avoid this, it’s essential to monitor your configurations periodically and take action to secure your organization.
Fortunately, Azure AD Exporter is here to rescue your tenant from cyber-attacks and data breaches! This PowerShell module provides you with all the backup copies of the Azure AD and Azure AD B2C settings for a better understanding of the configurations. It provides you with a historical view of all Azure settings, including changes over the years.
Let’s gear up to learn more about how this module helps you to manage Azure AD and Azure AD B2C configurations effectively.
What is Azure AD Exporter?
Azure AD Exporter is a PowerShell module, which enables you to back up Azure AD and Azure B2C configuration settings to JSON files stored on a local device or computer.
With Windows task scheduler, you can set this module to run automatically as a nightly scheduled task, thereby keeping track of the changes made to the Azure AD and Azure AD B2C settings with the backup documentation of Azure settings.
You can also integrate it with the DevOps pipelines (Azure DevOps, GitHub) for a better understanding of the configuration changes. DevOps pipelines can play a crucial role in version control, which helps admins to audit the trail of changes in the configuration settings.
Benefits of Azure AD Exporter:
- Azure AD Exporter makes it easy to maintain an up-to-date understanding of your tenant’s Azure AD and B2C configurations by integrating JSON files with DevOps pipelines.
- The filtering capability of this module enables you to filter the data based on a variety of factors, including users, groups, directory roles, applications, etc.
- Azure AD Exporter is an easy-to-use interface that simplifies the data extraction process of Azure AD and B2C settings with just a single cmdlet.
- You can use it to make sure the configurations you made are accurate.
Install Azure AD Exporter PowerShell Module
To export Azure AD and B2C configurations to JSON files, you need to download and install the Azure AD Exporter PowerShell module. But, before entering the procedure, make sure to be a Global administrator to access Azure Active Directory. Once you have verified that you meet the required permission, you can proceed with downloading and installing the module.
To install the Azure AD Exporter module, execute the following cmdlet in Windows PowerShell as administrator.
|
1 |
Install-Module AzureADExporter |
After confirming the prompt, it will take seconds to install the Azure AD Exporter module.
Connect Your Tenant Using Azure AD Exporter
Once done with the module installation, the next step is to connect your Office 365 environment using Azure AD Exporter. You can connect your tenant by running the following cmdlet.
|
1 |
Connect-AzureADExporter |
After executing the above cmdlet, you will be requested to provide the needed consent. By giving consent, you can access your Azure Active Directory.
Export Objects and Setting Using Azure AD Exporter
You need to run a plethora of cmdlets to get data about Azure AD users, groups, applications, and account settings in Azure AD, MSOnline, or MS PowerShell. However, you can get all the Azure AD settings by running a single cmdlet of Azure AD Exporter.
Export Default Settings and Objects of Azure AD
To export Azure AD and Azure B2C settings and objects, execute the below cmdlet.
|
1 |
Export-AzureAD -Path 'C:\AzureAD&B2Cconfig\' |
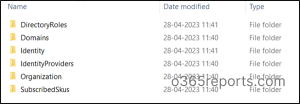
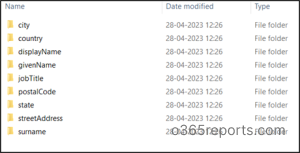
The above cmdlet will export only the default settings and objects shown in the below screenshot.
Extract All Azure AD and Azure B2C Settings and Objects
Need more settings details other than the above settings? Don’t worry! you can be able to get all the Azure AD and B2C settings and objects by adding ‘All’ parameter in the above cmdlet.
|
1 |
Export-AzureAD -Path 'C:\AzureAD&B2Cconfig\' -All |
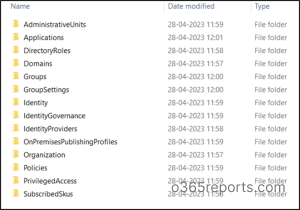
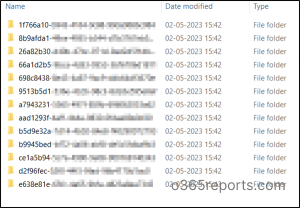
Here you can be able to view the additional settings like privileged Access, Groups, and Identity Governance.
Export Specific Settings and Objects of Azure AD
You can use the Azure AD Exporter tool to export JSON files of specific settings and objects in situations where you don’t need all the settings and objects.
To get details of specific settings/objects, you can run the above-given cmdlet with the ‘Type’ parameter.
Note: To get a list of currently valid types, run the below cmdlet.
|
1 |
(Get-Command Export-AzureAD | Select-Object -Expand Parameters)['Type'].Attributes.ValidValues |
We demonstrated the execution of the cmdlet using several valid types to provide you with an example.
Export Azure B2C Settings Alone– You can export Azure B2C configurations alone by executing the following cmdlet.
|
1 |
Export-AzureAD -Path 'C:\AzureAD@B2Cconfig\' -Type "B2C" |
This will give you the JSON files user flow settings as shown in the screenshot below.
Export Applications Details– You can export Applications settings by running the below cmdlet.
|
1 |
Export-AzureAD -Path 'C:\AzureAD@B2Cconfig\' -Type "Applications" |
This will export details of all the registered applications’ details like the screenshot below.
From the JSON file, you can get details of the application settings such as parental control, publisher domain, key credentials, etc.
Generate Conditional Access Details- It is crucial to monitor Conditional Access Policy changes for organization security. You can generate JSON files having details of the Conditional Access by running the below cmdlet.
|
1 |
Export-AzureAD -Path 'C:\AzureAD@B2Cconfig\' -Type "ConditionalAccess" |
This will give you the JSON files containing information of the Named Location and Conditional Access Policies.
Derive a Copy of PIM Settings– Privileged Identity Management is a service provided by Azure AD which helps you to monitor access to important resources in the organization. To make a copy of the PIM settings, execute the below cmdlet.
|
1 |
Export-AzureAD -Path 'C:\AzureAD@B2Cconfig\' -Type "PIM" |
This will give you the JSON file having Azure AD role and Azure AD resources. With this copy of PIM settings, you can efficiently manage PIM policies to control how and when admin roles are activated.
In addition to exporting PIM settings, you can audit PIM role activations to review who actually activated or deactivated privileged roles in your tenant.
Get Details of the Azure AD users- You can also keep track of the user’s metrics such as authentication methods, assigned plans with Azure AD exporter by running the below cmdlet.
|
1 |
Export-AzureAD -Path 'C:\AzureAD@B2Cconfig\' -Type "Users" |
Export License Details of the Organization –You can get all the necessary license details of your Office 365 environment using the type “SKUs”.
|
1 |
Export-AzureAD -Path 'C:\AzureAD@B2Cconfig\' -Type "SKUs" |
Integrate Azure AD JSON Files With GitHub
With the task scheduler, you can review the Azure AD settings’ changes. However, the ultimate alternative is to integrate the exported JSON files with DevOps pipelines. This will help you to maintain a history of changes made on the Azure settings. Also, this allows you to manage your Azure AD & Azure AD B2C configuration settings in a more organized and efficient way.
Instead of manually exporting the JSON files and pushing them to the remote repository, consider automating this process using Git commands.
For that, you should install Git on your local device. Then, follow the steps below to satisfy the prerequisites for pushing the changes to the remote repository.
- First, install Git on your device.
- After confirming all the consents, open Git CMD.
- To create a folder for your repository, run the command mkdir <folderName>.
- Then, navigate to this folder using cd LocalGit.
- Now, create a Git repository with mkdir <Repository name>.
Now, you can run the code below which will integrate the JSON files with Git.
|
1 2 3 4 5 6 7 8 9 10 11 12 13 14 15 16 17 18 19 20 21 22 23 24 |
$LocalRepo = '<Path of your local Repository>' $tenantId = '<tenant id>' $remoteRepoUrl = '<remote repository url>' Write-Host 'git checkout main...' git config --global core.longpaths true # needed for Windows git checkout main Write-Host 'Clean git folder...' Remove-Item $tenantPath -Force -Recurse Write-Host 'Installing modules...' Install-Module Microsoft.Graph.Authentication -Scope CurrentUser -Force Install-Module AzureADExporter -Scope CurrentUser -Force Write-Host 'Connecting to AzureAD...' Connect-AzureADExporter -TenantId $tenantId Write-Host 'Starting backup...' Export-AzureAD $tenantPath -All Write-Host 'Updating repo...' git config user.email "<email>" git config user.name "<name>" git add -u git add -A git commit -m "AzureAD Update" git remote add origin $remoteRepoUrl git push -u origin main Write-Host 'Done!' |
In short, to follow up Azure AD and Azure AD B2C settings’ changes Azure AD Exporter is the best tool, which can be integrated with a task scheduler or DevOps pipelines for a periodical review of the Azure settings changes.
Don’t let Azure settings’ changes leave you behind – stay in the loop with Azure AD Exporter! At the same, like how you easily export the Azure AD settings with the powerful one-stop Entra Exporter tool, you can also automate M365 tenant settings with M365DSC, which covers settings across workloads like Entra ID, Exchange Online, SPO, and more.! Not only you can automate, like this Entra Exporter, but you can also use the M365DSC to export tenant settings easily. Use them wisely and make them handle on your behalf.
We hope this blog will give you more information about Azure AD Exporter. Furthermore, feel free to reach us in the comments for any assistance.