
Managing large teams in Microsoft Teams sounds simple, until it brings unforeseen challenges. As teams grow, things can quickly spiral out of control with excessive private channels, overuse of @everyone mentions, and unchecked third-party app installations. Without the right controls in place, you’re left with a chaotic, unmanageable Teams environment that reduces productivity and causes collaboration breakdowns. 😩
So, what’s the solution here? 🤔 Many admins may try limiting features like app usage or channel creation to address the challenges of managing Microsoft Teams in large organizations.
In this blog, we’ll walk you through the best practices that admins can configure to keep large teams environments organized without sacrificing collaboration. Let’s get started! 💡
Best Practices for Managing Large Teams in Microsoft Teams
Managing large teams in Microsoft Teams effectively starts with the right settings and clear structure. With these 10 best practices, you can cut through the chaos, strengthen your Microsoft Teams governance, and keep collaboration seamless across large teams.
- Restrict private channel creations and other user permissions
- Enable channel moderation in Microsoft Teams
- Control channel mentions and notifications in Teams
- Create necessary Microsoft Teams tagging
- Track teams activity with usage reports and analytics
- Configure app permission policies in Microsoft teams
- Configure Microsoft 365 sensitivity labels in Teams meeting
- Standardize teams creation with templates
- Use app setup policies to automate approvals in Microsoft Teams
- Enforce teams naming convention policies
1. Restrict Private Channel Creations and Other User Permissions
Restricting private channel creation and managing user permissions is the key to maintain control and structure when handling large teams in Microsoft Teams. Without restrictions, users might create unnecessary channels or install unapproved apps leading to channel sprawls.
How to Restrict Private Channel Creations in Microsoft Teams
Required role permission: Microsoft Teams Owner
Member permission settings allow owners to control actions like creating private channel, updating, deleting or restoring channels. These options help define what members can or cannot do within a team.
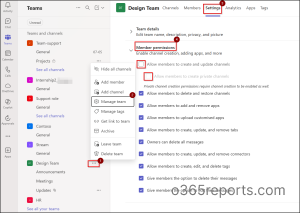
- Open the Teams app and go to the Team you want to configure.
- Click on More options (⋯) next to the team’s name> select Manage team.
- Navigate to the Settings tab> expand Member permissions.
- Uncheck the options to restrict private channel creations.
Note: Applying Microsoft Teams security best practices through careful configuration helps reduce chaos, empowers users, and enhances overall security.
How to Regulate App Permissions in Microsoft Teams
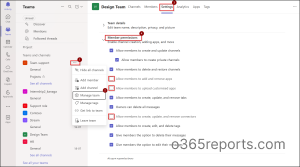
- In large organizations, unrestricted app usage can lead to app sprawl, security vulnerabilities, and compliance issues. By regulating app permissions such as disabling the ability for members to add or upload custom apps, you maintain tighter control over the Teams environment.
- Follow the same steps given above to navigate to the desired settings page.
- Now, uncheck the option which allow members to add, remove & upload customized apps. Also untick ‘Allow members to create, update, and remove apps’ option.
2. Enable Channel Moderation in Microsoft Teams (Post Permission)
Required role permission: Microsoft Teams Owner
In large teams, moderation keeps standard channels from becoming chaotic by limiting who can post and ensuring only authorized or relevant users share updates. This improves clarity and supports better communication especially in critical or high-traffic channels. By enabling channel moderation, you can ensure that important channel stay focused and relevant.
How to Set Up Channel Moderation in Microsoft Teams
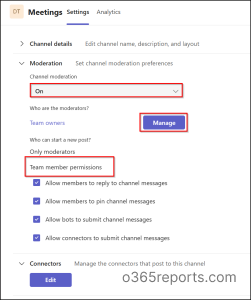
- Open Microsoft Teams and navigate to the team where you want to enable moderation.
- Go to the specific channel> click on More options (⋯)> Manage channel.
- Under moderation, you’ll see options to manage the moderators and team members permissions like allowing reply and pin channel message, allow bots and connectors to submit channel messages.
- By default, team owners become moderators.
Note: Moderation is only available in standard channels, not private or shared channels.
3. Control Channel Mentions and Notifications in Teams
Required role permission: Microsoft Teams Owner
Admins and team owners in large teams should manage mentions carefully to prevent notification fatigue and overload. Team and channel mentions are useful for broadcasting updates, but overuse can lead to notification fatigue especially in large teams. Microsoft Teams offers settings to manage @team, @channel, and @tag mentions so that you can keep communication focused and minimize distractions.
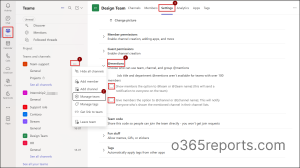
- Go to the Microsoft Teams app.
- Click on the Team name> click (⋯)> select Manage team.
- Go to the Settings tab and expand @mentions.
- Now you can choose who can use team, channel and group mentions.
- Uncheck the boxes of mention settings to avoid frequent notifications in large teams.
4. Create Necessary Microsoft Teams Tagging
Required permission: Microsoft Teams Owner
Tags in Microsoft Teams allows targeted @mentions (e.g., @DesignTeam) to specific user groups within a team. This is especially useful in large teams to organize members by tags and avoid over-notifying everyone. In Teams, it’s an individual team setting which can be done by teams’ owner to manage tags.
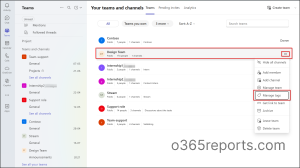
- In Teams, select a team> More options (⋯)> Manage tags.
- Click ‘Create tag’ and give a suitable tag name and description.
- Add members to the specific tag and click “Create”.
5. Track Teams Activity with Usage Reports and Analytics
Required role permission: Microsoft Teams Owner (For advanced insights, requires Microsoft Teams Administrator role with Teams Premium license)
Tracking usage and collaboration patterns is key to managing large teams effectively. The built-in Teams usage & activity reports in the Microsoft 365 admin center offer insights into daily active users, channel activity, app usage, meeting participation, and more. These metrics help admins identify inactive teams, low-engagement users, or under-utilized features. It enables data-driven decisions to improve productivity and optimize license usage.
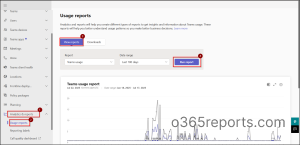
- To view detailed usage reports, log in to the Microsoft Teams admin center, go to Analytics & reports > Usage reports.
- Select a report type, choose the date range, and click Run report to generate the results.
While native reports provide usage visibility, consider using PS script to automate teams usage report, enabling inactivity tracking, date-based analysis, and scheduled execution.
6. Configure App Permissions Policies in Microsoft Teams
Required role permission: Microsoft Teams administrator
Managing Teams app permissions policies is essential for maintaining control over the apps that users can access and install. In large teams, users often install multiple third-party apps to meet individual needs, which can quickly lead to security risks, unapproved tools (shadow IT), and a cluttered app environment. Microsoft Teams offers app permission policies that allow admins to define which apps are allowed, blocked, or pre-installed for users. You can create different policies for different departments or user groups, ensuring that only relevant and secure apps are available to them.
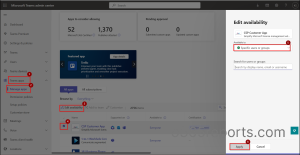
- Navigate to the Microsoft Teams admin center.
- In the left pane, expand Teams apps and click Manage apps.
- From the list of apps, click the checkbox next to the app you want to configure (e.g., CSP Customer App).
- Click on Edit availability and choose Everyone or Specific users or groups or No one from the dropdown.
- Use the search box to add users or Azure AD groups who should have access to the app.
- Click Apply to save your changes.
By setting up app permission policies, admins can restrict access to unapproved or unnecessary apps, helping reduce risk and maintain compliance. This approach helps maintain consistency, limits distractions, aligns app usage with organizational compliance and productivity needs.
7. Configure Microsoft 365 Sensitivity Labels in Teams Meeting
Required role permission: Microsoft Teams administrator
Sensitivity labels in Microsoft 365 help safeguard sensitive data by applying the right access controls, encryption, and restrictions to teams based on the assigned label.
Sensitive Labels in File Sharing
Sensitivity labels help enforce consistent sharing policies across teams, preventing accidental data exposure when users share files outside the organization. In large teams, managing access settings for every group can be time-consuming and error prone. Sensitivity labels automate this process by applying restrictions like “Do Not Share Externally” or “View Only,” ensuring compliance without constant admin oversight. Labels make it easier for admins to identify and audit shared files that contain sensitive data across many users and teams.
Sensitive Labels in Teams Meetings
You can also use sensitivity labels in Teams meeting invites to classify meetings based on the confidentiality of the discussion. For example, labels can automatically restrict meeting chat access, limit screen sharing, or block external participants. This ensures sensitive content isn’t accidentally exposed, especially in large teams where collaboration is widespread. Secure your Microsoft Teams meetings with end-to-end encryption to protect sensitive conversations from unauthorized access. This practice is useful when large organizations have diverse teams that frequently host cross-functional meetings.
Tips: Implementing Microsoft Teams security best practices for meetings and messaging helps large teams maintain compliance, protect data, and ensure safe collaboration.
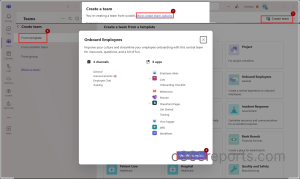
8. Standardize Team Creation with Templates
Required role permission: Microsoft Teams administrator
Team templates are a powerful way to standardize team creation across your organization, especially useful when managing large teams. Templates allow admins to predefine channels, tabs, apps, and settings, ensuring consistency and saving time. Templates can be used when new teams are created for similar use cases like onboarding, project management, or departmental collaboration. This helps large organizations maintain structure, reduce setup errors, and promote best practices across teams.
How to Create Team Template in Teams Admin Center:
- Log in to the Teams admin center.
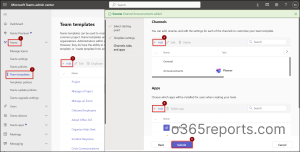
- In the left panel, go to Teams> Team templates> click ‘+ Add’ to create a new template. You can start from scratch or copy the structure of an existing team.
- Enter a name, a short description and a long description for the template.
- Now, add Channels and Apps:
- Add standard channels (e.g., “Announcements,” “Projects”) that should be automatically created.
- For each channel, you can add tabs (like Planner, SharePoint, or custom apps).
- Include default apps you want installed with every team using this template.
- Click Submit to create the template.
When a user creates a new team in the Teams app, they’ll see the option to choose from available templates. By setting up and enforcing Teams templates, admins can maintain consistency in team structure, reduce manual errors and onboard large groups quickly.
9. Use App Setup Policies to Automate Approvals in Microsoft Teams
Required role permission: Microsoft Teams administrator
For admins managing large teams, this centralizes and standardizes request handling that reduces delays, email clutter, and confusion around decision-making. The Approvals app in Microsoft Teams enables users to create, manage, and track approval requests directly within the Teams interface. Whether it’s leave requests, purchase orders, or content approvals, team members can submit forms that route to designated approvers for quick action.
Note: Admins can also automate routine processes making by creating workflows in Microsoft Teams to manage large teams efficiently from a single platform.
10. Enforce Teams Naming Convention Policies
Required role permission: Microsoft Teams administrator /Global Administrator and requires Azure AD Premium P1 license.
Setting up group naming policy in Microsoft Entra ID helps organize teams clearly and make navigation easier especially in large environments with many teams and channels.
- Sign in to the Microsoft Entra admin center.
- In the left pane, go to Entra ID> Groups>Settings> Naming Policy.
- Under ‘Group naming policy’:
- Add prefix and suffix as ‘Attribute or String’ and set them accordingly. For Example, Department-[GroupName]-Region → HR-TeamA-NY.
- Under Blocked words list:
- Prevent usage of terms like “CEO,” “Admin,” or sensitive brand names by uploading a list of words you wish to block.
- Click Save to apply the policy.
- Once applied, users will see enforced naming when creating teams in Microsoft Teams.
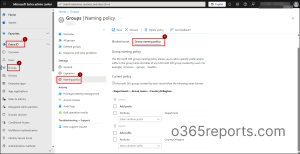
Standardized names make teams easily identifiable by department, function, or region. This reduces confusion, improves searchability, and ensures smoother lifecycle management across large, distributed teams.
Wrap Up
Managing large teams in Microsoft Teams doesn’t have to be complex, it’s all about setting the right foundations. From restricting private channel creation to enabling channel moderation and tracking usage, each best practice plays a vital role in simplifying daily operations and maintaining control in large Teams environments. I hope this blog gave you a clear path to streamline and scale your Teams environment with confidence.
“Effective management starts with proactive planning, not reactive problem-solving! “


