
Microsoft 365 distribution lists are a handy way to send emails to a large group of people. A dynamic distribution list automatically filters and adds members based on certain criteria, like email domain, job title, etc. But over time, projects end, teams restructure, and employees move on. What happens to the corresponding distribution lists (DL)? If these distribution lists remain untouched, they become inactive. They clog up your directory, potentially posing security risks and hindering overall email efficiency. But, how to determine if a distribution group is being used or not?
Unfortunately, Exchange Online doesn’t offer a direct way to identify and manage inactive distribution lists. Admins can use the message trace report to analyze email activity within the organization for up to 90 days. However, this report shows overall message activity for all types of groups in Microsoft 365, making it a tedious task to isolate distribution groups and track the last date a DL was used.
To simplify this process, we’ve developed a user-friendly script to pinpoint the exact inactivity period of Microsoft 365 distribution groups. By using the message trace report as input, our script filters out the exact number of inactive days for each DL in the organization.
How to Download Message Trace Report in Exchange Online?
Message trace reports in Exchange Online track email usage, including when emails are sent or received by mailboxes. This helps to identify which distribution lists are actively used and which ones are inactive within a defined period (usually up to 90 days).
You can get message trace report using PowerShell as well as Exchange admin center (EAC).
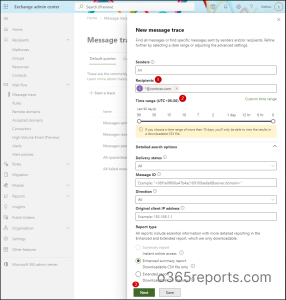
To download message trace report in Exchange admin center, follow the steps below.
- Sign in to the Exchange admin center.
- Navigate to Mail flow –> Message Trace –> Start a trace.
- Since we need to retrieve all emails received in the organization, use wildcard (*@yourdomain) in the Recipients section. For example, *@contoso.com.
- Then, specify the timeframe for the trace (up to 90 days) or set a custom start date and end date.
- Once you’ve set the time range, click Next and Prepare report.
The search will run, and the results won’t be available immediately. You can check the status under the Downloadable reports tab. When the report is ready, you can download it in CSV format.
In addition to using the Exchange Admin Center (EAC), admins can initiate message trace using PowerShell.
While the Get-MessageTraceV2 cmdlet can also retrieve up to 90 days of data, each query is limited to a 10-day range. To cover the full 90-day period, you would need to run the query multiple times with 10-day intervals. Therefore, using Start-HistoricalSearch is a more efficient solution for historical message trace analysis. It allows you to access detailed message trace information for up to the past 90 days.
To start a message trace report for a specific date range using PowerShell, use the following command:
|
1 |
Start-HistoricalSearch –ReportTitle “MessageTraceReport” -StartDate 6/6/2024 -EndDate 7/7/2024 -RecipientAddress *@contoso.com -ReportType MessageTrace –NotifyAddress user@contoso.com |
This command will generate the message trace report for the entire organization between the specified dates and notify the user upon completion.
To start a message trace report for the last 90 days, you can execute the following commands:
|
1 2 3 |
$endDate = (Get-Date).Date $startDate = $endDate.AddDays(-90) Start-HistoricalSearch -ReportTitle "MessageTraceReport" -StartDate $startDate -EndDate $endDate -RecipientAddress *@contoso.com -ReportType MessageTrace –NotifyAddress user@contoso.com |
These commands will generate the message trace report for the past 90 days and notify the user once the search is complete.
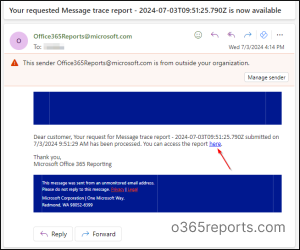
To download the message trace report, navigate to the Exchange admin center –> Mail flow –> Message trace –> Downloadable reports. Alternatively, the recipient of the notification email can download the report from the email message.
After downloading the message trace report, we can proceed with executing the script to identify unused distribution groups!
Download Script: FindInactiveDistributionLists.ps1
Script Highlights
- The script automatically verifies and installs the Exchange PowerShell module (if not installed already) upon your confirmation.
- Exports inactive days of distribution lists in Microsoft 365.
- Retrieves the last email received date.
- Exports report results to CSV.
- The script is schedular friendly.
- It can be executed with certificate-based authentication (CBA) too.
Distribution Group Usage Report – Script Output
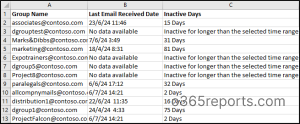
The script exports all the unused distribution lists in Exchange Online with the following attributes:
- Group Name
- Last Email Received Date
- Inactive Days
The exported report will look similar to the screenshot below:
Microsoft 365 Inactive Distribution Lists Report – Script Execution Methods
- Download the script.
- Start the Windows PowerShell.
- Select any of the methods provided to execute the script.
Export Inactive Distribution Lists into CSV
You can run the script with MFA and non-MFA accounts.
|
1 |
./FindInactiveDistributionLists.ps1 - HistoricalMessageTraceReportPath “./MessageTraceReport.csv” |
Here, -HistoricalMessageTraceReportPath specifies the path to the CSV file containing the message trace report.
This example allows you to find the last date a distribution list was used, thereby finding all the inactive DLs in the organization.
Tip:
Similar to inactive distribution lists, you can also identify distribution lists with external users to ensure sensitive information isn’t shared with unauthorized individuals
Get Distribution Group Usage Report Using Certificate
You can also run the script using certificate-based authentication, which is scheduler friendly. When you want to run the script unattended, you can choose this method. To connect to Exchange Online using a certificate, you must register the app in Azure AD.
|
1 |
./FindInactiveDistributionLists.ps1 - HistoricalMessageTraceReportPath “./MessageTraceReport.csv” -Organization <Domain> -ClientID <AppId> -CertificateThumbPrint <CertThumbPrint> |
Note: For the most accurate results in identifying distribution groups usage, it’s recommended to schedule the script to run to 90 days once. Make sure to update the message trace report manually before the scheduled date. Alternatively, you can schedule the trace report to automatically to store in the specific location.
This helps you gather and analyze data over a longer period for a better understanding of distribution list activity.
You can also verify distribution group members to access their future requirements and plan to remove inactive DLs.
Schedule Inactive Distribution Lists in Microsoft 365
Further, you can schedule the script by explicitly passing the credentials (usernames and passwords). The input file should be updated for scheduling.
|
1 |
./FindInactiveDistributionLists.ps1 - HistoricalMessageTraceReportPath “./MessageTraceReport.csv” -UserName <UPN> -Password <Password> |
You can use this format to schedule the script using task scheduler for non-MFA admin accounts.
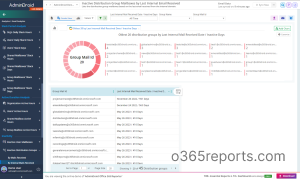
Find Inactive Distribution Lists Over 90 Days Using AdminDroid
As the traditional message trace feature is time consuming and limits your search to just 3 months, you may fall short when it comes to accessing inactive data 90 days before. Fortunately, AdminDroid’s Office 365 auditing tool provides a robust solution. With AdminDroid, you can analyze the inactivity period of distribution groups beyond 90 days, ensuring you have the historical data required for thorough audits and regulatory compliance.
Exclusive distribution group based reports offered by AdminDroid includes,
- Inactive Distribution Groups by Mails Received
- Inactive distribution Groups by External Mails Received
- Daily Top Distribution Groups by Mails Sent/Received
- Top DLs based on Sending/Receiving Internal Emails
- Top DLs based on Sending/Receiving External Emails
- Active Distribution Groups by Mail Sending/Receiving Frequency
- Monthly/Hourly/Daily Distribution Groups Mail Traffic Stats
- All Distribution Groups
- Distribution Group Members
- Distribution Group Membership Changes
- Users’ Distribution List Membership
Apart from this, AdminDroid offers 120+ reports and dashboards completely for free. It includes reports on Users, Licenses, Groups, Group Members, Devices, Login Activities, Password Changes, License Changes, and more. The Free Azure AD Reporter edition doesn’t have any restrictions in reporting functionalities such as customization, scheduling, and exporting.
Additionally, AdminDroid provides 1800+ pre-built reports and 30+ smart dashboards to know about your Microsoft 365 environment at a glance. This tool provides reports on Office 365 reporting, auditing, analytics, usage statistics, security & compliance, and alerts on critical M365 activities. Download AdminDroid Microsoft 365 reporting software and see how it helps you.
I hope this blog will help you find out inactive distribution lists in your organization. If you have any queries, reach us through the comment section.


