Sharing files and working with external users is a major key in today’s work world. But not every door should be open; it’s safer to lock some tight than leaving them vulnerable🔒. This blog is your guide to boosting up the security settings for Microsoft 365 external sharing. We’ll guide you through essential settings to block, so external collaborators can work together securely without compromising your sensitive information.❌
But before we start, let’s address a key distinction that might confuse some of us.
Difference Between External Access and Guest Access in Microsoft 365?
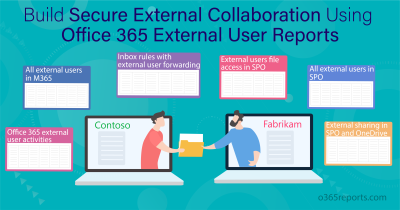
Often these terms are used interchangeably in Microsoft 365. To break it down, let’s imagine you are in the tenant ‘Contoso’ and I’m in the tenant Fabrikam.
External user: Imagine you, Contoso, invite me, from Fabrikam, to access a document. When I click on the link, I’m prompted to log in. Here’s the catch: even though I’m accessing Contoso’s document, I’m actually logging in through Fabrikam. So, technically, I’m an external user to Contoso, even though I’m accessing their content.
Guest user: Now, imagine Contoso sets up a separate account for me within their system. So, when I log in, I’m using credentials managed entirely by Contoso. In this case, my authentication process is internal to Contoso’s system, even though I’m still considered a guest user.
So, in a nutshell, in the first scenario, I authenticate externally via Fabrikam, while in the second scenario, I authenticate internally within Contoso’s system as guest.
Now, hoping that you are clear with the difference, let’s dive into the concept.
What are the Essential Settings to Block for External Users in Microsoft 365?
Firstly, why block external access? Collaboration is the key, but uncontrolled external access can be a security threat. External users might accidentally (or even maliciously) download sensitive documents, forward confidential emails, or introduce malware threats. By implementing the right blocking settings, you can ensure a secure and controlled environment for your M365 data.
We have categorized the security settings based on different services in Microsoft 365 for you. Let’s get started!
Microsoft Teams
1. Limit External User Channel Creation
Identifying teams with external user access is crucial for maintaining security and enforcing organizational policies. This enables administrators to review guest access permissions and implement stricter controls to manage external access securely. For instance, allowing external users to create channels can pose significant security risks. They might inadvertently or intentionally create channels that expose sensitive information or invite unauthorized participants, compromising the organization’s data integrity.
To limit external users from creating channels in Teams, follow these steps.
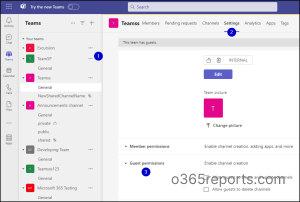
Step 1: Go to the respective team -> click on the three dots -> Manage team
Step 2: On the list of tabs, select Settings -> Then, Guest permissions.
Step 3: In the Enable channel creation, make sure that the following options are disabled.
- Allow guests to create and update channels.
- Allow guests to delete channels.
As an additional security practice, you can audit MS Teams channel creations using PowerShell.
2. Meeting Policy Restrictions for External Users
In the Teams admin center, under the Meetings section, select Meeting policies. Here, you can find a few settings inside the ‘Default org-wide global policy’.
- Who can bypass the lobby – Controls who can join a meeting directly and who must wait in the lobby until they’re admitted. Here you can use the ‘People in my org and guests’ and the ‘People in my org, trusted orgs, and guests’ options to control external users.
- External participants can give or request control- Turning this option off disables the ability of external users and guests to request people in your organization’s shared screen during a Teams meeting.
- Anonymous users can join a meeting after verifying by email code- Enabling this setting enforces email OTP verification, requiring external participants to authenticate their identity before joining a Teams meeting.
3. Data Loss Prevention for Teams
Microsoft 365 Data loss Prevention (DLP) policies play a major role in Teams security settings. Deploying DLP for external users in Microsoft Teams involves implementing policies to protect sensitive information from being shared or leaked outside the organization. For example, we can create a DLP policy to block sharing of sensitive info types like credit card numbers within Microsoft Teams by external users. Admins should review such DLP message detections regularly to mitigate risks and ensure secure communication externally.
4. Block the Download of Teams Meeting Recording Files from SharePoint or OneDrive
You can restrict the download of Teams meeting recording files from SharePoint or OneDrive. To turn on the policy, run the following cmdlet.
|
1 |
Set-SPOTenant -BlockDownloadFileTypePolicy <$true/$false(default)> -BlockDownloadFileTypeIds TeamsMeetingRecording |
After the policy is turned on, any new Teams meeting recording files created by Teams and saved in SharePoint and OneDrive are blocked from download or sync for all and external users.
Following are the configurations that you can consider setting up even before inviting external users to your organization.
5. Disable External Access in Microsoft Teams
If you’re an organization that will never communicate externally, you can directly disable external access setting in the Microsoft Teams admin center, instead of leaving them open to be enabled.
To block users in your organization from communicating with external users, you need to disable the following option. By disabling this option, users can no longer chat, add external users to meetings, use audio-video conferencing with external users, etc.
Step 1: Sign in to the Microsoft Teams admin center.
Step 2: Select users > External access.
Step 3: Under Teams and Skype for Business users in external organizations -> select Block all external domains.
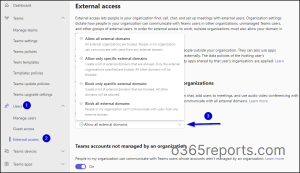
You can also disable guest access in Microsoft Teams. To do this, navigate to Microsoft Teams admin center ->Users -> Guest access. Here you can manage calling, meeting, and messaging settings for guest users.
Tip:
Beyond blocking external sharing globally, you can also restrict guest access to specific Microsoft 365 groups using sensitivity labels and PowerShell, giving you more granular control over teams and data.
6. Bonus Tip: Block all Subdomains of Domains in Blocklist
Microsoft Teams now offers a feature that allows organizations to enhance their domain blocking capabilities by including all subdomains of domains listed in the federation Block list (MC770792). This setting is disabled by default and can be enabled using the following PowerShell cmdlet.
For instance, if ‘fabrikam.com’ is included in the Block list and this setting is enabled, all related subdomains such as ‘sub.fabrikam.com’ and ‘tenant.fabrikam.com’ will automatically be blocked as well.
|
1 |
Set-CsTenantFederationConfiguration -BlockAllSubdomains $True |
Also, to take a security step from its end, Microsoft introduced brand impersonation protection for Teams chats to keep your organization safe. This new feature is designed to prevent spam or phishing attempts from external chats in Microsoft Teams.
SharePoint & OneDrive
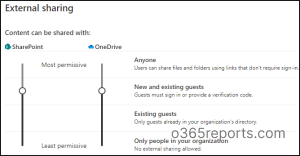
SharePoint admin center has a variety of settings that can be used to limit external sharing.
Step 1: Go to the SharePoint admin center.
Step 2: Select Sharing under “Policies”.
Step 3: You will find a range of options that you need to configure to limit external sharing in SharePoint.
1. Disable Anonymous Links:
Disable this option to restrict guest users from creating anonymous links for sharing. This eliminates the risk of uncontrolled sharing through forwarded links or accidental leaks.
2. Restricting External Sharing by Domain
Restricting external sharing by domain allows you to specify trusted email domains (e.g., your partners’) for external sharing. This ensures that only authorized individuals from those organizations can access the shared content, reducing the risk of unauthorized access from unknown domains.

3. Limit External Sharing to Specific Users in M365
Though you have disabled the ‘external sharing option’, if some of your users require the functionality, there’s a way available! This option restricts external sharing to a designated group of users within your organization. Only members of that group can share files, folders, and sites with external parties. As a result, only authorized personnel can share sensitive information and limits accidental leaks by other users.

4. Enforce Guest Use of the Invited Account
By default, guests can receive an invitation at one account but sign in with a different account.
This prevents guests from using a different account than the one they were invited with. This ensures the intended person accesses the information and prevents unauthorized access through alternate accounts. This setting only applies to sharing that doesn’t use Microsoft Entra B2B collaboration.

5. Prevent External Users from Re-sharing Files & Folders in SharePoint
By default, guest users can share items that they don’t own with other users or guests. To disable this behavior, you can uncheck this option. As a result, guest users cannot re-share items they did not create.

6. Limit Guest Access Expiration:
Setting guest access expiration in SPO sets a time limit for how long guests can access SharePoint sites and OneDrive folders. This ensures temporary access for specific projects or collaborations and automatically revokes access after a set period.

7. Block Users from Syncing Files
Admins can prevent external users from syncing files to their local devices using this setting. This also applies to internal users & it cannot be selectively enabled solely for external users.
- Go to the site where you want to disable syn.
- Select the gear icon to the top right corner ->site information -> View all settings.
- Locate Search and offline availability under Search.
- Under Offline Client Availability select No (default is Yes).
- Click OK at the bottom of the page.

Microsoft Entra ID
1. Block External Users from Downloading Office 365 Files
To block external users from downloading files from SharePoint, OneDrive, & other Office 365 apps, use the Conditional Access policy in Microsoft Entra ID.
Step 1: Sign in to Microsoft Entra ID admin center –> Protection -> Conditional Access.
Step 2: Create a new policy and provide a suitable name.
Step 3: Select Users -> Select users and groups -> Guest or external users -> Select all.
Step 4: In the Target resources section, select Cloud apps.
Step 5: Under Include, select Apps ->Office 365. It includes Microsoft Teams, SharePoint, OneDrive, etc. You can also select individual apps.
Step 6: Here comes the main part that actually does the job. The session control section has a Use conditional access app control option. From the dropdown, select Block downloads (preview).
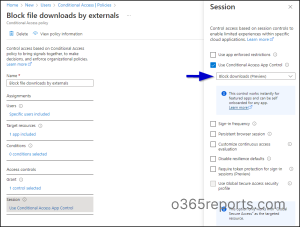
Similarly, you can block attachment downloads in OWA by combining Conditional Access with OWA mailbox policy.
2. Block External Users from Logging into Desktop Apps
In order to protect sensitive data, a company gives access to its desktop applications solely to authorized employees within the network, preventing external users from logging in. This measure mitigates the risk of unauthorized access.
Create a similar Conditional Access policy by following the exact steps that we have explained above up to step 5. After that,
Step 6: in the Conditions tab, select Client apps.
Step 7: Toggle the Configure button to Yes.
Step 8: Then under access controls, select Grant -> Block access.
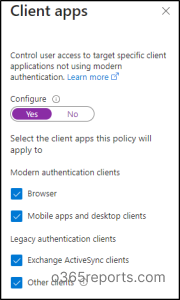
Impact: As a result, the user will only be able to access from a web browser.
3. Entra ID External Collaboration Settings
Microsoft Entra External ID allows you to restrict what external guest users can see in your Microsoft Entra. For example, you can limit guest users’ view of group memberships, or allow guests to view only their own profile information.
Step 1: Sign in to the Microsoft Entra admin center.
Step 2: Browse to Identity > External Identities > External collaboration settings.
Step 3: Under Guest user access, choose the level of access you want guest users to have.

- Option 1: “Guests have equal access to Microsoft Entra resources and directory data as members, providing the highest level of inclusivity.”
- Option 2 (Default): “Guests are restricted from certain directory tasks, like viewing user and group details, but can see membership of non-hidden groups.”
- Option 3: “Guest access is limited to their own directory objects only, preventing them from viewing other user profiles, groups, or memberships, offering the most restrictive level of access.”
4. Enforce Home Tenant MFA for Guest Access
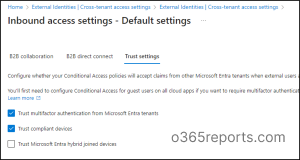
When MFA trust settings is enabled in cross-tenant access settings, it is a great way to improve security in your tenant. Once set up, B2B guest users gain access to enhanced authentication methods with stronger verification than typical Multi-Factor Authentication options available solely within a resource tenant.
To configure this setting,
Step 1: Navigate to Microsoft Entra admin center -> External identities ->Cross-tenant access settings.
Step 2: Under the Default settings tab, select Edit inbound defaults.
Step 3: Then, on the Trust settings tab, check the Trust multifactor authentication from Microsoft Entra tenants, Trust compliant devices -> Then Save.
Exchange Online
1. Restrict Sending to External Recipients:
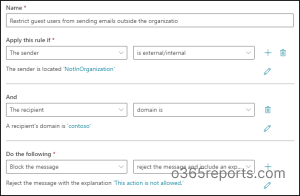
To prevent guest users from sending emails outside the organization, follow the steps given below.
Step 1: In the Exchange admin center, navigate to “Mail flow”.
Step 2: Select Rules and create a new rule with a descriptive name (e.g., “Block External Emails”).
Step 3: Under “Apply this rule if” choose conditions like the sender is “outside the organization” and the recipient is – select a domain you want to block.
Step 4: In the Do the following, select Block the message -> reject the message and include an explanation.
2. Enforce Message Encryption for External Emails
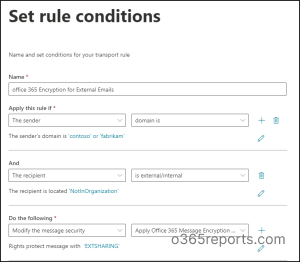
Step 1: In the EAC, navigate to Mail flow.
Step 2: Select Rules and create a new mail flow rule.
Step 3: Set conditions to identify emails sent externally. That is in the Apply this rule if, add one condition as the sender’s domain is and include the relevant domain list whose messages need to be encrypted. Then, another condition as the recipient is outside the organization.
Step 4: In the Do the following, select Modify the message security -> Apply Office 365 Encryption.
Step 5: The select RMS template flyout page appears. Select the sensitivity label of your choice and proceed to Save.
3. Block Calendar Details Sharing with External Users
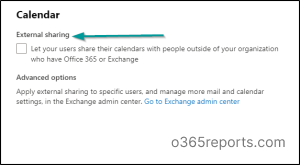
To disable calendar details sharing with external users, use the Microsoft 365 Admin Center:
Step 1: Sign in to the Microsoft 365 admin center and expand Settings.
Step 2: Click Org settings.
Step 3: Click Calendar.
Step 4: Uncheck “Let your users share their calendars with people outside of your organization who have Office 365 or Exchange”.
Step 5: Click Save.
Note – Sometimes, external users are also granted with PowerShell access based on requirements. In such cases, admins can consider restricting external user access to PowerShell in the organization. This helps to ensure that PowerShell access is controlled and aligned with the organization’s security measures and needs.
In conclusion, implementing right settings and is necessary for secure guest sharing in Microsoft 365. To gain insights into the specifics of external activities, you can export Office 365 external user reports. Thanks for reading! If you got any queries, reach out to us through the comments section.
Invest in security today to safeguard your future! 💪🔒
