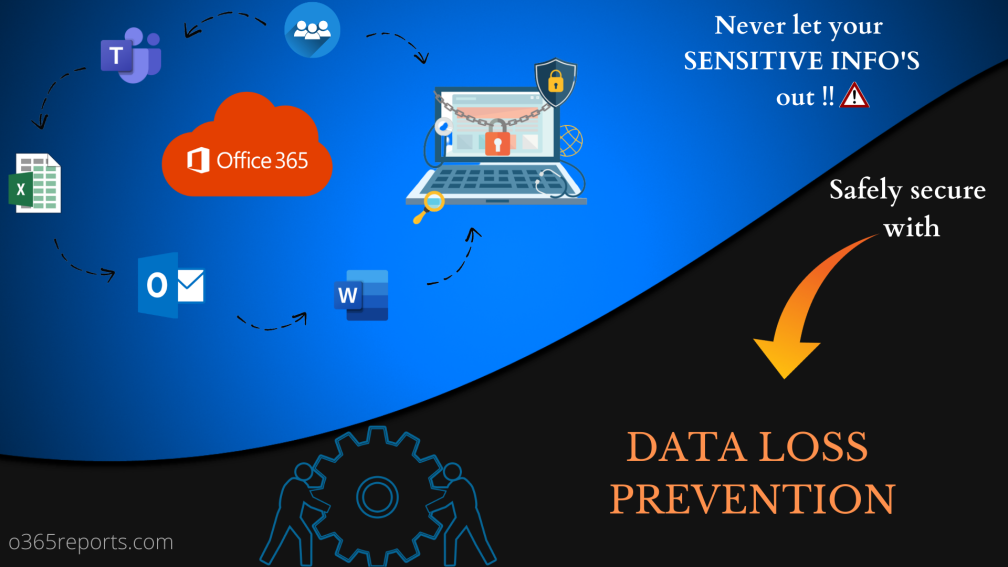
In today’s world, safeguarding sensitive data has become a top priority for organizations due to the potentially catastrophic consequences of data breaches! This is especially true for organizations that need to comply with strict data regulations. And here is where data loss prevention in Office 365 comes in! 🛡️
Fortunately, Microsoft 365 DLP offers a comprehensive data protection solution that enables you to monitor and secure the sharing of sensitive data. By regularly auditing DLP-detected messages, admins can ensure incidents are detected early, reducing the response time needed to address potential security issues.
Synopsis of the Contents:
- What is a Data Loss Prevention policy?
- License Requirements for Data Loss Prevention Policy.
- How to Allow Users Access the Data Loss Prevention Policy?
- How to Create DLP Policy from Default Templates?
- How to Create a Custom DLP Policy?
- How to Create a DLP Policy Using PowerShell?
- How to View DLP Policy in Microsoft 365?
- How to View DLP Reports?
What is Data Loss Prevention(DLP) in Office 365?
To hold sensitive information from falling into the prey’s hands, data loss prevention was included as part of Microsoft Information Protection (MIP) configurations. It helps to identify and prevent unauthorized messages from being shared, altered, or exploited.
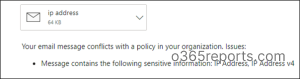
The Data loss prevention rules identify whether the data shared contains any sensitive information (like credit card numbers, IP addresses, etc.) that could result in a breach of security. It prevents unauthorized sharing or alteration of data, ensuring personal data protection within trusted boundaries. To enhance accuracy, you can also create custom Sensitive Information Types (SITs) tailored to your organization’s unique data patterns. If it detects any such data, then it enforces the configured policies and prevents sharing.
What Can You Do With the DLP Policy?
Office 365 has a wide range of sensitive information types that are distinct to each country. Such information could include passport numbers, social security numbers, credit card numbers, and a lot more. Microsoft provides a complete guide to sensitive information types and how to identify them by a specific keyword, internal functions, regular expressions, or pattern matching.
For example: When a user attempts to mail sensitive information (such as IP addresses), the DLP policy will identify the action and alert the user or immediately block it.
License Requirements for Data Loss Prevention Policy
Before exploring DLP license requirements, it’s important to know the available options, which help you choose the best fit for your needs. Currently, there are two DLP license types and a stand-alone option.
- Data loss prevention
- Data loss prevention for Microsoft Teams
Data Loss Prevention Licensing
| Data Loss Prevention | Data Loss Prevention for Microsoft Teams |
|---|---|
| Ensures the security of sensitive data shared among OneDrive, SharePoint, and Exchange Online.
Also, it protects a few aspects of Teams because Teams uses SharePoint to store files. |
A DLP policy for Microsoft Teams focuses on Teams chat, channel messages along private channel messages.
• Office 365 E5/A5/G5 |
POINT TO REMEMBER:
Starting June 30, 2023, Microsoft 365 E3/G3/F3/A3 licensed users who are covered under Teams DLP policies will not have their Teams messages scanned for data loss prevention. To continue using Teams DLP, organizations will need to have Microsoft 365 E5/A5/G5/F5 licenses. For more detailed information on restrictions, refer the news: MC546441.
How to Allow Users Access the Data Loss Prevention Policy?
The DLP policy’s purpose is to guide users on how to keep sensitive data safe and secure. Typically, global admins are responsible for creating, editing, and deleting DLP policies, and they can assign access permission to others who require it. Therefore, follow the below steps to assign permissions to access the DLP policy.
- Navigate to Microsoft Purview → Roles & scopes →Microsoft Purview solutions → Roles.
- Then, create a role group.
- In the Choose roles, select the DLP compliance management. Here, you can either select DLP compliance management or View-only DLP compliance management based on your preference.
- Next, you can assign access to the DLP policies by selecting the desired users in the “Choose Users” section.
- Bingo!! It’s over. Hereafter, the added members can create, modify and remove DLP policies.
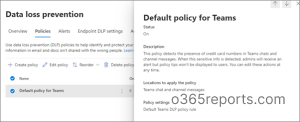
How to Create DLP Policy from Default Templates?
By default, all Teams will adhere to the default policy, which serves as a baseline guideline for Teams. Here, the default DLP policy for Teams works as follow!
- Whenever a credit card number is shared via Teams chat, this policy automatically sends out a notification to the admin. Admins can change the response action for the detection based on our preferences.
Steps to Create Policy from Default DLP Templates:
1. To create DLP policy from default templates, Navigate to Microsoft 365 compliance page → Data loss prevention.
2. After clicking on the create policy, there will be a lot of default DLP policy templates to start from. These defaults cover the fundamentals of compliance.
There are 40+ in-built policy templates for common industry regulations and compliance needs.
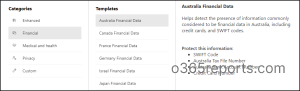
3. Select the categories and templates that fit your requirements from the Categories tab.
4. By default, the service name, description, and locations are pre-set, but editable.
5. To limit the policy to certain users or groups, you’ll need to assign admin units that is created in Azure AD. If you prefer the policy to apply to all users and groups in your organization, you can move on to the next step.
Note: This feature is currently in preview and requires an E5 license to configure.
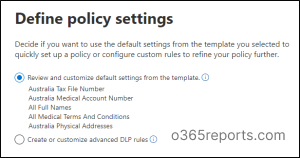
6. Finishing up all this leads to policy settings where you have the option to either select the default rules or create customized rules. Here, we consider the default settings from the template.
⇒While using default templates, you can also edit the sensitive data you want to protect.
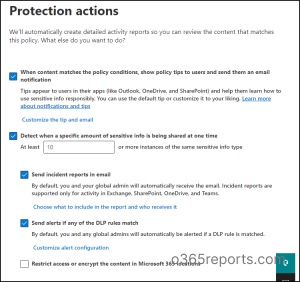
7. Then, the protection actions will set the rule for the policy. You can either choose the default rules or create customized rules. (Here, we consider the default settings from the template.)
8. After completing all the steps, the system will prompt you to test the policy before turning it on to avoid disrupting user productivity and ensure compliance.
How to Create a Custom DLP Policy?
Rather than setting up a default policy, you can opt to create an entire custom DLP policy of your own! By accessing the respective admin center or compliance center, you can configure DLP policies for all Office 365 services, including email and files in SharePoint and OneDrive Business. (Make sure all DLP policies are configured tenant-wide.)
To create a custom DLP policy,
1. Navigate to Microsoft 365 compliance →Data loss prevention.
2. In the “Categories” tab and click the Custom option to create a custom policy.
3. After creating, give the DLP policy a name along with the description.
4. To limit the policy to certain users or groups, you’ll need to assign admin units that is created in Azure AD. If you prefer the policy to apply to all users and groups in your organization, you can move on to the next step.
Note: This feature is currently in preview and requires an E5 license to configure.
4. Next, you have to determine the service locations, where your policy must be enforced. Furthermore, you can customize by including or excluding any group, site, workspace, etc…
5. The policy settings determine the rule to be applied to your policies. Here, admins need to go with the “Create or Customize advanced DLP rules”, which has rich flexibility in configuring rules and enforcement actions.
- Among the 100+ sensitive info types, add the types of sensitive information you’d like to prevent from sharing.
When assigning confidence levels to sensitive info types, make sure to keep the level at medium confidence. Sometimes, high confidence leads to false positives.
- The instance count denotes how many times the sensitive information is suspected in an email or document to be blocked.
It should be set to 1 because it should not permit any confidential data to leave the organization.
6. Next, the setting of the rule comes over. It consists of several conditions and actions that govern how your users can utilize your sensitive data. You can choose according to your preference.
- Monitor – If you only want to audit the behavior over the content but still allow the user to access it.
- Block – Restricts the process completely.
- Override –Restricts activities while allowing users to override if specified conditions are met. Here, the user will receive a policy tip while enclosing such data.
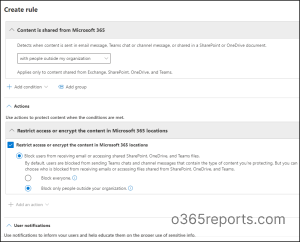
7. After saving the rule with proper conditions and actions, the status of the rule will get turned on.In our case, when a user tries to share content outside your Microsoft 365 organization, the DLP rule performs the following actions:
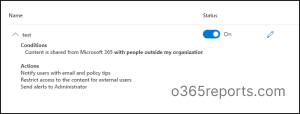
8. Creating DLP policies is simple and effective! Review your settings and take the smart approach by testing before turning it on to reap the benefits of secure data sharing.
How to Create a DLP Policy Using PowerShell?
Even though the UI mode offers a smooth interface to work with, it’s not capable of automating bulk operations! This is where PowerShell comes in and helps us to create a DLP policy at a fast pace.💯
Connect to the Security and Compliance Center PowerShell first to ensure you have the necessary tools and access for an effective DLP policy creation process.
|
1 |
Connect-IPPSSession |
Both MFA-enabled and non-MFA accounts can be managed using this cmdlet. After connecting with the Compliance Center, proceed with the following steps to create a DLP policy using PowerShell.
1. New-DlpCompliancePolicy – Used to create the DLP policy in the Microsoft Purview portal.
- The -Mode parameter denotes the actions and notifications level of the DLP policy.
- Next, determine the locations where to enforce them. The -All parameter enforces the policies across Exchange Online, SharePoint, and OneDrive. Also, you can specify the SharePoint site URL for granular enforcement!
|
1 2 3 4 |
New-DlpCompliancePolicy -Name USFinancialPolicy -Mode Enable -ExchangeLocation All -SharePointLocation All |
2. Set-DlpCompliancePolicy – Used to modify data loss prevention (DLP) policies in the Microsoft Purview compliance portal.
This cmdlet offers a range of parameters, such as ExceptIfOneDriveBy, ExchangeSenderMemberOf, and OneDriveSharedByMemberOf, which allow you to add locations for enforcement. This enables you to further customize your DLP policies beyond the default ‘All’ option.
|
1 2 |
Set-DlpCompliancePolicy -Identity USFinancialPolicy` -Comment "Primary policy applied to SharePoint Online, Onedrive, and Exchange Online locations." |
3. As of now, we have created a DLP policy and defined the locations where it applies. Now, it’s time to create a DLP rule that determines which types of sensitive information should be protected and what actions should be taken when a rule is matched. You can use the “New-DlpComplianceRule” PowerShell cmdlet to create this rule.
New-DlpComplianceRule – Used to create data loss prevention (DLP) rules in the Microsoft Purview compliance portal.
|
1 2 3 4 |
New-DlpComplianceRule -Name SecurityRule ` -Policy USFinancialPolicy ` -ContentContainsSensitiveInformation @{Name="U.S. Social Security Number (SSN) ";minCount="1"} ` -BlockAccess $True |
4. That’s it, the DLP policy is now fully equipped and ready to take charge! Once set up correctly, the DLP policy will appear in the UI and block any tenant user sharing a US Social Security Number.
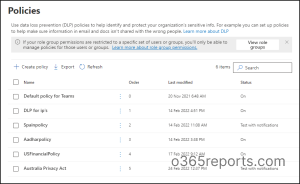
How to View DLP Policy in Microsoft 365?
Viewing the DLP policy allows you to verify the settings and ensure that it is properly configured to protect sensitive data. It also enables you to make any necessary changes to the policy to ensure maximum security while also providing insight into its functionality and impact on your organization’s data protection efforts.
So, navigate to Data loss prevention in the compliance center and select the “Policies” section from the drop down.
How to View DLP Reports?
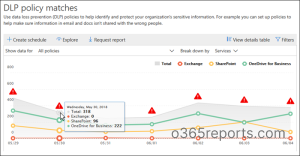
After configuring, you’ll need to monitor the DLP reports of your policy. Viewing DLP reports provides valuable information on incidents, policy violations, and the overall effectiveness of your DLP policy. It can help you identify areas that require improvement, assess the risk level, and take necessary actions to mitigate them. DLP reports also aid in compliance audits and demonstrate due diligence toward protecting sensitive data.
So, to view your DLP policy effects, go to the Reports section in the Microsoft Purview page for detailed visual representation.
With DLP policy reports, you can quickly view
- Number of the rule matches
- Number of the false positives and overrides happened.
You may further narrow down the results by defining a specific policy, rule, or action, as well as a time frame and location.
Shield Your Sensitive Data: Microsoft 365 DLP to the Rescue!
As the cloud continues to expand & provide more avenues for data access, the risk of data loss and unauthorized disclosure increases! Fortunately, with DLP policies in place, admins can ensure compliance and prevent sensitive information from falling into the wrong hands, all without impeding users’ productivity. 💯 Plus, the recently enhanced Test-Message cmdlet makes troubleshooting DLP policy issues a breeze!
Don’t let the fear of data loss hold you back – implement Microsoft 365 DLP today and keep your data safe and secure!