Sharing files and folders with unauthenticated users in SharePoint and OneDrive is a critical aspect of collaboration as it allows anonymous users to access the content without any authentication requirements. When we share links to unauthenticated users, we don’t always recheck the permissions as it is easier and more convenient to share them with others. As a result, the number of accidental/intentional unauthenticated sharing increases📈.
What’s the solution here🤔? Many of us may go for disabling external sharing or turning off Anyone links in SharePoint. Does this completely prevent unauthenticated sharing? In certain scenarios, it does not! and it may even affect productivity. Therefore, it’s essential to understand how to share files securely with anonymous/Anyone links in SharePoint and OneDrive.
We have brought together a few of the security best practices (Find some extra tips below!) for sharing files and folders in SharePoint and OneDrive with unauthenticated users. With these secured sharing settings in place, one can ensure that the files and folders remain secure even in the hands of unauthenticated users.
Before we begin, the first step is to enable the ‘Anyone’ sharing setting in Microsoft 365.
How to Check Whether Unauthorized Sharing is Allowed in Your Organization?
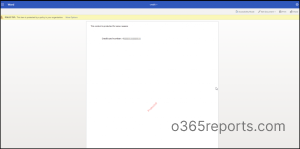
When you try to share a file/folder using Anyone links in SharePoint/OneDrive, you may see that the ‘Anyone with the link’ option is greyed out and the following error shows up.
“Your organization is preventing you from selecting this option”
This is because anonymous sharing is disabled for your organization. To allow users to share files with unauthenticated users, you must enable ‘Anyone links’ for your entire organization and for individual sites or teams using any of the below methods.
Using Microsoft Entra ID:
Sharing is controlled at the highest level in the Microsoft Entra ID admin center. Any configuration made here overrides any sharing setting configured in other places across Microsoft 365. To check whether the sharing setting is enabled.
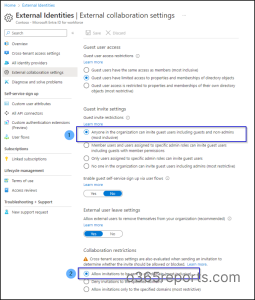
Navigate to Microsoft Entra ID -> External identities -> “External collaboration settings”.
Check the following before proceeding further.
✅ “Anyone in the organization can invite guest users including guests and non-admins” option is selected.
✅ Guest domains that you want to collaborate with aren’t blocked.
Using SharePoint Admin Center:
To grant external access to files and folders stored in SharePoint and OneDrive, specific configurations must be set up within the SharePoint admin center. These settings can be adjusted on both the organization level and the site level.
Organization-level setting:
Navigate to SharePoint admin center -> Policies -> Sharing-> Drag the indicator to “Anyone” -> Save.

Site-level setting:
- Navigate to the SharePoint admin center.
- Under ‘Sites’, choose ‘Active sites’.
- Select the site for which you want to enable ‘Anyone’ links.
- Click on ‘Sharing’-> Select “Anyone” -> Then, Save.
By utilizing the settings in the above Microsoft 365 portals, admins can allow/restrict users from sharing data in OneDrive and SharePoint. Therefore, before proceeding to share data, make sure these settings are configured correctly. Otherwise, users will not be able to share files/folders using Anyone links.
Sharing Files & Folders with Unauthenticated Users in SharePoint and OneDrive
Now, let’s look at some of the best ways to manage SharePoint permissions for secure guest sharing.
- Set expiration for Anyone links
- Set view-only permissions for links
- Set up default link type
- Make use of Data Loss Prevention
- Add copyright information using sensitivity labels
- Turn on safe attachments
- Decide who can share a file, folder, or site
- Block download
- Set passwords
- Share with review mode for Word files
1. Set Expiration for Anyone links
Files shared with unauthenticated users for a longer time may lead to potential risks. This can be solved by just setting expiration dates for the anonymous (Anyone) links while sharing. To do this,
For organization level:
- In the SharePoint admin center, select ‘Policies’-> Sharing in the left menu.
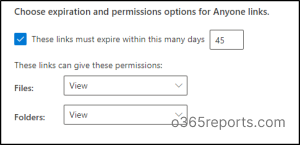
- Select “These links must expire within this many days” under “Choose expiration and permissions options for Anyone links”.
- Type the number of days in the box and click Save.
For site level:
- Navigate to Active sites -> select a site -> Click on the ‘Settings’ tab.
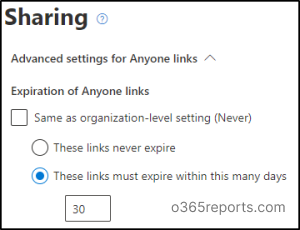
- Select ‘More sharing settings’ -> Find ‘Advanced settings for Anyone links’.
- Uncheck the “Same as organization-level setting” checkbox. This ensures that the site does not adhere to the organization-level settings.
- Under ‘Advanced settings for Anyone links’, select “These links must expire within this many days”, and type the number of days.
- Click save.
You can also set expiration for a specific site using PowerShell by leveraging the following cmdlet.
|
1 |
Set-SPOSite -Identity https://contoso.sharepoint.com/sites/marketing -OverrideTenantAnonymousLinkExpirationPolicy $true -AnonymousLinkExpirationInDays 30 |
After setting expiration, it is also crucial to monitor expired anyone links to ensure effective security, compliance, and access needs.
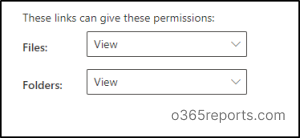
2. Set View Only Permissions for Links:
By default, ‘Anyone links’ allows unauthenticated users to edit the files. If you don’t want them to edit files, you can set ‘View’ permissions for Anyone links by navigating through,
SharePoint admin center -> Policies -> Sharing -> “Choose expiration and permissions options for Anyone links” -> Change permission to “View” for both files and folders.
3. Set up Default Link Type
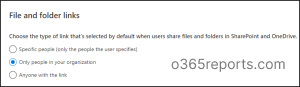
If your organization allows sharing with anyone, the sharing links in SharePoint Online are usually set to “Anyone” by default. So, it’s important to follow sharing link best practices when handling sensitive documents to avoid creating unauthenticated links.
To minimize this risk, you can change the default link setting to ‘Only people in your organization’. It means by default, users within your organization are allowed to access the shared data. If users want to share files with anonymous users, they will need to actively select ‘Anyone with the link’ while sharing.
Setting up Default Link Type at the Organization level:
- Go to the SharePoint admin center-> Policies -> “Sharing.”
- Find “File and folder links” and choose “Only people in your organization.”
- Save the changes.
Setting up Default Link Type at Site level:
To configure the default sharing option for specific sites, do the following.
- In the SharePoint admin center, go to “Active sites.”
- Pick the site you want to change and click on “Sharing.”
- Uncheck the ‘’Same as organization-level setting’’ checkbox.
- Choose “Only people in your organization” and save.
4. Make Use of Data Loss Prevention
To prevent unauthorized sharing of sensitive content in SharePoint and OneDrive, you can use SharePoint DLP. Using DLP, you can set actions to detect sensitive content while sharing files and folders.
For example, to protect sensitive information like credit card numbers in files shared with “Anyone links”, you can create a DLP policy this way.
Step 1: Sign in to the Microsoft Purview admin center.
Step 2: Locate ‘Data loss prevention’ and select ‘Policies’ from the dropdown.
Step 3: Select ‘Create policy’ -> Choose ‘Custom’ -> ‘Custom policy’ -> Name your DLP policy.
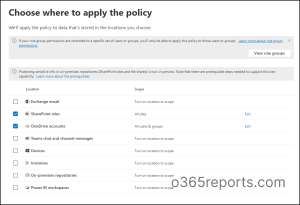
Step 4: On the ‘Choose where to apply the policy’ page, deselect all settings except ‘SharePoint sites’ & ‘OneDrive accounts’ -> Select ‘Next’.
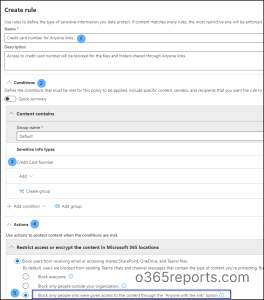
Step 5: On the ‘Custom advanced DLP rules’ page, select ‘Create rule’ -> Name your rule.
Step 6: Under ‘Conditions’, select ‘Content contains’ -> ‘Add’ -> ‘Sensitive info types’-> ‘Credit Card Number’.
Step 7: Under ‘Actions’, select ‘Add an action’ -> ‘Restrict access or encrypt the content in Microsoft 365 locations’.
Step 8: Select ‘’Block only people who were given access to the content through the Anyone with the link” option.
Step 9: Select Save -> Next -> Choose your test options -> Next ->Submit -> Done.
Thus, when people share files and folders from SharePoint & OneDrive that contain sensitive info type (ie., credit card number in our case) to others using ‘Anyone links’, their access will be blocked.
5. Add Copyright Information using Sensitivity Labels
Applying Microsoft 365 sensitivity labels adds a watermark or a header/footer automatically to your organization’s Office documents. In this way, you can make sure that the shared files contain copyright or other ownership information.
6. Turn on Safe Attachments
When you allow anonymous users to upload files, there is a risk of malicious file uploads. With the Safe Attachments in Microsoft 365, you can check email attachments in a virtual space before sending them to others. If a file seems unsafe, you can put it in quarantine to keep everyone’s email safe.
Tip:
You can also create a mail flow rule to encrypt emails that include sensitive file or folder attachments, preventing unauthorized users from accessing sensitive content.
Additional Tips for Sharing Files and Folders with Unauthenticated Users
After you have enabled anonymous sharing, you can also depend on the following settings to avoid uncontrolled sharing in SharePoint Online and OneDrive.
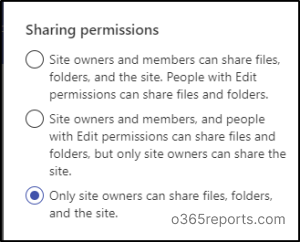
7. Decide who can share a file, folder, or site:
By default, when a user is given Edit permission, they can share documents with others in SharePoint. Subsequently, those recipients can re-share the documents with a third person. You can utilize this option to disable non-owners of the site from resharing SharePoint file, folder, or site. Navigate to your desired SharePoint site -> Settings ->Site permissions -> “Change how members can share” and specify who can share files and folders on that site.
Assigning sharing permission is crucial because if any site is shared with external users, they can create files or folders when the desired permission was given. In such cases, admins should find all the files or folders created by external users to maintain security.
Tip: To enhance control, enable content approval in SharePoint to ensure all new or edited content is reviewed before it’s visible to others. To eliminate manual follow-ups and reduce delays, streamline content approvals in SharePoint Online using Power Automate.
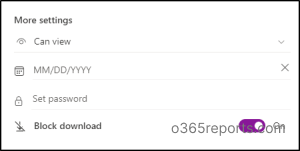
8. Block download:
When you share files & folders in OneDrive or SharePoint, you will have the option to block download under ‘More settings’. This prevents users from downloading the shared files/folders.
However, even if a file is downloaded, extended permissions in SharePoint help maintain control over the file outside the platform.
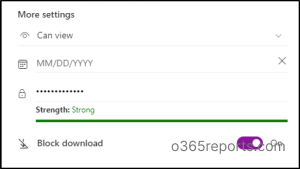
9. Set passwords:
This functionality enables you to secure a shared file or folder by protecting it with a password. The recipient can access the file only after entering the password.
10. Word files:
This option comes in handy, specifically when you share Word files with external users. You can share the file by setting the “Can review” option so that the recipient can only leave comments and suggestions and can’t edit the file. Even if they try to edit the file, the text turns red and details of who edited the document show up when you click the edited text. The content remains unchanged until the file owner accepts the suggestions made by the recipient; only after acceptance, the content has been changed in the file. Additionally, if you need users to have editing permissions while staying informed about changes in real time, consider using SharePoint Alerts alternatives like Power Automate or document library rules.
Points to Remember:
- The site-level sharing settings should not be configured as more permissive than the organization-level settings.
- The OneDrive sharing setting should not be configured as more permissive than the SharePoint setting.
- In SharePoint Online, we cannot share a site or a document library anonymously. It is only possible for files and folders.
- When sharing a folder in OneDrive or SharePoint anonymously, the recipient can download and upload files to the folder. However, they are not allowed to delete the files even if the user has ‘Edit’ permission and uploaded any file by themselves.
- Knowing the difference between Share and Copy Link is crucial, as it determines permissions and helps control external access when sharing files with unauthenticated users.
I hope this blog will help you with limiting external sharing in SharePoint and OneDrive and planning secured sharing with unauthorized links. While it’s important to manage external sharing settings, keeping track of how much storage your SPO libraries are consuming is equally important to ensure that space isn’t being wasted on unnecessary or oversized files.Thanks for reading. Feel free to reach us in the comment section for any queries.


