Microsoft Teams is a chat-based collaboration platform that enables users to share documents, conduct online meetings, make voice/video calls, and more. It becomes the most unavoidable communication tool nowadays, because of the wide usage of its meeting and calling functionalities in this pandemic period. To enhance the user experience with Teams, Microsoft keeps improving the meeting and calling features. They have recently introduced the policy parameter for controlling the 1:1 call recording independently of Teams Meeting Recording.
A Glimpse of the Blog
Why Teams Recording Is Important?
Recording a call, meeting, or an event will be helpful for users to recollect it in the future. Also, the recording file can be shared with any users within and outside the organization. So, it will also be helpful for a newbie to refer to the previous discussions when required.
How to Enable Teams 1:1 Call Recording?
Microsoft has introduced the Teams 1:1 call recording feature last year. Since then, it was controlled by the Teams Meeting Policy parameter, AllowCloudRecording. With effect from 31st May 2021, 1:1 call recording is handled separately by a new parameter in Teams Calling Policies, AllowCloudRecordingForCalls. By default, it is disabled. The ‘start recording‘ button will be greyed out for the users, until the call recording feature is enabled for them. It can be done by the following ways.
- Enable Teams 1:1 call recording through Teams admin center
- Enable 1:1 call recording through PowerShell
Method 1: Enabling 1:1 Call Recording Through Teams Admin Center
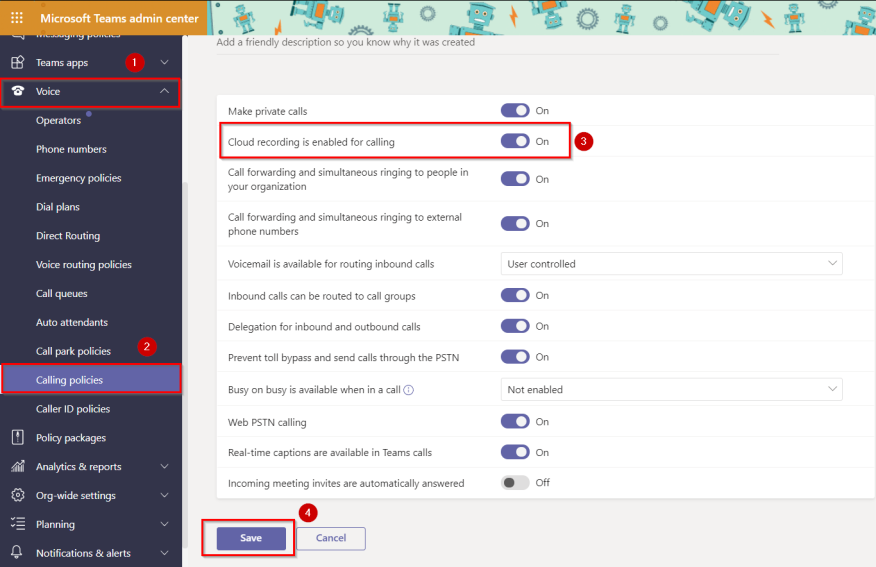
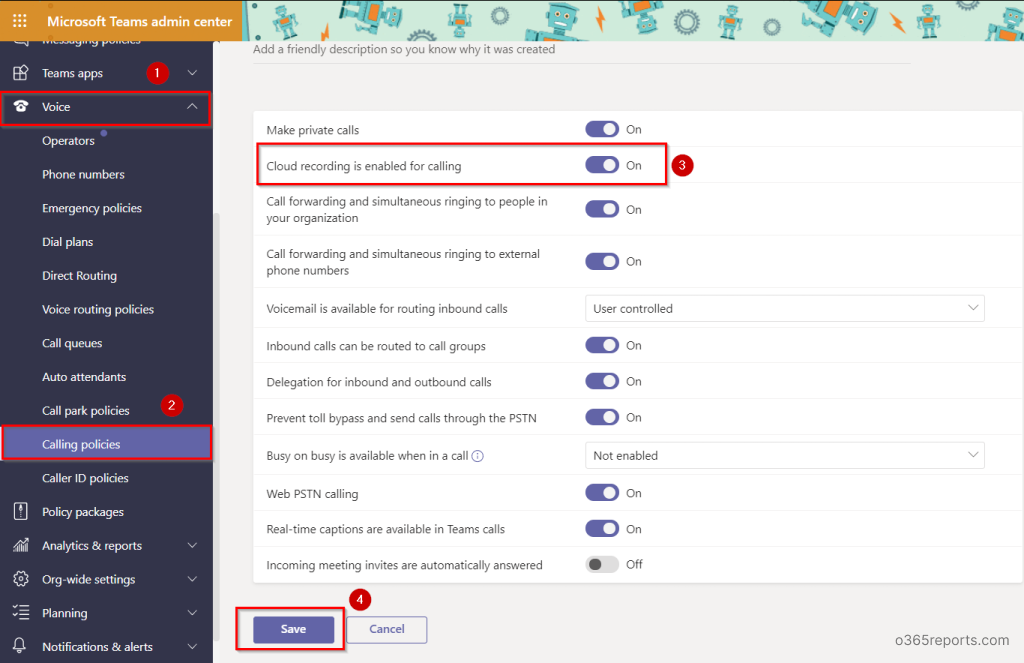
- Go to the Teams Admin Center.
- Click on the ‘Voice > Calling policies’ tab from the left pane.
- Choose a calling policy to which you want to enable call recording.
- Toggle on the attribute, Cloud recording is enabled for calling and click ‘Save’.
Method 2: Enabling Teams 1:1 Call Recording Through PowerShell
You can follow the below steps to turn on Teams 1:1 call recordings.
Step 1: Install Microsoft Teams PowerShell Module (If you haven’t installed it yet)
|
1 |
Install-Module -Name MicrosoftTeams -Force –AllowClobber |
You can also use the PowerShell script to connect all Microsoft 365 services with a single cmdlet.
Step 2: Connect your PowerShell to Microsoft Teams Administration portal by providing credentials.
|
1 |
Connect-MicrosoftTeams |
Step 3: Enable the Call recording feature for a teams’ calling policy – Here I am enabling it for a Global Policy.
|
1 |
Set-CsTeamsCallingPolicy -Identity Global -AllowCloudRecordingForCalls $True |
Below is the cmdlet to be used in case of any custom teams calling policy.
|
1 |
Set-CsTeamsCallingPolicy -Identity <Custom Policy Name> -AllowCloudRecordingForCalls $True |
Note: If you have Teams PS module already, you can run the below cmdlet to update the module to the latest version.
|
1 |
Update-Module MicrosoftTeams |
How to Assign a Teams Calling Policy to Users?
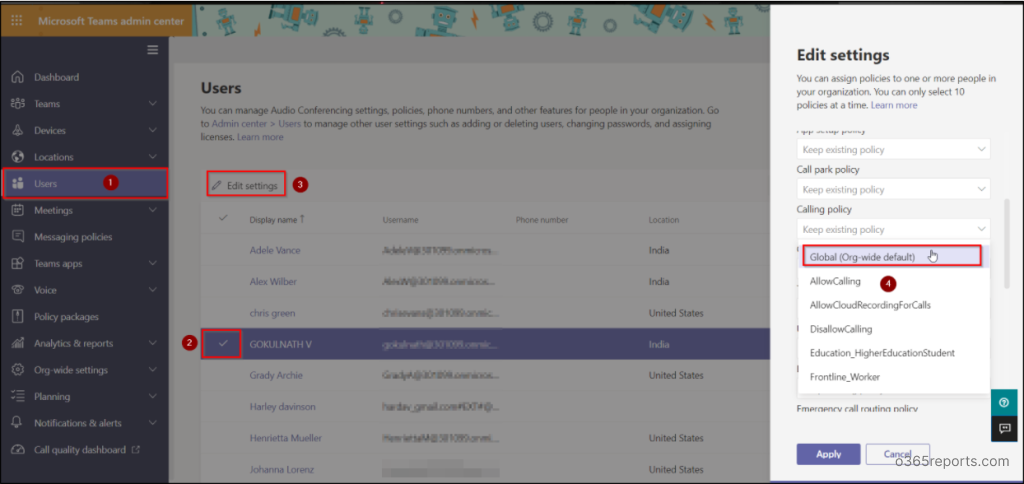
If you have enabled the teams 1:1 call recording feature for a Microsoft Teams calling policy, users or groups previously assigned with the policy will get a privilege to record 1:1 calls. You can assign these policies to users in the following ways.
Policy Assignment to Users through Teams Admin Center
- Go to the Teams Admin Center.
- Click on the ‘Voice > Calling policies’ tab from the left pane.
- Choose the policy and click on ‘Manage users’.
- Search for the users in the search bar and ‘Add’ them.
- Once finished adding the required users, click ‘Apply’.
Policy Assignment to Users Through PowerShell
Assign the calling policy with cloud recording feature enabled, to specific users by using the below cmdlet.
|
1 |
Grant-CsTeamsCallingPolicy -identity "<UserPrincipalName>" -PolicyName <UserPolicyName> |
Note:
- You cannot assign a ‘Global (Default) policy’ to users using PowerShell.
- If you enabled Microsoft Teams 1:1 call recording privilege for a Global policy and want to assign this policy to users, use Teams Admin Center.
- You can follow the same way to assign Microsoft Teams Meeting Policy.
How Does Teams 1:1 Call Recording Work?
Once you’ve enabled this feature, you can record 1:1 calls in Teams. The recording will be done in the same way as the meeting recording. After the recording gets started, the user on the other end of the call will be notified. The recording link will be available on the chat screen of both the users, once the recording has been stopped.
Where Are Microsoft Teams Recordings Stored?
Secured Cloud Storage
By default, 1:1 call recordings are stored in the Recordings folder of the user’s OneDrive account who initiated the recording. With these cloud storage functionality, Microsoft Teams makes way for secure sharing of the recording within and across your organization. Refer this blog, to know the exact places to find your stored Teams data.
Video Permissions
Generally, the person who initiated 1:1 call recording will have full rights to the recorded video. The person on the other side of the call will have ‘read-only’ access to the recorded video in case of an internal call, and ‘no access’ in case of an external call. The recording has to be manually shared with the users having no access. Before sharing, make sure that your organization allows external sharing. Then, you can navigate to ‘your One-Drive > Recordings’, and share the recording with the specific user.
Things You Might Note!
In some scenarios, this feature can violent the compliance. So, admins should think about the following before enabling this policy.
- This recording feature does not apply to any OOB (Out of the Box) calling policies. (Create custom policy and enable ‘AllowCloudRecordingForCalls’ in this case).
- As of now, the Teams 1:1 PSTN call recording feature works only for Web PSTN calling.
- This feature does not affect the 1:1 Compliance recording. It is still controlled via Compliance recording policy.
Likewise, you can configure Microsoft Secure Score recommended Teams configurations for more secured collaboration.
I hope this blog will help you to get a clear idea about the 1:1 call recording update and its usage. Feel free to drop your queries in the comment section.
