SharePoint Online is one of the vital office 365 apps, which plays the most important role in protecting the documents of your organization. Being the centralized repository for your organization’s files and folders, SharePoint Online manages and shares documents inside your organization as well as remotely for collaborative working.
Sharing your documents and contents outside your organization is often needed for collaboration with your external vendors, customers, consultants, etc. This is why enabling and auditing external sharing for a SharePoint Online site needed more focus, especially in the case of sharing documents with sensitive information. This blog provides you the ways and means to enable SharePoint Online External Sharing in more effective methods.
Note: You must be a ‘Global Administrator’ or a ‘SharePoint Administrator’ to configure these settings.
Before You Start
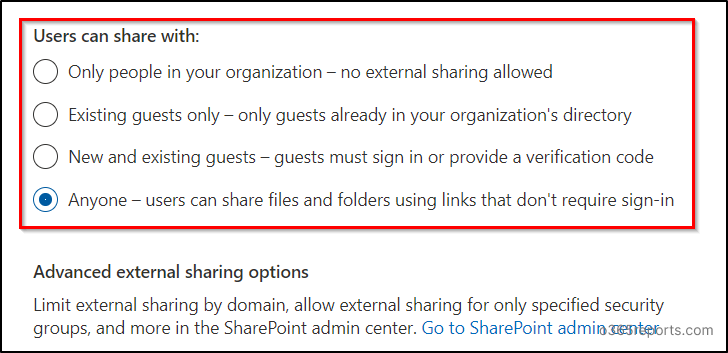
You can set the external sharing permissions for SharePoint Online at four different levels.
Anyone: This is the non – restrictive permission level one can set for external sharing. Files and Folders in the sites set to this permission level can be shared with anyone that doesn’t require any sign-in. That is why this sharing is always known as Anonymous sharing.
New and Existing guests: With this permission level set to your site, the files and folders can be shared with existing guests in your directory and new guests only. You can prefer this sharing permission, if you want to audit external user file access in a more effective way.
Existing guests: Use this permission level to share SharePoint documents only with the guests already in your organization’s directory.
Only people in your organization: This is the most restrictive permission level. It doesn’t allow you to share your site documents externally. It only allows sharing within the organization.
How to Configure External Sharing in SharePoint Online?
You can set the external sharing configuration for SharePoint either through Admin Center or PowerShell. Also, you can enable it for entire organization or specific site collection. Let’s see all the methods here.
Method 1: Configure External Sharing from admin center
- Configure Tenant-wide External Sharing Setting (Tenant level)
- Enable External Sharing for Specific Site (Site level)
Method 2: Configure external sharing using PowerShell
- Configure organization-level external sharing setting (Tenant level)
- Turn on external sharing settings for a site collection (Site level)
Note: Individual site permission level cannot be less restrictive than the Global permission level.
Ex: If the permission level for external sharing is set at ‘New and Existing guests‘ at global level, you cannot set an individual site to ‘Anyone’ permission level, which is less restrictive than the global configuration.
SharePoint Online External Sharing Access – Tenant Level
To set the sharing level of your site without considering any advanced features,
- Go to Microsoft 365 Admin center and sign in with your Global admin account.
- In the left pane, under Settings > Org settings, click SharePoint.
- Choose the external sharing permission type you wish to set, and click Save.
Advanced External Sharing Options
- To enable external sharing setting with many advanced features, login to SharePoint admin center or click on ‘Go to SharePoint Admin center‘ found at the bottom of the previous image and perform the following.
- In the left pane, under Policies > Sharing.
- You can adjust the indicator by sliding and placing it to the external sharing permission type you needed.
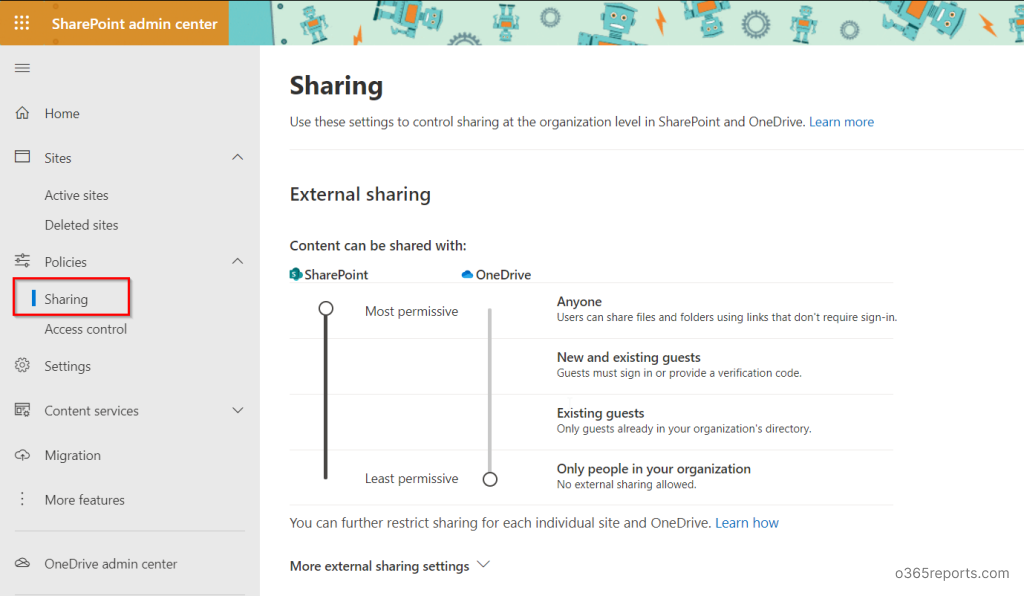
More External Sharing Settings
Refer to the bottom of the previous image to find “More external sharing settings”. Expanding the setting will display the following features.
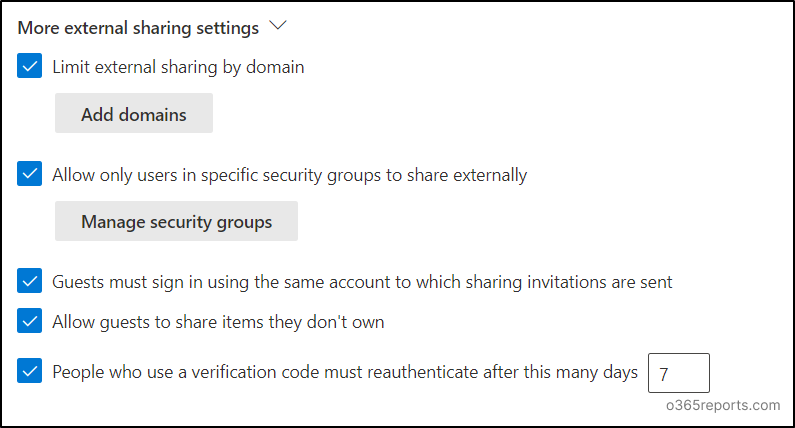
1.Limit external sharing by domain:
This option allows you to set which domains you want to / need not to share your SharePoint site with. You could add domains in Allowed and Blocked lists for your external sharing.
Note: The above limitations will not apply when users share files and folders using Anyone links.
2.Allow only users in specific security groups to share externally:
By enabling this feature, you could limit the external sharing authority to users of specific security groups. (i.e., No other than the specified people could share externally). You could also set the security group to share the site with anyone or with authenticated guests.
3.Guests must sign in using the same account to which sharing invitations are sent:
Enable this option if you want the external users to sign in with the same account to which the invitation has been sent. If you don’t enable this, the invited users could access the invitation with any preferred account. But there’s not much to worry about, as in both cases, the invitation will expire after they redeem once.
4.Allow guests to share items they don’t own:
Enabling this option depends on the type of documents on the site. Because this option allows guest users to share the contents in the site (which they don’t own) to share externally.
5.People who use a verification code must reauthenticate after this many days:
Enable this feature and set the number of days after which the user has to reauthenticate if the site has been shared with New and existing guest user link.
Default Link Sharing Type
Go to the ‘Files and folders’ section in the SharePoint admin center Sharing page. Choose how links should be shared by default, when a user shares files and folders. This default sharing selection doesn’t mean that the link should be shared in that type only. They could also change the sharing type while sharing.
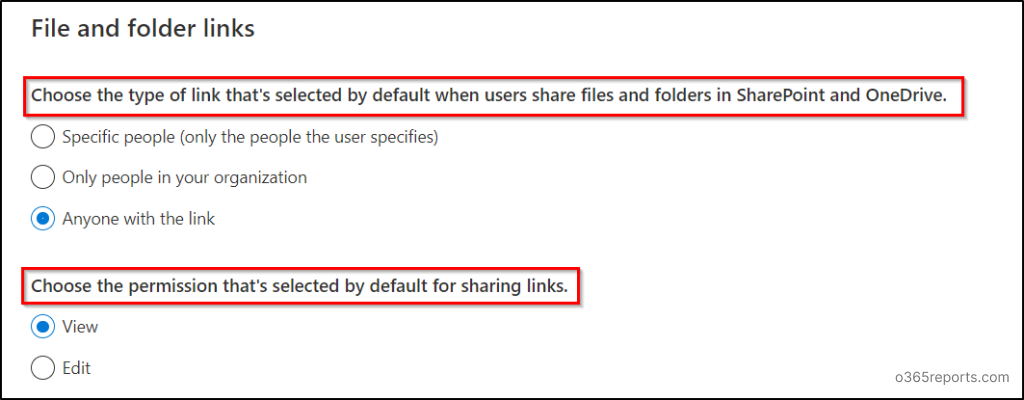
The below-attached image shows how the default sharing settings work during sharing. The default setting will be automatically selected, but you could change your preferences here.
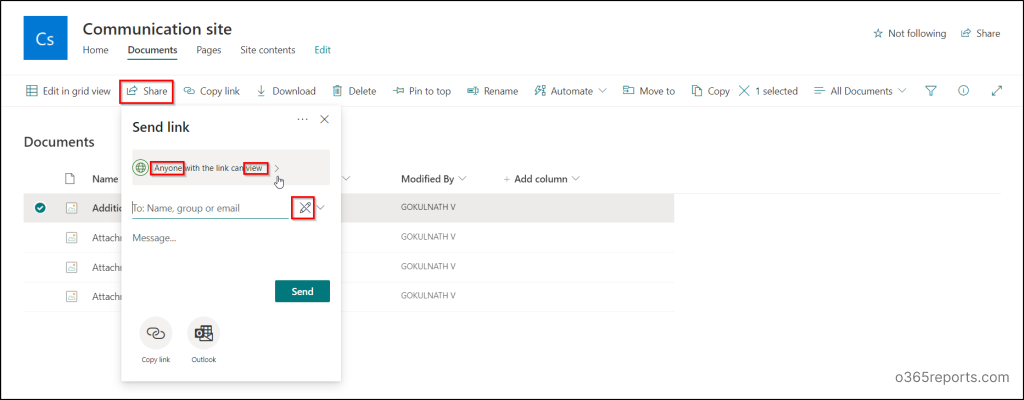
Note: It’s recommended to enable ‘Anyone’ sharing links only for specific sites that are meant to face the external world. Also, regularly monitor anonymously shared links to understand what content is accessible without authentication.
External Sharing Configurations for Anonymous Links
Use these features to share the files and folders through anonymous links more securely. (Applicable only for Anyone links)
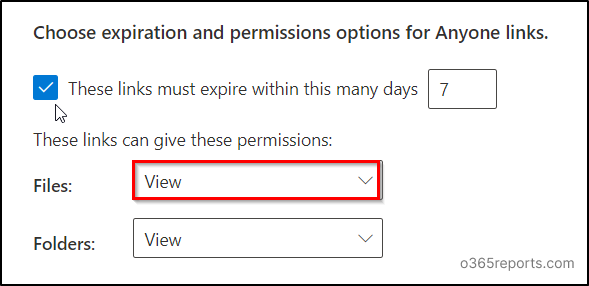
You can choose to share the files in [View/ View and Edit] mode and folders in [View/ View, edit, and Upload] mode. You can also set the active days for the link so that it will expire after that. But don’t forget to regularly identify and review all expired anonymous links to ensure they no longer grant access and maintain robust security.
Other Sharing Settings
These settings are not a direct configuration to set policies for external sharing. But these features will be providing additional support to the owners of the site in managing and sharing files and folders.

SharePoint Online External Sharing Access – Site Level
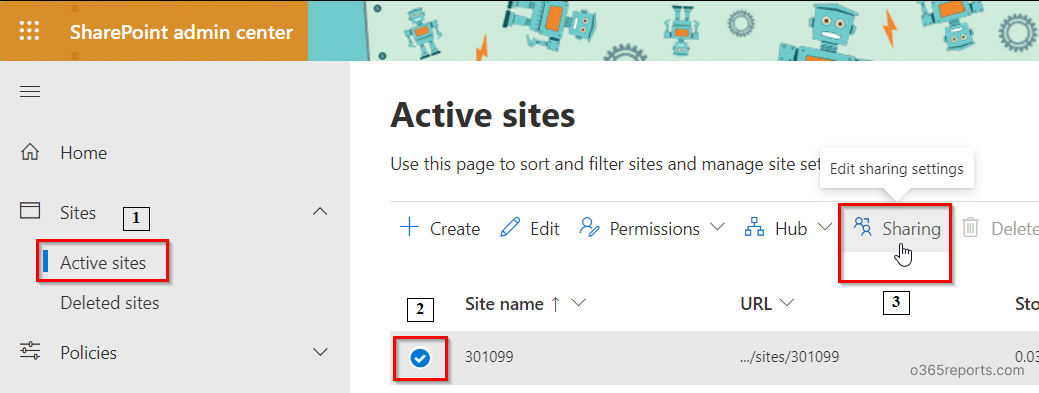
To enable external sharing settings to each site individually,
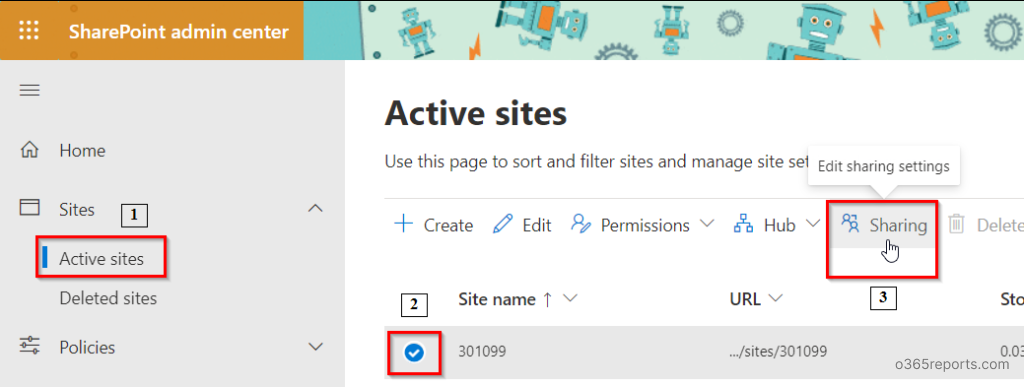
- Go to SharePoint Admin center and sign in with your Global Administrator account (or) SharePoint Administrator account.
- In the left pane, under sites, select ‘Active sites’.
- Select a site and click the ‘Sharing icon’ that appears above.
- Upon clicking you could find the setting page where you could see all the external sharing features.
- These features are similar to those we discussed in ‘More External Sharing Settings’ above in the blog. You can refer to the same.
Enable External Sharing Using PowerShell – Tenant Level:
Enable Tenant level external sharing for your SPO through PowerShell using the following cmdlets.
Connect SharePoint online to PowerShell using the below-given cmdlet.
|
1 |
Connect-SPOService -url https://<HostName>-admin.sharepoint.com/ |
Set the sharing level for your tenant by using the below-given cmdlet.
|
1 |
Set-SPOTenant -SharingCapability <PermissionLevel> |
You can choose any one of the following permission level based on your organization’s need.
- ExternalUserAndGuestSharing – sets the permission level to Anyone
- ExternalUserSharingOnly – sets the permission level to New and Existing guests
- ExistingExternalUserSharingOnly – sets the permission level to Existing guests
- Disabled – sets the permission level to Only people in your organization
Note: To use Connect –SPOService, the SPO PowerShell module must be installed. You can Install and Connect SharePoint Online PowerShell using PowerShell script or try install manually.
Enable External Sharing Using PowerShell – Site Level:
You can enable site level external sharing for your SPO sites through PowerShell, by using the following cmdlet.
|
1 |
Set-SPOSite -Identity <Site url> -SharingCapability <PermissionLevel> |
Till now, we have seen how to enable external sharing in SharePoint Online in different ways and additional sharing settings. Not only configuration but also limiting external sharing by blocking essential settings becomes crucial for securing organization data.
Efficiently Audit External Sharing Configuration with AdminDroid
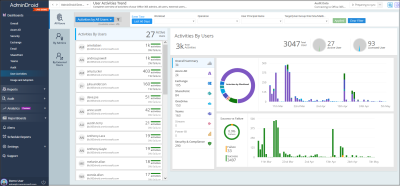
AdminDroid provides crystal clear metrics on sharing in SharePoint Online, which helps to investigate each external sharing deeply with adequate details. Let’s see the list of reports given below for auditing external sharing as well as external user activities on resources from AdminDroid SharePoint Online auditing tool.
- Files shared to external users
- File/folder accesses by external users
- Files shared by external users
- Site invitations shared to external users
- Access request approvals
- Anonymous link creations
- Anonymous link modifications
- Anonymous link accesses
- Anonymous user activities
Monitoring these activities periodically will improve your resource management and prevent sensitive data from being exposed. In addition to that, enhance your SharePoint Online management to protect your sensitive data and spot out suspicious activities asap with AdminDroid.
What Makes AdminDroid Tops the List of Microsoft 365 Reporting Tools?
- Use 1600+ reports and 30+ insightful dashboards to visualize a bird’s eye view as well as ground-level view of your Microsoft 365 environment.
- Get alerts for crucial activities to respond to threats quickly.
- Schedule your required reports to monitor data instantly from your email.
- Filter the report data to get the desired results.
- Utilize compliance report bundles for fulfilling compliance standards.
It’s not the end! The above points are a few of the highlights of AdminDroid. Explore AdminDroid Office 365 reporter now and analyze every feature it delivers to solve admin’s problems.
We hope that this blog will provide you better clarity on setting External Sharing Permissions for your SharePoint site and managing them effectively. Similarly, you can also configure external sharing in Microsoft OneDrive. That’s it! Post your queries in the comment section. We would love to help you.

