
When organizations need to manage information about external vendors, stakeholders, or customers, Active Directory contacts become essential. These non-security principals store details about external users, such as email addresses, phone numbers, company information, and other attributes in the Global Address List (GAL). This helps users easily find and communicate with people outside the organization.
However, when contacts are not handled properly, the directory can quickly become cluttered with outdated or duplicate entries. This leads to communication delays, confusion among users, and increased effort for admins to maintain an accurate and organized directory.
To make things easier, we have developed a PowerShell script that simplifies Active Directory contact management, helping admins to maintain an accurate and organized directory.
How to Manage Contacts in Active Directory
Before moving to the script, let’s look at some of the commonly used tools to manage contacts in Active Directory. While each method can help admins perform contact management tasks, they differ in terms of functionality, scalability, and ease of use.
Active Directory Users and Computers: The Active Directory Users and Computers (ADUC) console is commonly used to create, update, and manage contacts through a graphical interface. It is simple and effective for basic, day-to-day administration tasks. However, it becomes time-consuming and inefficient when handling bulk contact operations, as admins should perform most actions manually on individual contact accounts. This makes the process slow and impractical in larger environments.
Active Directory PowerShell: PowerShell is one of the most efficient ways to manage Active Directory contacts, especially in large environments. Unlike graphical tools, Active Directory PowerShell supports bulk operations and lets admin automate repetitive tasks easily. However, managing contacts with PowerShell requires multiple cmdlets and additional effort to validate changes, handle exceptions, and maintain audit records.
To overcome these limitations, we developed a PowerShell script that supports 12 key operations to simplify Active Directory contact management, covering everything from creation and updates to removal. By using this single script, admins can streamline the entire lifecycle of contacts in Active Directory.
Download Script: ADContactManagement.ps1
Script Highlights:
- Performs 12 actions to manage Active Directory contacts.
- Supports bulk contact management for all actions using CSV input files.
- Allows you to perform multiple actions in a single execution.
- Enables you to run a specific contact management action directly.
- Automatically installs the Active Directory PowerShell module if it is not already installed.
- Exports the execution results to a CSV log file for easy tracking and review.
Active Directory Contact Management – Script Execution Methods
Follow the steps below to run the Active Directory contact management script:
- Download the PowerShell script and save it locally on your Windows.
- Open Windows PowerShell and navigate to the script location.
- Choose any of the execution methods below based on your requirements.
Method 1: Execute the Active Directory Contact Management Script Interactively
|
1 |
.\ADContactManagement.ps1 |
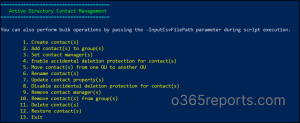
This format launches an interactive menu, listing all the Active Directory contact management actions supported by the script. Simply select the desired action, provide the required details, and run it.
After execution, it automatically generates a CSV report containing details such as the OU path, contact name or distinguished name, errors, and other relevant information.
Method 2: Run the Script for a Specific Contact Management Action
When you need to perform a specific management action without loading the full interactive menu, you can use the -Action parameter as shown below.
|
1 |
.\ADContactManagement.ps1 -Action 1 |
Along with this parameter, specify the action number corresponding to the operation you want to perform. This allows you to skip other prompts and execute the selected actions directly.
Method 3: Bulk Manage Active Directory Contacts
To manage multiple Active Directory contacts in bulk, you can run the script with the -InputCSVFilePath parameter.
|
1 |
.\ADContactManagement.ps1 -InputCSVFilePath <InputFilePath> |
Replace <InputFilePath> with the path to your input CSV file to perform bulk contact management actions.
After execution, the script displays all available actions and allows you to select the required operation to be performed on the inputs specified in the CSV file.
Method 4: Run Multiple Active Directory Contact Operations in a Single Execution
By default, the script terminates after performing a single action. If you need to execute multiple actions in a single run, you can execute the script with the -MultiExecutionMode parameter.
|
1 |
.\ADContactManagement.ps1 -MultiExecutionMode |
This helps perform all required actions within a single session, eliminating the need to rerun the script for each operation. Once all actions are completed, the script generates a single consolidated log file containing the execution results and other relevant details.
Method 5: Execute Active Directory Contact Management with Credential Authentication
By default, the script uses the credentials of the currently signed-in user to perform Active Directory contact management operations. If you need to execute the script using a different account, you can specify alternate credentials through the -Username and -Password parameters.
|
1 |
.\ADContactManagement.ps1 -Username <Username> -Password <Password> |
Replace <UserName> and <Password> with the credentials of an account required to perform the operation.
Note: When running the script from a workstation, you are required to provide domain credentials using the -Username and -Password parameters to ensure the script can authenticate and connect to the appropriate Active Directory environment.
Manage Active Directory Contacts: Get the Most from the Script
The script combines a wide range of Active Directory contact management capabilities into a single solution, supporting both single and bulk operations. Below are the use cases you can implement using the script.
- Create new contacts in Active Directory
- Add contacts to Active Directory groups
- Set a manager for contacts in Active Directory
- Protect contacts from accidental deletion in Active Directory
- Move contacts from one OU to another in Active Directory
- Rename contacts in Active Directory
- Update contact properties in Active Directory
- Disable accidental deletion protection for AD contacts
- Remove managers from Active Directory contacts
- Remove Active Directory contacts from groups
- Delete contact objects from an Active Directory domain
- Restore deleted Active Directory contacts
1. Create New Contacts in Active Directory
This script allows you to create new Active Directory contacts in the specified target OU. Run the script as follows to create a contact in Active Directory.
|
1 |
.\ADContactManagement.ps1 -Action 1 |
This format prompts you to enter the name of the new contact and the path of the Organizational Unit (OU) where it should be created.

Once executed, this script generates a log file containing details such as the event time, new contact name, OU path, status, and error messages.
Output Log:
 To create multiple AD contacts at once, run the PowerShell script with the parameter –InputCSVFilePath as shown below.
|
1 |
.\ADContactManagement.ps1 -Action 1 –InputCSVFilePath <InputFilePath> |
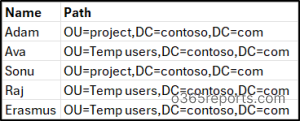
Replace <InputFilePath> with the actual path of the input CSV file and ensure it contains the columns Name and Path with the required details.
2. Add Contacts to Active Directory Groups
To streamline communication with external recipients, contacts can be added to Active Directory groups such as mail-enabled security groups or distribution lists. This ensures external vendors, partner, stakeholders are automatically included in relevant team updates and email broadcasts.
Run the script as follows to add external contacts to a distribution group or security group in Active Directory.
|
1 |
.\ADContactManagement.ps1 -Action 2 |
This script prompts you to enter the distinguished name of the contact and the target group.
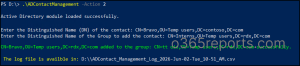
After adding the contacts to the specified group, the script generates a log file to track the execution details, ensuring proper auditing and easy troubleshooting.
Output Log:

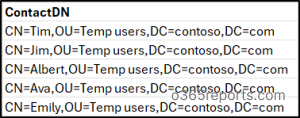
This PowerShell script allows you to add multiple contacts to multiple groups in bulk using a CSV file, eliminating the need for manual updates. Create a CSV file with the columns ContactDN and GroupDN, and populate them with the distinguished names of the contacts and the respective groups.

Then, execute the script with the -InputCSVFilePath parameter to add AD contacts to groups in bulk.
|
1 |
.\ADContactManagement.ps1 -Action 2 –InputCSVFilePath <InputFilePath> |
Replace <InputFilePath> with the actual path to the CSV file. This makes bulk group membership management more efficient and less time-consuming, supporting the following scenarios:
- Add a single contact to multiple groups.
- Assign multiple contacts to a single group.
- Map multiple contacts to multiple groups.

3. Set a Manager for Contacts in Active Directory
Active Directory contacts often represent external stakeholders whose information can change over time. Assigning a manager indicates who is responsible for the contact, helping maintain clear ownership within the directory.
To assign manager for an Active Directory contact, run the script as follows:
|
1 |
.\ADContactManagement.ps1 -Action 3 |
Then, enter the distinguished name of the contact and the manager to be assigned to the contact.
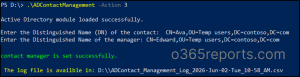
Output Log:
![]()
To assign managers in bulk, prepare a CSV file with the columns ContactDN and Manager, and populate it with the distinguished names of the contacts and their respective managers.
 Then, run the script with the -InputCSVFilePath parameter to assign managers for multiple contact objects in a single execution.
|
1 |
.\ADContactManagement.ps1 -Action 3 –InputCSVFilePath <InputFilePath> |

4. Enable Accidental Deletion Protection for Contacts in Active Directory
In large environments, a contact in Active Directory can be accidentally deleted during bulk cleanup or routine administrative changes. This can lead to issues such as disruption of email routing or broken communication references.
To prevent such issue, you can enable the Protect Object from Accidental Deletion option on critical contact objects in AD. This adds an extra layer of protection and helps ensure that important contacts are not unintentionally deleted.
Run the script as follows to protect a contact from accidental deletion in Active Directory.
|
1 |
.\ADContactManagement.ps1 -Action 4 |
When prompted, enter the distinguished name of the contact to prevent accidental deletion.

Output Log:
![]()
To enable accidental deletion protection for multiple contacts, create a CSV file with a column named ContactDN containing the distinguished names of all contacts.
Then, replace <InputFilePath> with the path to your CSV file and run the script as shown below.
|
1 |
.\ADContactManagement.ps1 -Action 4 –InputCSVFilePath <InputFilePath> |
5. Move Contacts from OneOU to Another in Active Directory
When reorganizing Active Directory objects, admin often need to move contacts between Organizational Units to reflect departmental changes, location updates, or broader restructuring. However, performing these moves manually can become complex in large environments and increases the risk of placing contacts in incorrect OUs.
Additionally, contacts protected from accidental deletion cannot be moved until the protection is temporarily disabled. In such cases, admins must first remove the “Protect Object from Accidental Deletion” setting before relocating the contact and re-enable it afterward if required. This script helps simplify the process of moving contacts between OUs.
Execute the script as follows to move contacts from one OU to another in Active Directory.
|
1 |
.\ADContactManagement.ps1 -Action 5 |
This prompts you to enter the distinguished name of the contact and the target OU path. If the contact is protected from accidental deletion, the script detects it and prompts you to temporarily disable the protection. After moving the contact, the script allows you to re-enable the protection to help maintain contact’s security.

Output Log:

As organizations evolve, multiple contacts may need to be moved between different OUs to reflect ownership changes and ensure proper traceability within Active Directory. To move multiple contacts in bulk, create a CSV file with the columns ContactDN and TargetOUPath.

Then, run the script with –InputCSVFilePath parameter as follows to move multiple contacts between OUs in Active Directory.
|
1 |
.\ADContactManagement.ps1 -Action 5 –InputCSVFilePath <InputFilePath> |

6. Rename Contacts in Active Directory
Contact names in Active Directory are not static and may need to be updated due to name corrections, organizational changes, or naming standardization. Performing these updates through the Active Directory UI can be time-consuming, especially when navigating object properties manually. This script simplifies the process by allowing contact names to be updated in just a few steps.
To rename an Active Directory contact, run the script as follows:
|
1 |
.\ADContactManagement.ps1 -Action 6 |
The script prompts you to enter the contact’s distinguished name (DN) and the new full name of the contact. After the operation is completed, a CSV log file is generated containing the details and status of the rename action.

Output Log:

When multiple contact names need to be updated due to company rebranding, naming convention changes, or data corrections, renaming each contact individually can be time-consuming and prone to errors. To rename multiple Active Directory contacts at once, prepare a CSV file with the columns ContactDN and NewName. Then, populate the file with the distinguished name of each contact and its corresponding full name.

Next, run the script using the -InputCSVFilePath parameter to rename multiple Active Directory contacts in bulk.
|
1 |
.\ADContactManagement.ps1 -Action 6 –InputCSVFilePath <InputFilePath> |
7. Update Contact Properties in Active Directory
Incorrect or outdated contact details in Active Directory can result in missed communications, unnecessary delays, and difficulty reaching the right personnel. Information such as phone numbers, office locations, and department assignments must remain accurate to avoid operational inefficiencies. Regular updates help maintain a reliable and consistent directory for all users.
To modify Active Directory contact properties, run the script as follows:
|
1 |
.\ADContactManagement.ps1 -Action 7 |
The script prompts you to provide the distinguished name of the contact, the operation you want to perform (Add, Remove, Replace, or Clear), the property you want to update, and the value for the property.
 Note: Ensure the property name matches exactly as it appears in the Active Directory Attribute Editor.
Output Log:
![]()
If you want to update properties for multiple contacts, prepare a CSV file with the following columns:
- ContactDN – The distinguished name of the contact you want to update
- PropertyToUpdate – LDAP attribute name of the contact property
- Value – The value to be added, removed, or set for the specified attribute
- OperationToPerform – Choose between the 4 actions (Add, Remove, Clear, or Replace)
Then, execute the script as follows to update all contact properties in Active Directory.
|
1 |
.\ADContactManagement.ps1 -Action 7 -InputCSVFilePath "<InputFilePath>" |

8. Disable Accidental Deletion Protection for AD Contacts
Admins often enable Protect Object from Accidental Deletion on critical Active Directory contacts to safeguard them during routine maintenance or bulk cleanup. However, there are scenarios where a protected contact must be deleted, moved, or reorganized as part of administrative tasks.
In such situations, the protection must be temporarily disabled before the action can be performed. To remove accidental deletion protection from a contact, run the script as shown below and provide the distinguished name (DN) of the contact when prompted.
|
1 |
.\ADContactManagement.ps1 -Action 8 |

This format disables the accidental deletion protection for the specified AD contact.
Output Log:
![]()
To disable deletion protection for contacts in bulk, prepare a CSV file with all the distinguished names of target contacts under the ContactDN column. Then, run the script using the -InputCSVFilePath parameter to handle the operation at scale.
|
1 |
.\ADContactManagement.ps1 -Action 8 -InputCSVFilePath "<InputFilePath>" |
9. Remove Managers from Active Directory Contacts
When a manager leaves the organization or is no longer responsible for a contact, it is important to update the contact’s ownership information to maintain accurate records. Run the script as follows to remove the manager assigned to a contact in Active Directory.
|
1 |
.\ADContactManagement.ps1 -Action 9 |
Next, enter the distinguished name of the required contact from whom you want to remove the assigned manager. 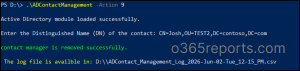
Output Log:

During HR changes, project closures, or bulk directory cleanup, admins may need to remove manager assignments from multiple contacts at once. To support such bulk updates, prepare a CSV file with the column ContactDN. Then add the distinguished names of the required contacts to remove managers.
Next, run the script using the -InputCSVFilePath parameter to remove managers for all the specified contacts.
|
1 |
.\ADContactManagement.ps1 -Action 9 -InputCSVFilePath "<InputFilePath>" |
10. Remove Active Directory Contacts from Groups
Contacts are often added to Active Directory groups to receive organizational communications and updates. When those contacts no longer require group membership, retaining them in the group can result in unnecessary emails and outdated memberships.
To remove a contact from an Active Directory group, run the script as below:
|
1 |
.\ADContactManagement.ps1 -Action 10 |
Enter the distinguished name of the contact and the target group from which it should be removed.

Output Log:
![]()
In large environments, admins often need to remove multiple contacts from groups during cleanup activities such as project closures, external collaboration completion, or retirement of unused contacts. Manually updating each contact group membership can be time-consuming and prone to inconsistencies. To ensure accurate Active Directory group membership, this script supports bulk contact removal using a CSV file containing the ContactDN and GroupDN columns.

Provide the distinguished name of both the contact and the target group. Then, execute the following script to remove contacts from multiple Active Directory groups.
|
1 |
.\ADContactManagement.ps1 -Action 10 -InputCSVFilePath "<InputFilePath>" |

11. Delete Contact Objects from an Active Directory Domain
When contacts become outdated or no longer required, it is important to remove them from Active Directory. Retaining unused contacts can clutter search results and complicate audits. To remove an Active Directory contact, run the script as follows.
|
1 |
.\ADContactManagement.ps1 -Action 11 |
Provide the distinguished name of the contact when prompted. If accidental deletion protection is enabled, the script will prompt you to disable it before proceeding and then safely delete the contact once protection is removed.

Output Log:
![]()
To delete multiple contacts in the Active Directory domain, prepare a CSV file with columns ContactDN and add the distinguished name of all target contacts.
Then, run the script as follows to delete all specified contacts in seconds.
|
1 |
.\ADContactManagement.ps1 -Action 11 -InputCSVFilePath "<InputFilePath>" |
When a contact is protected from accidental deletion, the script prompts for confirmation before removing the protection.
- If you choose Yes, the script disables the protection and deletes the contact.
- If you choose No, the script skips the protected contact and continues processing the remaining entries.
The results of each operation are recorded in the log file for auditing and troubleshooting purpose.

12. Restore Deleted Active Directory Contacts
When an Active Directory contact is accidentally deleted, it can result in missing address book entries, disrupted communication, and the loss of important contact information. While Active Directory provides the ability to restore deleted objects, the recovery process is not always straightforward. Admins often need to browse the Deleted Objects container using LDAP queries or manually search to locate the correct contact before initiating the restore operation.
This script simplifies the recovery process and helps restore deleted contacts in seconds. Simply run the script as shown below and provide the full name of the deleted contact when prompted.
|
1 |
.\ADContactManagement.ps1 -Action 12 |
The script automatically searches the ADUC container for the specified contact and restores it along with all its available attributes.
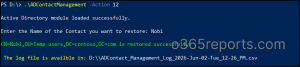
Output Log:

To restore multiple deleted Active Directory contacts at once, prepare a CSV file with the column Name containing the full name each deleted contacts.
The, run the script with the -InputCSVFilePath parameter to restore deleted AD contacts in bulk.
|
1 |
.\ADContactManagement.ps1 -Action 12 -InputCSVFilePath "<InputFilePath>" |
This iterates each entry in the list and restores all the contacts available in the deleted objects container.
Simplify Active Directory Contact Management with AdminDroid
The PowerShell script surely helps simplify Active Directory contact management and reduces the effort involved in performing routine administrative tasks. But what if creating, updating, moving, deleting, or restoring contacts was just a few clicks away?
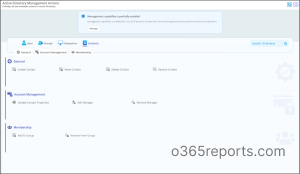
With AdminDroid’s Active Directory management tool, it is.
AdminDroid provides a centralized web-based interface that enables you to manage the complete lifecycle of Active Directory contacts quickly and efficiently. Instead of running scripts, validating parameters, and preparing CSV files for every operation, you can perform contact management tasks directly from an intuitive console.
With Active Directory contact management tool, you can:
- Create and manage Active Directory contacts
- Update contact properties such as phone numbers, departments, office locations, names, and more
- Move contacts between Organizational Units
- Add or remove managers for contacts
- Manage contact group memberships
- Delete contacts when they are no longer required
- Restore deleted contacts
Go Beyond Basic Contact Management
AdminDroid Active Directory Companion extends far beyond individual contact operations with enterprise-grade management capabilities.
- Bulk Management – Select contacts directly from reports or import them through a CSV file and perform bulk actions with a few clicks.
- Workflow Automation – Combine multiple contact management tasks into a single workflow and execute them with minimal effort.
- Granular Delegation – Delegate specific contact management tasks to help desk teams or departmental admins without granting unnecessary Active Directory permissions.
- Built-in Auditing – Every contact management action performed through AdminDroid is automatically audited, allowing you to track who made a change, what was modified, and when it occurred.
AdminDroid goes beyond contact management. It provides a centralized hub featuring 450+ Active Directory reports, 60+ management actions, advanced automation, and deep security insights to simplify your entire infrastructure.
Whether you’re managing a handful of contacts or thousands across multiple departments, AdminDroid helps reduce administrative effort, improve operational efficiency, and simplify Active Directory management.
Download AdminDroid today and start your 15-day free trial to experience faster, easier, and more efficient Active Directory administration.
We hope this blog helped you get a clear understanding of how to manage Active Directory contacts efficiently using PowerShell. With an effective approach, you can maintain accurate contact information, improve directory organization, and ensure seamless communication with external stakeholders.
If you have any questions or comments, feel free to share them in the comments section below. We’d love to hear from you.


