Managing who can access what application in a modern cloud environment isn’t as simple as it used to be. Each of these apps has its own sensitivity level and security needs. Maybe one app only needs MFA, while another should only be accessed from compliant devices. Traditionally, IT administrators used to configure Conditional Access policies in Microsoft Entra ID to enforce these rules. Each time a new app or requirement comes up, a new policy is added. Over time, this leads to “policy sprawl”, a confusing web of overlapping rules that’s hard to manage or audit. This is where configuring Conditional Access policy with custom security attributes helps!
Why Custom Security Attributes Matter
In complex environments with hundreds of applications, maintaining consistent access controls can be challenging. Custom security attributes in Microsoft Entra ID solve this by allowing organizations to define metadata that reflects each application’s business importance or risk level. These attributes serve as a bridge between business logic and security policy, ensuring that access decisions are context aware.
For example, apps handling financial or confidential data can easily be tagged as “High Sensitivity”, ensuring they always receive stronger protection. By classifying applications this way, organizations can achieve more accurate access control, reduce manual effort, and improve overall policy consistency across their environment.
How Custom Security Attributes Works with Conditional Access in Entra ID
When combined with custom security attributes, Conditional Access policies reach the next level by gaining dynamic adaptability. Instead of manually selecting applications in each CA policy, administrators can assign attribute tags to applications that describe specific security requirements. Conditional Access with custom security attributes can then dynamically target those applications based on their assigned values.
For example:
- A payroll app might be tagged with “Require MFA” to indicate that it should fall under policies enforcing stronger authentication.
- A finance system might carry the tag “Require Compliant Device” to ensure access only from managed, secure devices.
When these attributes are in place, a single Conditional Access policy can automatically apply to all applications that meet the defined criteria. This dramatically reduces the need for multiple app-specific policies, lowers administrative overhead, and ensures consistent enforcement of security standards. It’s a simple rule: tag once, stay secure.
Next, let’s explore how to apply filters for applications within a Conditional Access policy.
Set Up Dynamic Conditional Access with Custom Security Attributes
Let’s go through how to set up a dynamic Conditional Access policy to require few security checks using custom security attributes in Microsoft Entra ID.
- Create custom security attributes in Entra ID
- Assign custom security attributes to Applications
- Implement Conditional Access policy using custom security attributes
1. Manage Custom Security Attributes in Entra ID
This is where you define your organization’s labeling system. Think of custom attributes as metadata tags that describe your applications’ risk or security requirements.
Prerequisites for Applying Custom Security Attributes with Conditional Access policies
Before you begin, make sure you have the right setup and permissions in place.
- You must have a Microsoft Entra Account with an active subscription to define security attributes.
- Confirm that your account has both the Attribute Definition Administrator and Attribute Assignment Administrator roles.
These permissions aren’t granted to global administrators by default. They must be manually assigned.
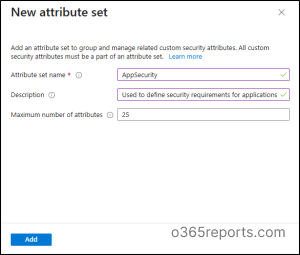
Create an Attribute Set in Microsoft Entra
This is like creating a folder to store related attributes. For example, let’s create an attribute set called AppSecurity and define attributes such as SecurityChecks.
- Sign in to the Microsoft Entra admin center.
- From the left menu, navigate to Entra –> Custom security attributes.
- Click “+ Add attribute set”. (If the option is disabled, it means that you haven’t been assigned with the right role)
- Enter the suitable Name, Description, and Maximum number of attributes.
- Click Add.
Define Custom Security Attributes in Microsoft Entra ID
Follow the steps below to define a custom security attribute in Microsoft Entra ID.
- In the custom security attribute page in Entra ID, open the created attribute set.
- Click “+ Add attribute”.
- Provide a proper Attribute name and Description.
- Select a data type as String as Conditional Access app filters only support custom security attributes of the string type.
- Specify whether multiple values can be assigned to the attribute. If you select “Yes,” the attribute can hold more than one value. If you select “No,” the attribute will only allow a single value.
- Choose whether the attribute should accept only predefined values (Yes) or allow both predefined and user-defined values (No). In the example below, we have added four security check options as the attribute values.
- Click Create.

These attributes act as reusable compliance labels that can be referenced dynamically by Conditional Access policies.
2. Assign Custom Security Attributes to Applications
After defining your compliance attributes, the next step is to tag applications with respective custom security attribute values that should enforce compliant device access.
- In Microsoft Entra admin center, navigate to Entra ID –> Enterprise apps.
- Open the application you want to tag (e.g., “FinanceApp or PayrollSystem”).
- Then, click on Custom security attributes under Manage section.
- Click + Add assignment.
- Select the required Attribute set, Attribute name, and Assigned values.
- Finally, select Save.
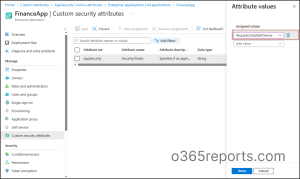
This step associates your defined security labels with real applications. When these tagged apps are evaluated by Conditional Access, Entra automatically recognizes their assigned values.
3. Link Custom Security Attributes to Conditional Access Policy
With your custom attributes set up, you can now create a Conditional Access policy that automatically applies to all applications tagged with a specific attribute value. Let’s look at an example of creating a Conditional Access policy that dynamically targets applications tagged with the custom attribute value “Require Compliant Device.”
Before you proceed, make sure your tenant includes Microsoft Entra ID P1 or P2 licenses and that you have at least the Conditional Access administrator role assigned.
- Navigate to Entra ID –> Conditional Access in the Microsoft Entra admin center.
- Click + New policy or choose one from the list of current CA policies.
- Give the CA policy a meaningful name.
- In the Assignment section, choose Users. In the Include category, select All users and exclude required users or break glass accounts.
- Navigate to Target resources and ensure the Resources (formerly cloud apps) field is selected.
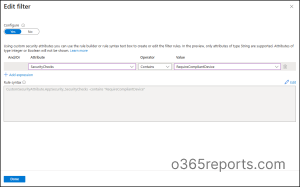
- Choose Include –> Select Resources –> Select resources based on attributes and toggle Yes to configure filter.
- Now, choose the needed Attribute, Operator, and Value. For our scenario, we chose the ‘RequireCompliantDevice’ value.
- Click on Done. [Any app you later tag with this attribute will automatically fall under this policy.]
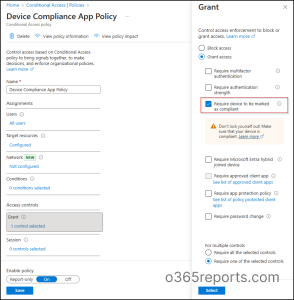
- Click Grant under Access controls. Grant controls in Conditional Access policy lets you choose ‘Require device to be marked as compliant’ checkbox. Once done, click Select.
- Confirm your settings and flip the Enable policy toggle from ‘Report-only’ to On.
- Click Create to create your CA policy.
This configuration ensures that once your policy is created, any app tagged with the chosen attribute automatically falls under that policy, no manual targeting needed. In short, you design once, and Entra handles the rest.
End User Experience:
When a user tries to access an application tagged with “Require Compliant Device”, Entra ID evaluates the user’s device posture in real time.
- If the device is compliant (as reported by Intune or another MDM), access proceeds as usual.
- If the device is non-compliant, access is blocked.
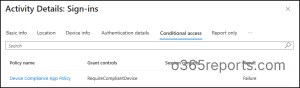
For deeper insight into what happened, head to the Entra ID sign-in logs to see which Conditional Access policy was triggered and why.

By embracing application custom attribute driven Conditional Access, organizations can achieve a more scalable, manageable, and agile security posture that aligns perfectly with Zero Trust principles. For any questions or insights, feel free to reach out in the comments section.