Hey Tech Admins! you might be quite aware that Microsoft has deprecated its Baseline Policy feature on February 29th, 2020. The Security Defaults which has replaced it has been creating quite a buzz around how flexible can it get. Well, we understand how essential it is for you to understand the Security Defaults pre-configured settings to utilize it to your advantage. No worries! We’ve got your back!
In this blog we provide you with insight on Security Default’s Deployment considerations, Various deployment methods, Errors you might encounter and more on what alternative measures you can you avail if Security Defaults doesn’t suffice the granular needs of your organisation.
Enabling Security Defaults through your Azure portal.
- Sign in to the Azure portal as a Security Administrator, Conditional Access Administrator, or Global Administrator.
- Browse to Azure Active Directory > Properties.
- Select Manage Security Defaults.
- Set the Enable Security Defaults toggle to Yes.
- Select Save.
Everything you should know about Security Defaults:
New user:
If you are a new user, the Security Defaults feature is enabled by default for you but If you require high-end granular security access and user exclusion for service and break glass accounts, you are not the target audience for Security Defaults. In such scenario, you can either configure Common Conditional Access Security Policy or Custom Conditional Access policy but, before configuring them you will have to first disable Security Defaults and then configure Conditional Access Policies as per your organizational needs, as depicted here.
Existing user:
- If you are an existing user, make sure that none of your applications use legacy authentication.
- if any application is identified using legacy authentication protocols adopt modern authentication for those since Security Defaults blocks legacy authentication.
- Make sure all the users in your organisation comply to register MFA within 14 days, as further delay will block user from performing any action. it’s also vital to note that for users with privileged actions, registration with Microsoft Authentication app is mandatory. No 14-day MFA registration period would be made available for privileged action users. If you are an existing user and have not enabled any basic security settings, then Security Defaults will be enabled by default.
Errors that you may encounter while you try to enable Security Defaults:
Error 1:
It looks like you have Baseline Protection policy enabled, the preview version of Security Defaults. Enabling Security Defaults will remove all Baseline protection policies from your tenant since Security Defaults is the most up-to-date version.
You may likely experience this error if you have enabled any or all the baseline policies, in such case enabling Security Defaults may lead to the removal of any baseline policy in place. However, it must be noted that due to deprecation of baseline policy if you have previously enabled baseline policies then you will have to either opt for Security Defaults or configure Conditional Access Policy.
Error 2:
It like you have a custom Condition Access Policy enabled. Enabling a Conditional Access Policy prevents you from enabling Security Defaults. You can use Conditional Access to configure policies that enable that same behavior provided by Security Defaults.
If you have configured any custom Conditional Access Policy this error might occur.
- Deployment of Conditional Access Policy will prevent you from enabling Security Defaults
- To deploy Security Defaults, you will have to disable all the Conditional Access Policies in place.
Factors you should be considering before deployment of Security Defaults.
Case 1:
The MFA: – Considerations for MFA in regards with Security Defaults.
Here are measures you must consider with respect to user account in your partner tenant, to ensure a smooth deployment
- It is significant to identify if any corporate policy prevents employees from using mobile devices while working because it will influence the multi-factor authentication implemented via Security Defaults. If your organization has a policy that prevents the use of mobile devices, then you should consider one of the following options: –
- Deploy a Time-Based One-Time base Password (TOTP) application that can run on secure system.
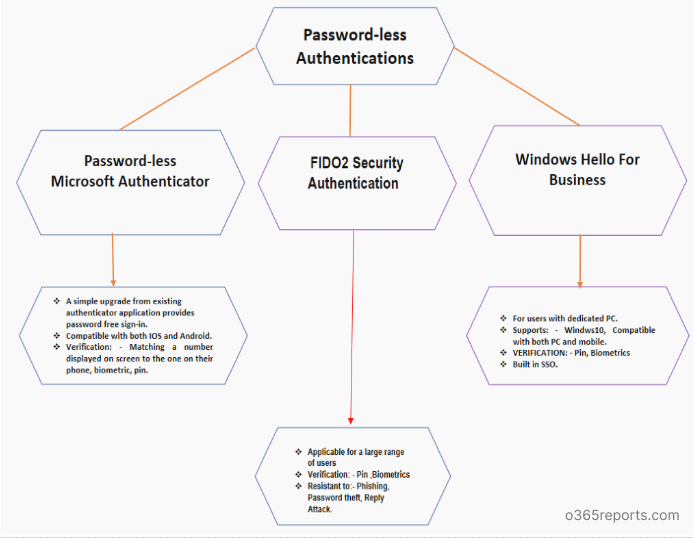
- Password free authentications available for MFA.
You can now experience password free usability experience by enabling Password-less authentication techniques such as FIDO2 Security Key, Windows Hello for Business and Password-less Microsoft Authenticator Application.
- These strong authentication factors are based on the same world-class, public key/private key encryption standards and protocols, which are protected by a biometric factor (fingerprint or facial recognition) or a PIN. Users apply the biometric factor or PIN to unlock the private key stored securely on the device. The key is then used to prove who the user and the device are to service.
Deployment considerations and steps for Password–less Authentication.
Enable combined registration for Azure MFA and self-service password reset (SSPR).
Register Azure MFA and SSPR for all your users. Ensure all your users can perform Azure MFA. The mobile device used by your users must be registered to Azure Active Directory. The above are critical for both for Microsoft authenticator application and FIDO2 Security Keys.
Use compatible FIDO2 security key and ensure to use a Microsoft-tested and verified FIDO2 security device, or other compatible FIDO2 security device.
For Windows Hello, Azure Multi-Factor Authentication, Latest version of Microsoft Authenticator must be installed on devices running iOS 8.0 or greater, or Android 6.0 or greater with push notifications allowed as a verification method
How to enable Password-less Authentication?
1. FIDO2 Security Key:
- Sign-in to the Azure portal.
- Browse to Azure Active Director > Security >Authentication Methods > Authentication Method Policy (Preview).
- Under the method FIDO2 Security Key, choose the following options: –
- Enable – Yes or No
- Target – All users or Select users
- Save the configuration.
2. Windows Hello for Business:
Windows Hello deployment can be either carried out by Key Trust Model or Certificate Model on the bases of it being a hybrid or a on premise deployment. Hybrid deployment is considered for enterprises using Azure Active Directory and on-premise Azure Active Directory for on-premise deployment.
- Hybrid Azure AD Joined Key Trust Deployment
- Hybrid Azure AD Joined Certificate Trust Deployment
- Azure AD Join Single Sign-on Deployment Guides
3. Password-less Microsoft Authenticator Application.
- Sign-in to the Azure portal
- Search for and select Azure Active Directory. Select Security > Authentication methods > Authentication method policy (Preview)
- Under Password-less phone sign-in, choose the following options: –
- Enable – Yes or No
- Target – All users or Select users
- Save to set the new policy
4. Implement a third-party solution that enforces multi-factor authentication for each user account in the partner tenant that provides the most appropriate verification option.
5. Purchase Azure Active Directory Premium licenses for the impacted users to enable Conditional Access Policy.
If you have any application or device that does not support the use of modern authentication, they will be blocked. To address this limitation the app password feature can be used to ensure that your application or your device will still authenticate.
When Security Defaults are enabled the requirement is to enforce MFA for each user, including service accounts, in your partner directory any automation or integration that leverages user credentials for authentication will be impacted. Thereby, it is important that you identify such accounts and deploy Conditional access for those.
Case 2:
Say an Azure external process running on PowerShell which has not yet been transcended as a service principle yet, which implies that it doesn’t support client token, open authentication or any modern authentication flow but uses a simple username and password for authentication in such scenario’s deploying Security Defaults is not possible thereby Conditional Access Policy must be resorted.
How to register for MFA?
- You can register for MFA by visiting the site: – https://aka.ms/mfasetup
- Sign-in into your Microsoft account with your password.
- You will then encounter the above information, on clicking Next you will be asked to register MFA using Microsoft Authenticator Application.
- Choose the compatible option.
- Click Set up.
- On clicking set up you will be asked install Microsoft Authenticator Application.
- Choose between “Work or school account”
- Then scan the generated QR code or enter the verification code in your Microsoft Authenticator Application to login.
Deploying OAUTH Tokens for Azure MFA in Cloud.
- Buy OAUTH token from the vendor of your choice.
- You can avail any OAUTH TOTP token with 30- or –60 second refresh that has a secret key of 128 characters or less.
- Once you purchase the keys from your vendor, they will have to send you a file with a secret key, serial number, time interval, manufacturer, and model for each token.
- Then assign the tokens to users, edit that file to add your user’s user principal names (usually their email address) and then upload it to Azure Portal > Azure Active Directory > MFA Server > OAUTH tokens.
- Authentication through hardware tokens are better than authentication through Microsoft Authenticator Application because they provide secure password generation without network connection and is safe from external infiltration that might infect or intercept the generated code
The users are provided with a 14-day time limit to register for MFA, the users who defy to register within 14 days will be blocked unless they complete their MFA registration.
Can any other authentication application be used in place of Microsoft Authentication App?
- YES! You can use other third-party TOTP applications too.
Here is how you can register third-party TOTP applications to authenticate your Azure account.
- Go to the MFA security setup/verification page: – https://aka.ms/MFASetup
- Select Add method tab in Security info page.
- Select Authenticator app in Add a method dialog box that appears.
- Click Add.
- Select I want to use a different authenticator app.
- Click Next
- Scan the QR code with the Authenticator Application of your choice.
- Enter the code generated on your authenticator application.
- Your authentication application is successfully registered.
Can you use conditional access along with Security Defaults?
You cannot while availing conditional policy, you simultaneously can’t avail Security Defaults but If you possess a conditional access license yet, have refined from configuring any Conditional Access Policies then you can enable Security Defaults.
Worried about Security Defaults not being able to provide the flexibility that your organisation requires. Here is what you can do!
Many organisations require the ability to exclude specific accounts like your emergency access or break-glass administration accounts which is not possible when you enable Security Defaults in such cases you have to disable Security Defaults and configure common conditional access policies that will care of basic security while enabling you user exclusion.
- Require MFA for administrators
- Require MFA for Azure management
- Require MFA for all users
- Block legacy authentication
The configuration of the above four policies together would mimic functionality enabled by Security Defaults. For more granular access you can configure your own conditional access policy according to your organisational needs
Configuring Conditional Access Policy.
- Sign in to the Azure portal using an account with global administrator permissions.
- Search for and select Azure Active Directory, then choose Security from the menu on the left-hand side.
- Select Conditional Access, then choose + New policy.
- Enter a name for the policy, such as MFA Pilot.
- Under Assignments, choose Users and groups, then the Select users and groups radio button.
- Check the box for Users and groups, then Select to browse the available Azure AD users and groups.
- Browse for and select your Azure AD group, such as MFA-Test-Group, then choose Select.
- To apply the Conditional Access policy for the group, select Done.
Hope the above-given deployment considerations help you analyse and select apt deployment technique for your organisation. Prevent any account compromises through Security Defaults or Conditional Access Policy and manage your organisational needs by selecting an appropriate deployment technique, also we would love to know how helpful was this blog for you to deploy a secure identity management story for your organisation so do tell us how you get around with Security Defaults in the comment section.


