Date Loss Prevention (DLP) policies in Microsoft 365 form the backbone of data security in any organization. However, without regular auditing, even the best DLP policies may fall short. By regularly auditing DLP-detected messages, admins can ensure incidents are detected early, reducing the response time needed to address potential security issues.
How to Audit DLP Detected Message in Microsoft 365?
You can track DLP rule matches in Microsoft 365 using the following methods:
1. Using Microsoft Audit Logs: Microsoft Purview’s Audit Logs retain data for up to 180 days, allowing admins to search and export records of DLP-detected messages.
- Go to the Audit page within the Microsoft Purview Compliance Portal.
- Specify the required date and time range.
- From the Activities drop-down menu, select “Matched DLP rule.”
- Choose the required workload in the Workloads drop-down, and then click Search.
- Once the search is complete, you can export the report for DLP-matched messages.
2. Using DLP Activity Explorer: The DLP Activity Explorer provides a graphical overview of DLP activity, including filtering options for more targeted analysis.
- Log in to the Microsoft Purview Compliance Portal.
- Under Solutions, select Data Loss Prevention and choose Activity Explorer.
- In the Activity Explorer window, select the desired date range.
- Choose “DLPRuleMatch” from the Activity drop-down.
Drawbacks:
- Microsoft Audit Logs: While it offers a 180-day retention period, searching and exporting DLP logs can be slow, and the reports are not very user-friendly.
- Activity Explorer: It provides helpful visuals and filters, but the 30-day retention period limits long-term tracking and historical analysis.
To overcome these limitations, we’ve developed a PowerShell script for auditing DLP-detected messages, extending retention to 180 days and offering intuitive filtering options.
Download Script: AuditDLPRuleMatches.ps1
Script Highlights
- Tracks DLP rules matched Microsoft Teams messages.
- Audits SharePoint shared contents for DLP rule violations.
- Identifies sensitive info shared through OneDrive files.
- Monitors Exchange Email messages flagged by DLP policies.
- This script retrieves DLP audit log for the last 180 days by default.
- Helps to generate DLP audit reports for custom periods.
- Monitors sensitive information shared by a specific user.
- Lists DLP policy detections for targeted policy.
- Can export DLP policy rule matches based on alerts severity (High, Medium, Low).
- Exports report results to CSV file.
- The script can be executed with an MFA-enabled account too.
- Supports Certificate-based Authentication too.
- Automatically installs the EXO Module (if not installed already) upon your confirmation.
- This script is scheduler friendly.
DLP Rule Matches Audit Report – Sample Report
The exported report on DLP rule matches report looks like the screenshot below.

The script exports Microsoft 365 DLP detected message activity report with the following attributes: Rule Matched Time, Workload, Message Sent Time, Message Sent From, Message Received by, Sensitive Information Type, Subject, Bcc, CC, File Name, File Owner, File Path Url, File Shared From, Policy Name, Rule Name, Condition, Matched Values, Rule Actions, Confidence, Incident ID.
Audit DLP Detected Messages in Microsoft 365 – Script Execution Steps
- Download the script.
- Start the Windows PowerShell.
- Select any of the methods provided to execute the script.
Method 1: Execute the script with MFA or non-MFA account
|
1 |
.\AuditDLPRuleMatches.ps1 |
Executing this script will export all DLP policy rule matches across your Microsoft 365 environment in the last 180 days.
Method 2: Execute the script by explicitly mentioning credentials.
|
1 |
.\AuditDLPRuleMatches.ps1 -UserName admin@contoso.com -Password XXX |
The above method supports only non-MFA accounts. If the admin account has MFA, you need to disable MFA using CA policy to make this work.
Method 3: Execute the script using certificate-based authentication.
To use certificate-based authentication, you must register app in Entra ID which help you connect Exchange online using certificate. This method is schedular friendly.
|
1 |
.\AuditDLPRuleMatches.ps1 -Organization <Domain> -ClientId <AppId> -CertificateThumbprint <CertThumbPrint> |
You can either use CA certificate or create a self-signed certificate which is cost effective.
Get the Most Out of the ‘Microsoft 365 DLP Detected Messages’ PowerShell Script
Effortlessly track and audit DLP-detected messages across a range of workloads, empowering you to ensure data security at an unprecedented level. By specifying desired workload in the –WorkloadCategory parameter, you immediately gain access to detailed insights. The script can be customized for Exchange, Microsoft Teams, SharePoint, and OneDrive, each offering over 15 columns of valuable information to give you the most comprehensive overview possible.
- Export DLP rule matched Microsoft Teams messages
- Monitor SharePoint files that match DLP policies
- Track Exchange email messages Flagged by DLP rules
- Keep an eye on OneDrive files that match DLP rule conditions
- Audit DLP rule matches for custom period
- Monitor sensitive information shared by a specific user
- List the DLP detected messages by a specific policy
- Export DLP rule matches based on alerts severity
Export DLP Rule Matched Microsoft Teams Messages
When sensitive information is shared in Microsoft Teams chats, DLP steps in to detect them. Admins should audit these detections to reduce risks and maintain secure communication both internally and externally. To export DLP detected Microsoft Teams messages run the script specifying -WorkloadCategory ‘MicrosoftTeams’.
|
1 |
.\AuditDLPRuleMatches.ps1 -WorkloadCategory MicrosoftTeams |
Sample Output:

This command allows you to capture and review all Teams messages that trigger DLP policies, ensuring rapid intervention when critical information is shared.
Monitor SharePoint Documents that Match DLP Policies
Data Loss Prevention in SharePoint Online helps organizations monitor unauthorized sharing of sensitive information. It scans documents for patterns like social security numbers, credit card details, and other personal data to detect DLP rule matches. To track DLP detected SharePoint documents, run the script by including –WorkloadCategory ‘SharePoint’.
|
1 |
.\AuditDLPRuleMatches.ps1 -WorkloadCategory SharePoint |
Sample Output:

Running this command allows you to easily track DLP rule-matched SharePoint documents, aiding in the investigation of potential data leaks.
Track Email Messages Flagged by DLP Rules
Exchange’s DLP feature helps track the transmission of sensitive data through email. Monitoring DLP rule matches in Exchange enables admins to detect potential data breaches at minimal time. Specify –WorkloadCategory ‘Exchange’ to audit DLP Detected Exchange Online emails.
|
1 |
.\AuditDLPRuleMatches.ps1 -WorkloadCategory Exchange |
Sample Output:

Admins should monitor and review flagged email messages to identify trends in potential data exposure, take corrective actions where necessary.
Keep an Eye on OneDrive Files That Match DLP Rule Conditions
DLP detected alerts in OneDrive notify admins of policy violations involving sensitive data, such as personal or financial information, that users may inadvertently share. These alerts help ensure that sensitive content is protected and shared only with authorized individuals. To monitor DLP detected OneDrive messages run the script specifying –WorkloadCategory ‘OneDrive’.
|
1 |
.\AuditDLPRuleMatches.ps1 -WorkloadCategory OneDrive |
Sample Output:

By auditing DLP-detected messages in OneDrive, make sure sensitive information is shared with rightful users.
Audit DLP Rule Matches for Custom Period
While monitoring DLP rule matches activity over the past 180 days provides a comprehensive overview, there are instances where it’s necessary to specifically identify and focus on events that occurred within a narrower timeframe.
To address this, parameters like -StartDate and -EndDate come in handy, allowing you to generate a targeted activity report for custom periods.
|
1 |
.\AuditDLPRuleMatches.ps1 -StartDate 10/25/24 -EndDate 11/12/24 |
The above example provides a report on the Microsoft 365 DLP rule matches during the period from Oct 25, 2024, to Nov 12, 2024. Utilizing these parameters, you can generate n DLP detected messages audit report for the last 7 days, 30 days, 90 days, 180 days, or any other required duration.
Monitor Sensitive Information Shared by a Specific User
This use case allows you to track and audit Data Loss Prevention (DLP) rule matches for individual users within your organization. By using parameters like -TargetUser, you can generate a specific user’s communications through email, Teams, or SharePoint that match the organization’s DLP rules.
|
1 |
.\AuditDLPRuleMatches.ps1 -TargetUser neji@contoso.com |
Running this action helps security and compliance teams identify any potential risks related to sensitive data shared by the user ‘Neji’.
List the DLP Detected Messages by a Specific Policy
Similar to targeted user, you are also capable of auditing DLP rule matches based on a specific policy. It allows you to track policy effectiveness, review potential security incidents, and take appropriate actions to mitigate risks. To export DLP policy match reporting, use the –TargetPolicy parameter.
|
1 |
.\AuditDLPRuleMatches.ps1 -TargetPolicy ‘Policy Name’ |
Running this script helps you target specific compliance policies, enabling quick identification and resolution of potential violations. If issues arise, use Test-Message cmdlet to investigate any DLP rule execution problems.
Export DLP Rule Matches Based on Alerts Severity
Admins would want to export DLP rule matches based on alert severity to streamline their security and compliance processes. Having the ability to directly export and view ‘high, medium, low’ severity alerts helps admins act faster, mitigating risks before they escalate. To list the DLP detected messages based on alerts severity, use the –AlertSeverity parameter.
|
1 |
.\AuditDLPRuleMatches.ps1 -AlertSeverity ‘High’ |
By running this script, admins can address high-severity alerts immediately to avoid potential data breaches.
Simplify DLP Policy Match Reporting Using AdminDroid
We have explored how to track DLP rule matches using PowerShell script and respective use cases. But do you believe if I say there is a lot easier way to get all Microsoft 365 DLP rule matched messages without using PowerShell?!
AdminDroid simplifies Microsoft 365 DLP message detections with dynamic audit activity reports. Here are a few things you can track:
- Teams DLP Reports
- DLP Rule Detected Teams Messages
- MS Teams DLP Rule Information
- MS Teams messages exempted from DLP Rule
- SharePoint DLP Reports
- SharePoint DLP Rule Information
- DLP Rule Matched SharePoint Documents
- SharePoint Documents exempted from DLP Rule
- Exchange DLP Reports
- DLP Rule Detected Email Messages
- DLP Configuration Changes
- OneDrive DLP Reports
- DLP Rule Detected OneDrive Files
- OneDrive DLP Rule Information
- OneDrive Files exempted DLP Rules
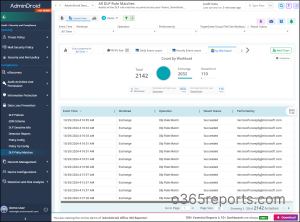
In addition, AdminDroid provides a wide range of features, including 1800+ pre-built reports and 30+ Office 365 dashboards. These reports provide comprehensive insights, covering areas such as reporting, auditing, analytics, usage statistics, security, and compliance.
Besides, AdminDroid offers a free Azure AD reporting tool that includes 120+ reports & dashboards covering various categories. These reports come with features such as exporting, sending reports via email, and scheduling.
Download AdminDroid Microsoft 365 management tool now and experience the power of simplified administration!
I hope this blog is useful for auditing DLP policy rule matches in your organization. If you have any queries, you can reach us through the comment section.


