In today’s dynamic workplace, effective collaboration and communication are key to driving productivity. Microsoft 365 groups provide a more versatile solution than traditional distribution lists, allowing teams to share files, manage tasks, and schedule meetings seamlessly. Migrating your distribution lists to Microsoft 365 groups not only enhances functionality but also streamlines your organization’s workflows.
In this blog, we’ll explore the various methods for upgrading distribution lists to Microsoft 365 groups and why it’s important. Plus, to make your conversion process easier, we’ve crafted a handy PowerShell script and discussed it for your convenience.
Why Should You Upgrade Distribution Lists to Microsoft 365 Groups?
Distribution Lists are contact groups in Outlook that serve the purpose of email communication well where as Microsoft 365 groups provide a collaborative space and access to a vast collection of resources for team collaboration.
M365 group provides a shared inbox, shared calendar, shared files library, shared OneNote notebook, and much more to the group members. However, distribution groups are just for sending an information to users through an email.
Thus, upgrading the distribution lists to Microsoft 365 group will help you to have a flexible and advanced space for collaboration and communication. After migration, you will have more control over your data, all permissions, and management.
Check the Eligibility of Office 365 Distribution Lists for Migration
All distribution lists cannot be converted to Microsoft 365 groups due to certain conditions. Those which are simple, non-nested, and cloud-managed can only be converted into groups of M365. Then the criteria for non-eligibility of distribution lists is way more to explain.
Thus, run the following cmdlet to get the eligible Office 365 distribution groups with their primary SMTP address for migration. Before running the command, make sure you are connected to the Exchange Online PowerShell module.
|
1 |
Get-EligibleDistributionGroupForMigration |
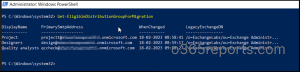
Along with group eligibility, make sure you have Exchange Administrator roles assigned and an active mailbox to convert the DL to a Microsoft 365 group.
Native Upgrade Methods of Distribution Lists that are Under Deprecation!
After checking the eligibility of distribution groups, let us see the direct methods of converting distribution lists to Microsoft 365 groups under deprecation.
Exchange admin center: Distribution lists are migrated to Microsoft 365 group in the Exchange admin center using the ‘Change group type’ option.
You can access this option by navigating to Exchange admin center -> Recipients -> Groups -> Distribution list –> Select the Group name -> Change group type –> Send upgrade request.

After clicking “Send upgrade request“, a fly-out pane opens, prompting you to send a request to the group owner to change the group type. You need to select the group owners and hit the “Send request“ button.
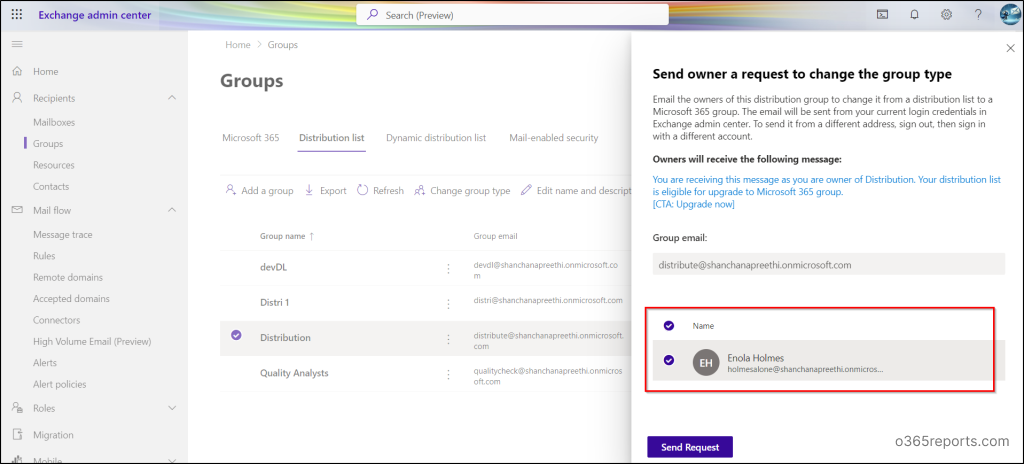
This sends an email to the DL owners, asking them to convert the DL into a Microsoft 365 group. The DL owners can then decide whether or not to proceed with the upgrade.
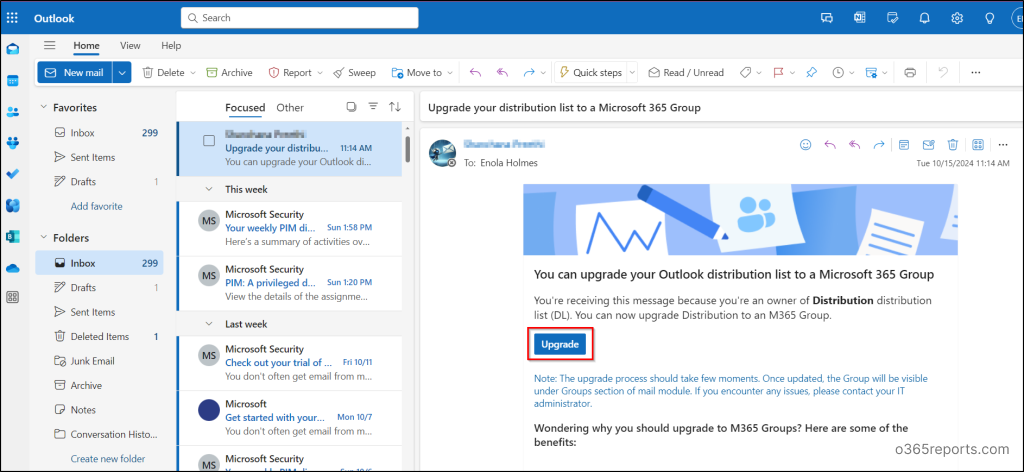
DL owners can convert their distribution lists directly by clicking the “Upgrade” button in the email they receive. The conversion process typically completes within 5 to 10 minutes in Microsoft 365.
After a successful conversion, the Microsoft 365 group will retain all members of the distribution list, including their email addresses. Notably, the distribution list’s email address remains unchanged after the upgrade.
Note: Distribution list owners cannot directly upgrade a DL to a Microsoft 365 group; the process must be initiated by an admin.
PowerShell: Distribution lists can be easily upgraded to Microsoft 365 groups using the PS cmdlet ‘Upgrade-DistributionGroup’.
However, the process can become time-consuming if your organization has many distribution groups. Native methods don’t support bulk conversion of distribution lists to Microsoft 365 groups, making the task more tedious.
Thus, to lend you a hand, we have prepared a PowerShell script that automates the process and eases your conversion. As it migrates the distribution groups more securely in no time and without much human intervention, let us dive deep into the script and its features.
Script Download: ConvertDLtoM365Group.ps1
Script Highlights:
- The script is executed with both MFA and non-MFA-enabled accounts.
- Installation of the Exchange Online V3 PowerShell module is done automatically (if not installed on your PowerShell environment) upon your confirmation.
- The script uses modern authentication to connect to Exchange Online.
- A non-member of the distribution group can also run this script.
- Bulk conversion is possible using the script.
- An update option is available i.e., you can update the group name, mail address, and access type after creating the group.
- The script is scheduler-friendly i.e., credentials can be passed as parameters instead of getting interactively.
How to Execute the Script?
Method 1: To execute the script with MFA and non-MFA accounts.
|
1 |
.\ConvertDLtoM365Group.ps1 |
Method 2: To execute the script by explicitly mentioning the credentials only for non-MFA accounts.
|
1 |
.\ConvertDLtoM365Group.ps1 -UserName admin@O365reports.com -Password XXX |
Method 3: Execute the script for bulk conversion of distribution lists to Microsoft 365 groups.
|
1 |
.\ConvertDLtoM65Group.ps1 -Inputfile “your input file path “ |
Enter your input file path shown in the screenshot given below.

After executing the script, you may encounter an error message stating “Removed existing Distribution List does not updated…Waiting for 5 seconds,” which indicates that there may be a delay in deleting the old distribution lists and creating new groups.
It is important to note that this error message does not necessarily mean that the script has failed to run. Therefore, we recommend to be patient and wait for the process to complete.
Steps to Migrate the Distribution Lists to Microsoft 365 Groups Using PowerShell Script
Step 1: Provide the distribution group mail address as an input
Primarily, it requests the credentials of your Office 365 account to access the distribution groups you want to convert. Enter your credentials to log in to your account.
Once you have connected to Exchange Online, it asks for your Outlook distribution lists’ mail addresses to convert them. If you want to list a few, then enter them separated by a comma.
Note: You can’t convert the distribution list to Microsoft 365 group, if it has any groups as a member or owner in it.

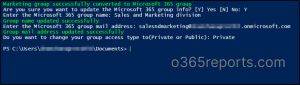
Step 2: Define Microsoft 365 Group Privacy
Once the group is found eligible, it asks you to define the access type of Microsoft 365 group to Private or Public.
Note: If the access type is not specified or misspelled, then the access type is defined as Private by default

Once you have entered all the inputs, the script creates a M365 group and moves all the members to it.
Also note that, if you are the distribution list owner and running the script, you will be added as both member and owner into the created Microsoft 365 group.
Step 3: (Optional) Update the basic attributes of Microsoft 365 Group
You can alter or update the basic attributes of the M365 group such as group name, group mail address and the access type of the group under this option.
Check the Distribution Lists to M365 Group Migration Status!
You can easily check the created M365 groups by exporting the M365 group report to a CSV file using PowerShell. This option will facilitate you with a detailed report on newly migrated Microsoft 365 groups.
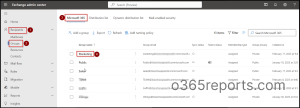
Also, you can check the newly created M365 group by navigating to the Exchange admin center -> Recipients -> Groups -> Microsoft 365 as shown below.
Thus, this script is so simple to execute and saves all your work and time. It easily converts distribution lists to Microsoft 365 groups and reduces the burden of Office 365 admins in DL migration.
So, we are done with upgrading distribution lists to M365 groups using this PowerShell script. But, managing M365 groups and their ownership & membership is crucial. However, the process of retrieving desired reports and information at the urging situations is real trouble in the native admin centers as well as in the PowerShell environment. Here comes AdminDroid Microsoft 365 Reporter, the rescuer!
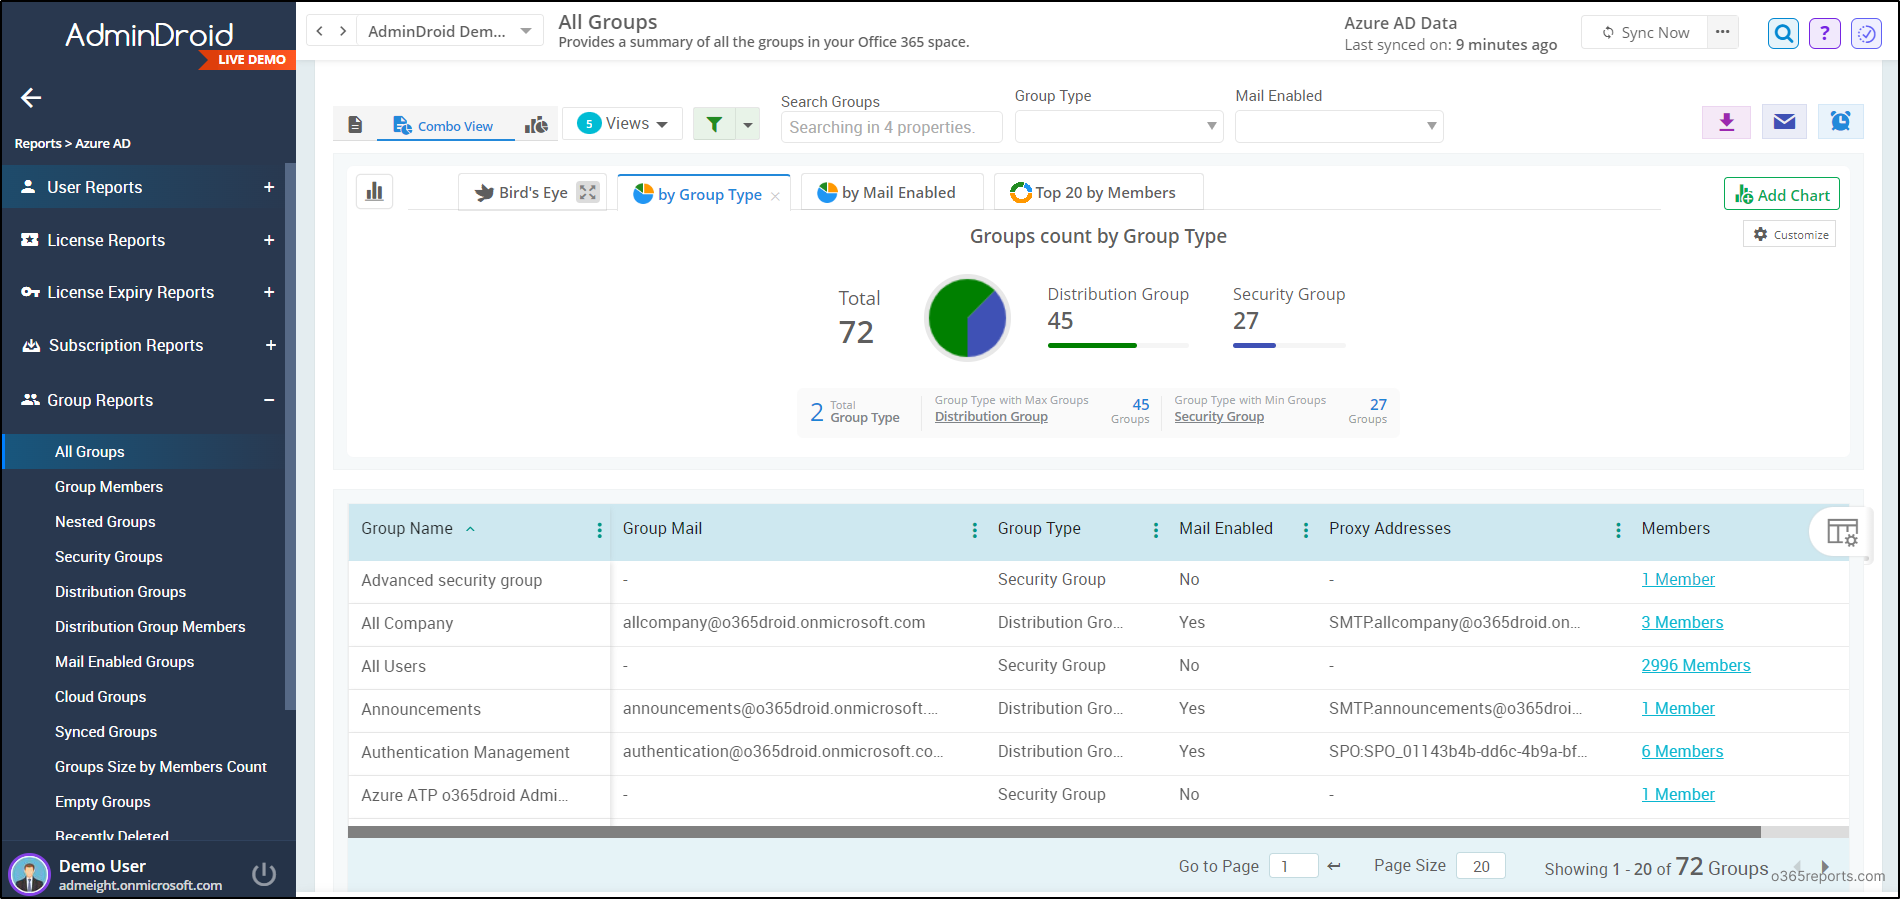
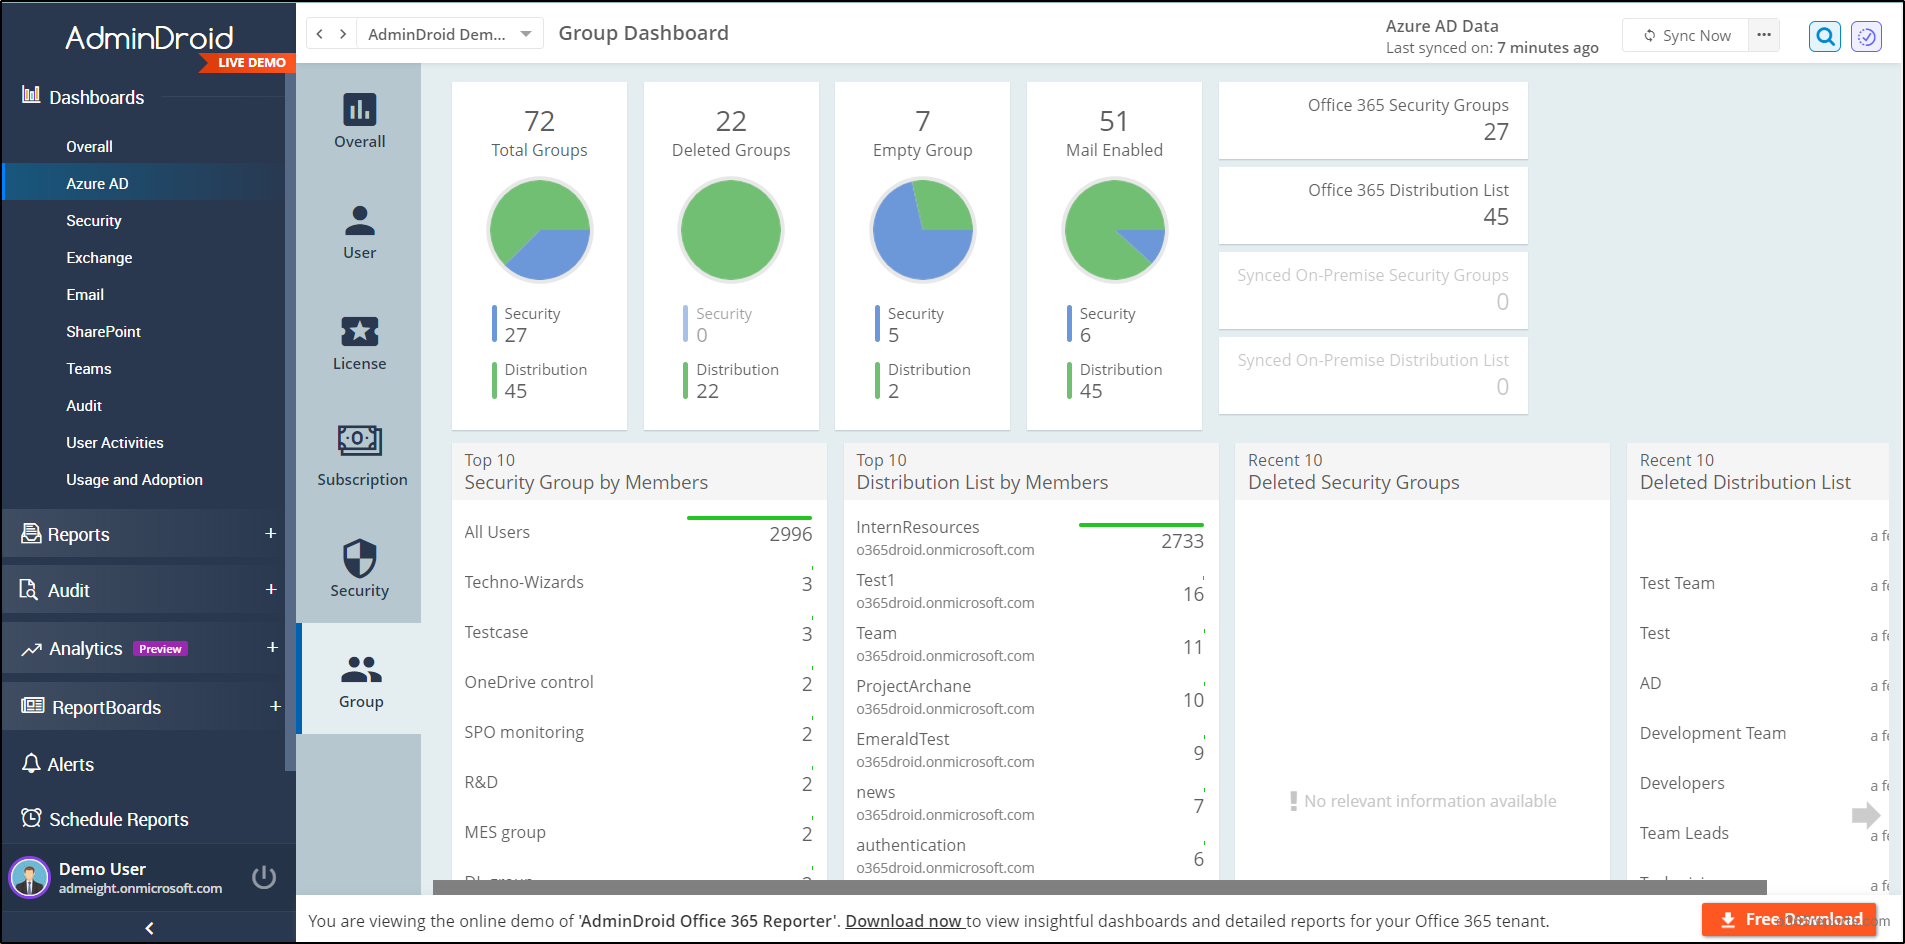
Find All Desired Azure AD Group Reports in AdminDroid for Free!
Admins, you can now easily spot all the Microsoft 365 groups and their memberships in the AdminDroid’s group reports. It includes in-depth details like group name, group mail, proxy address, members count, etc., for enhanced group management. Also, it offers distinguished reports on group members, cloud groups, synced groups, group size, empty groups, recently deleted groups, etc.
AdminDroid’s Free Azure AD reporting tool don’t limit to Microsoft 365 groups but also hold vast data about nested groups, security groups, distribution groups, group owners, group mailboxes, synchronization status, and more for effective management.
Along with the above, you can also audit group activities like group creation, deletion, modification, license changes, setting changes, membership changes, owner changes, operations, etc., with the AdminDroid Azure AD auditing tool.

In addition, it depicts a clear picture of your organization by delivering reports on users, groups, licenses, M365 security, multi-factor authentication, and password changes.
Apart from this, AdminDroid delivers a dedicated smart dashboard for Office 365 groups under the Azure AD dashboards to have an eagle-eye view of all Azure AD groups in a single frame.
Without any doubt, AdminDroid is the treasure chest for Microsoft 365 reporting and monitoring, granting all your desired reports. It is an absolutely all-inclusive solution providing valuable insights on various Microsoft 365 services such as Exchange Online, Microsoft Teams, SharePoint Online, OneDrive, and Yammer.
Thus, manage your Azure AD environment effectively with the 120+ free reports and AI-powered visually appealing charts under the AdminDroid Azure AD management tool.
“Encompassing all great features with an easy-to-setup and user-friendly nature, AdminDroid act as the perfect choice for Microsoft 365 management.”
I hope this blog helps you upgrade the distribution lists to Microsoft 365 groups and manage them with ease in your Microsoft 365 space. Share your opinions and thoughts in the comment section.