With the rise of remote work, it’s becoming increasingly challenging to maintain control over who can access your organization’s sensitive data. That’s where named locations come in. By using named locations in their Conditional Access policies, administrators can ensure that only authorized users, devices, and applications can access sensitive data from trusted locations.
Therefore, let’s jump into the blog to learn more about named locations in Conditional Access policies and how they can help you create an efficient access control strategy.
Named Locations in Conditional Access Policies
Named locations in Conditional Access policies are a powerful tool for enforcing granular access controls based on the user’s location. It majorly helps in reducing false positives. (Incorrect indication of location).
Also, Named locations can be used for multiple purposes. It can be configured to allow access to certain individuals or groups while blocking access from specific locations.
In this way, it can be customized to meet specific security and access control requirements.
Here is the path you can follow to manage named locations
Microsoft Entra admin center → Protect &Secure → Conditional Access → Named Locations (under user manage tab).
In addition to the Entra admin center, you can manage named locations using the Entra PowerShell module, which is especially useful for quick management at large scale.
Basically, there are two primary ways to determine location of Office 365 users. They are:
Configure Named Locations by Country in Azure AD
The ‘countries location’ allows us to create named locations by specifying the country name. In addition to that, we can determine the countries’ location by two different types. They are:
Define Countries Location and Verify Secure Access
We can use this method to allow users to access your resources from specific IP address.
Further, When the user tries to sign in, the system will get the IP address of the user’s device .And it periodically compares with the location, we specified earlier. Thereby ensuring the login is from the specified named location and avoiding suspicious sign-ins.
If you want to determine the country location by IP address, you need to do the following steps:
- At first, from the named location tab, Click the Countries location (At the top) 🔝.
- Then, give a suitable name for the location.
- Afterwards, click the “Determine location by IP address (IPv4 only)” from the drop-down box.
- Now, select the countries that you’re planning to add as named location from the list.
- Finally, click on the Create option.
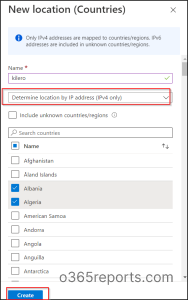
NOTE: In this case, only the IPv4 addresses map to the country’s location. IPv6 addresses will include in unknown countries/regions.
Configure Named Locations by GPS Coordinates
As of now, we’ve got a clear idea of determining the countries’ location by IP address, so let’s dive into the other option. The other option is location by GPS coordinates.
GPS coordinates are a unique identifier of a precise geographic location. So, admins can use this method to get high accuracy in location detection. Location by GPS coordinates is used to determine the location of a country/region with the help of latitude and longitude values. (GPS coordinates).
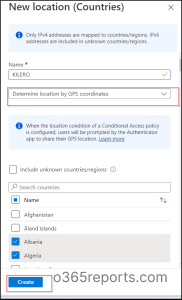
If you want to determine the country’s location by GPS coordinates, you need to do the following steps:
- From the named location tab, Click the Countries location (At the top) 🔝.
- Give a suitable name and description for the location.
- Then, click the Determine location by GPS coordinates from the drop-down box.
- Select the countries that you’re planning to add as named location from the list.
- Finally, click the Create option.
 Requirements
For this, the user needs to have an AUTHENTICATOR APP.
The user needs to install the authenticator app on mobile phones. The notification will pop up every hour inside the app. Then, the user have to share the location by giving permission.
Every hour the notification will come. And the user must approve them by push notification from the app 🔔. The Azure AD tracks the user’s location using notifications .Then it periodically compares it with specified countries, thereby ensuring the login is only from the authorized network.
Is GPS Coordinates a Savior?
A VPN is a protected network that establishes a private tunnel between the user’s device and a remote server. Undoubtedly, it ensure privacy, security, and anonymity. When a user uses VPN, the VPN simply masks the user’s true IP address with the VPN server’s IP address.
As only VPN providers have access to the IP address, it is hard for admins to trace it. undoubtedly ,here the GPS coordinates method comes as a savior!
Solution for IP Addresses that Cannot be Mapped to Countries
Some IP addresses may fail to map the exact country’s location, such as IPv6 addresses.
Besides this, with developing technology, the IPv6 addresses of users are not well-documented in databases.
In such cases, if you want to include such countries or regions too, then you can enable the INCLUDE UNKNOWN COUNTRIES/REGIONS option. Because, this type doesn’t allow for IPV6 address.
You can use these settings when the policy using should apply to unknown locations. 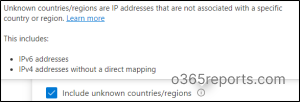
Configuring Named Locations by IP Ranges
If an organization wants its users to access Office 365 resources only from the specific IP ranges, this is the best method!. And this is a great method that can give you more accuracy in detail and help in securing the data.
In countries’ locations, we can include only IPv4 addresses.
But in this method, both IPv4 and IPv6 addresses can be included.
Follow the below steps to configure specific IP ranges in named locations:
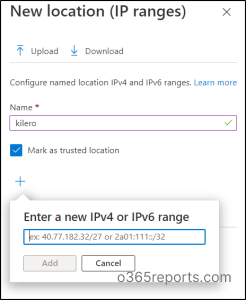
- At first, in the named location tab, click on the IP ranges location (At the top).
- Then ,give a suitable name for the location.
- After that, click the + icon and add the IPv4(Ex:141.23.22.12) or IPv6(EX: 2001:db8:3333:4444:5555:6666:7777:8888.) addresses range. Besides that, add one or more IP addresses.
- Now, If you want them to be your trusted location, click on the checkbox “Mark as trusted location”.
- At last, Click Create.
If it is not marked as a trusted location, it will come under your named location. Otherwise, it will come under the trusted locations. (We can add up to the 2000 IPv4 and IPv6 address ranges.)
👎 Drawback
Only public IP address ranges are added. While we cannot add private IP address ranges here! (Organizations using the intranet).
Point to Remember
- Apart from all, you should enter the IP address range with the subnet. Otherwise, it is not a valid one.
EXAMPLE:127.22.34.22/45 → Here 45 is the subnet.
- You can use these IP based named locations to configure CAE’s strictly enforced location policies for a Conditional access policy.
What is the Solution for Private IP Addresses?
Undoubtedly, The ultimate solution is the configuration of MFA trusted IPs.
This is clearly for the organization’s private network ,i.e., private IPs (LAN). Therefore, if an organization is using the intranet, they can configure their intranet IP addresses in MFA-trusted IPs. This also comes under the TRUSTED LOCATIONS.
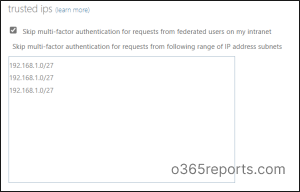
Click configure Multifactor authentication trusted IPs (At the top in named locations tab) . As a result, you are directed toward the Multifactor authentication page. Here, you can see the “skip Multifactor authentication for request from federated users on my intranet.” option.
→ Federated users on my intranet are the authorized users using the organization’s intranet .
Further they are our trusted users, then there will be no risky events. so we can provide them access without any Multi-factor authentication.
.
When added to a Conditional Access policy, the policy is periodically evaluated. Of course, it checks whether the user is on the organization’s intranet. On the contrary ,if the user is not on the intranet, the policy detects this as a non-compliant access attempt.
How To Use Named Location in Conditional Access Policies?
From the above topics, we have understood a lot about named locations. Now, let’s get into the steps to configure these named locations in Conditional Access policies !
- At first, open the ‘Conditional Access’ page and click on to create a new policy.
- Give a suitable name for the policy.
- Then select users and groups based on your need.
- Now, under clouds or actions, you can select from either cloud apps/user actions/ authentication context from the drop down based o your requirements.
- After that , under conditions, click on the Locations.
- Now, toggle the ‘Configure’ bar to Yes.
Here you’ll be given three options to select from and configure the location based on your requirement.
- Any locations- In this category, all the locations are included. For example, the named locations, trusted locations, and as well as the locations that are not specified in the named locations. If you choose the “ANY LOCATION” option , you can grant or block access for the users from any location.
- All trusted locations- Both the named location (Marked as trusted locations) as well as MFA trusted IPs comes under the trusted location.
- Selected locations- In this category, all the named locations configured by admins are shown separately. It includes the named locations determined by country range, IP ranges, and MFA-trusted IPs.
Here, you can select from any of the above location types. After that, you can proceed to configure the policy to grant/restrict access from specific locations.
⚠️ A quick caution: While configuring Conditional Access, marking office IPs as trusted locations to skip MFA prompts might seem convenient. However, this practice can weaken your Zero Trust security stance and expose your environment to potential threats.
It’s always better to validate such configurations and ensure they align with your organization’s security principles. Once your locations and access rules are properly set, you can test the enforcement using the What If API using Maester tool. You can also use the Conditional Access gap analyzer and Conditional Access insights and reporting workbook to spot the missed named locations and analyze the impacts.
Tip
– If misconfigurations in CA policies are causing unexpected sign-in failures, identify the Conditional Access policy blocking the user’s sign-in and take the necessary steps to resolve the issue.
Usually, it’s straightforward to ensure that the correct location setting is in place for a Conditional Access policy. However, there’s a sneaky possibility of misconfigurations slipping through the cracks, leaving a chance for attacks to intrude and perform malicious activities. To make matters worse, legitimate users may face unnecessary access restrictions during these misconfigurations. Thus, periodical monitoring of Conditional Access policies is essential for escaping from account compromises, phishing attacks, etc.
Therefore, to help you keep an eye on the Conditional Access policy, AdminDroid lends its hand! AdminDroid Azure AD reporting tool, provides you with crystal-clear analytics of Conditional Access policy configurations, failed sign-ins due to CA policies, MFA configured policies, etc. Also, you can get a report showing locations configured with Azure AD Conditional Access policies having information such as included/excluded locations, policies with custom locations and more.

Added to the location-configured policy, you can gain a complete analysis of the Conditional Access policy, thereby taking proactive measures to safeguard your organization from attacks. In this way, AdminDroid’s Conditional Access Policy Analytics empowers you with comprehensive insights into policy configuration analysis, policy effectiveness assessments, user behavior, and more. With this holistic approach, admins can effectively evaluate access permissions and enhance the organization’s security posture.
You can find the below reports for efficient management of Conditional Access policies with AdminDroid.
Policy Enforcement Reports
- Successfully Blocked by Policy
- Successfully Passed by Policy
- User Failed to Fulfill Policy Requirement
- Sign-ins Without Any Conditional Policy Check
Policy Assignment Overview
- All policies Assignments
- Policy with Group Assignments
- Policy with Role Assignments
- Policy with Platform Assignments
- Policy with Location Assignments
- Policy with Devices Assignments
MFA Configured policies
Policies with MFA –Displays all the policies with MFA configured grant control in Azure AD.
MFA Policies Assignment Overview- List the MFA enabled Conditional Access policies.
MFA Policies Assignment Details – Shows policies with detailed information having MFA conditions.
Moreover, AdminDroid analytics goes above and beyond by delivering a comprehensive overview of the Conditional Access policy.
Not only you can monitor the Conditional Access policy with AdminDroid, but you can gain valuable insights into the entire Azure AD environment! By the way, to make you stand in shock, AdminDroid Offers 75+ auditing reports, 10+ insightful Azure AD dashboards,45+ statistical, all at no cost. With these comprehensive reports, you can effortlessly gain a panoramic view of your Azure AD portal, visualizing every activity and configuration for better Azure AD management.
Get 360-Degree Insights into Azure Active Directory with AdminDroid!
Still, thinking? Download AdminDroid and monitor your Office 365 environment with ease!
Access Control by Named Locations
At the end of the day, the goals are simple: Safety and Security
– JODI RELL
In conclusion, whether it’s a physical office, a remote worksite, or a public space, obviously admins can define the conditions under which access to sensitive data and resources is granted or denied. This provides the admins with an assurance that only authenticated users and devices from trusted locations can access the sensitive Office 365 resources.
Overall, named locations in Conditional Access policies act as a helping hand for admins. At last, I hope this blog will help you understand the named locations in Conditional Access policies in Microsoft 365.Further,feel free to reach us in the comments for any assistance.