When managing Microsoft 365, the goal is always to make sure the right people have the power to do their job, and no more. Because these permissions decide who can reset passwords, create users, manage devices, or even delete resources. In small teams, you can assign roles to users directly. But as your team grows, managing these roles, one person at a time becomes complex and risky. This is where role-assignable groups become necessary.
Microsoft introduced them to give organizations a scalable, predictable, and secure way to manage administrative access while staying aligned with the principle of least privilege.
In this blog, we’ll break down how role-assignable groups work in Entra ID and walk through the steps to create and manage them efficiently.
What are Role-Assignable Groups in Microsoft Entra ID?
A role-assignable group is a specialized group within Entra ID that’s designed specifically for delegating permissions through Microsoft’s RBAC system. Instead of assigning a role to each user individually, the role is assigned once to the group, and every member automatically inherits all permissions tied to that role. This makes it easier for administrators to manage powerful access by maintaining a single group membership list.
However, because these groups can hold highly privileged roles, both the members and owners of role-assignable groups are treated as protected users.
For example,
Imagine a role-assignable group named Zava Security Admins that has the Security Administrator role assigned to it. Bob is the owner of this group, which means he controls who can be added or removed—but he does not automatically get the Security Administrator role unless he is also a member.
Alice is a Password Administrator, a role that normally allows her to reset user passwords. If Alice were allowed to reset Bob’s password, she could reset it, sign in as Bob, add herself as a member of the Zava Security Admins group, and instantly become a Security Administrator through group membership. ⚠️
To prevent this type of privilege escalation, Entra ID protects the owners and members of role-assignable groups. As a result, lower-level admins like Alice cannot reset or modify the credentials of anyone in that group including Bob, unless they are privileged role administrator.
Prerequisites and Limitations for Role-Assignable Groups
Before you create a role-assignable group, make sure you meet the following requirements:
- You must have a Microsoft Entra ID P1 or P2.
- To create the group, you must be logged in as a Global Administrator or Privileged Role Administrator.
- The group must be a Security group or a Microsoft 365 group (Unified).
Along with these prerequisites, there are a few important limitations you should keep in mind while creating a role-assignable group.
- A group must be created as role-assignable from the start. You cannot convert an existing group into a role-assignable group.
- Once a group is marked as role-assignable, this setting cannot be changed (it’s permanent).
- Role-assignable groups cannot use dynamic membership rules. This prevents admins from modifying dynamic rules to add themselves and indirectly gain privileged roles.
- There is a maximum limit of 500 role-assignable groups per Entra ID organization.
- Group nesting isn’t supported. A group can’t be added as a member of a role-assignable group.
How to Create Role-Assignable Groups in Microsoft Entra ID?
You can create a role-assignable group in Microsoft Entra ID using three ways.
Create Role-Assignable Groups Using Microsoft Entra Admin Center
To create a role-assignable group from the Microsoft Entra admin center, follow the steps below:
- Sign in to the Microsoft Entra admin center.
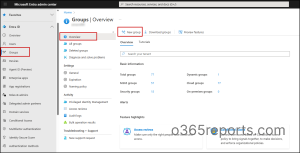
- Under Entra ID, select Groups -> Overview -> New group.
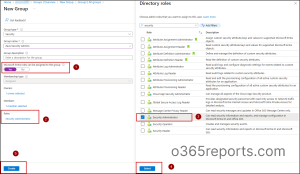
- Choose the group type — Security or Microsoft 365.
- Give the group a suitable name and description.
- Toggle Microsoft Entra roles can be assigned to the group button to Yes. This makes the group role-assignable, so you can assign Entra ID roles to it.
- Owners: Assign at least one group owner.
- Members: Add members now or skip and add them later.
- Roles: Search and select the Entra ID role the group should manage from the directory roles list, then click Select.
- Click Create to finish creating the group.
When you click Create, you will see a confirmation message:
“Creating a group to which Microsoft Entra roles can be assigned is a setting that cannot be changed later. Are you sure you want to add this capability?”
This is a final reminder that once a group is made role-assignable, its status is irreversible – you cannot convert it back to a normal security group.
To stop the group from having role-based permissions, you must either:
- Remove the role assignment from the group, or
- Remove users from the group.
Configure Role-Assignable Groups Using PowerShell
You can create role-assignable groups using the New-MgGroup cmdlet in Microsoft Graph PowerShell.
First, connect to Microsoft Graph PowerShell with the Group.ReadWrite.All scope, and run the following cmdlet.
|
1 |
$group = New-MgGroup -DisplayName "<GROUP NAME>" -Description "<GROUP DESC>" -MailEnabled:$false -SecurityEnabled:$true -MailNickName "<MAIL NICK NAME>" -IsAssignableToRole:$true |
In this example, we’ll create a role-assignable security group. If you want to create a Microsoft 365 group, you must additionally include the –GroupTypes “Unified” parameter in the cmdlet as,
|
1 |
$group = New-MgGroup -DisplayName "<GROUP NAME>" -Description "<GROUP DESC>" -MailEnabled:$true -SecurityEnabled -MailNickName "<MAIL NICK NAME>" -IsAssignableToRole:$true -GroupTypes "Unified" |

After creating the group, you must assign the required Entra ID role to it using the New-MgRoleManagementDirectoryRoleAssignment cmdlet.
|
1 |
$group = Get-MgGroup -Filter "displayName eq '<GROUP NAME>'"; $role = Get-MgRoleManagementDirectoryRoleDefinition -Filter "displayName eq '<ROLE NAME>'"; New-MgRoleManagementDirectoryRoleAssignment -PrincipalId $group.Id -RoleDefinitionId $role.Id -DirectoryScopeId "/" |
Make sure to replace <ROLE NAME> and <GROUP NAME> with the appropriate Entra ID role and the name of your role-assignable group.

If you need a quick overview, you can generate a full role-assignable groups report that lists all role-assignable groups, with details such as group name, group ID, etc.
Create Role-Assignable Groups Using Microsoft Graph API
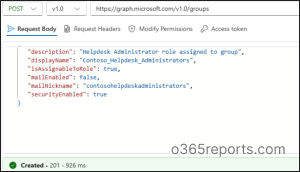
You can also create role-assignable groups programmatically using the Microsoft Graph API. To do this, send a POST request to the /groups endpoint and include the property “isAssignableToRole”: true.
Note: To create a role-assignable group, the calling user or app must have Groups.ReadWrite.All permission with admin consent; otherwise, the request fails with 403 Forbidden.
In the Graph Explorer, configure as follows:
HTTP method: POST
API Endpoint: https://graph.microsoft.com/v1.0/groups
Request Body:
{
“description”: “Helpdesk Administrator role assigned to group”,
“displayName”: “Contoso_Helpdesk_Administrators”,
“isAssignableToRole”: true,
“mailEnabled”: false,
“mailNickname”: “contosohelpdeskadministrators”,
“securityEnabled”: true
}
Now we have created a security role-assignable group. You can also create Microsoft 365 groups using the Graph API by sending a POST request to the same /groups endpoint. But make sure to include –GroupTypes “Unified” to specify that it’s an M365 group.
After creating the group, you must still assign the required Entra ID role to the group using the Role Assignments API as given below:
POST https://graph.microsoft.com/v1.0/roleManagement/directory/roleAssignments
{
“@odata.type“: “#microsoft.graph.unifiedRoleAssignment”,
“principalId”: “<Object ID of user or group>”,
“roleDefinitionId”: “<ID of role definition>”,
“directoryScopeId”: “/”
}
Integrating PIM with Role-Assignable Groups
The default configuration above results in standing access — meaning every member has the administrative role permanently. This violates the security principle of Just-In-Time (JIT) access. Privileged Identity Management (PIM), a feature within Entra ID Governance, solves this by turning a permanent assignment into an eligible assignment.
Here’s how the integration works:
- PIM manages the membership of the role-assignable group itself.
- The Entra ID role still stays permanently assigned to the group.
- PIM makes a user’s membership eligible, not active, so they aren’t part of the group (and don’t hold the role) until they activate it.
- Users become temporary group members only when they request and activate access through PIM.
- Each member can activate the role only for a fixed, approved time period.
Note: An Entra ID P2 license is required to configure PIM for groups.
Other Points to Remember
- Privileged Role Administrators can create access reviews for role-assignable groups.
- To add a role-assignable group to an access package, you must be a User Administrator and also an owner of that group.
Role-assignable groups bring structure, security, and scalability to Entra ID role management. Instead of juggling individual assignments, you manage a single group, which makes privileged access easier to control, audit, and govern.
We hope this blog helps you get a clear overview of how role-assignable groups work in Entra ID. Thanks for reading. For more queries, feel free to reach us through the comments section below.