Effective communication is vital for organizations of all sizes, and emails play a crucial role in that process. After a phishing attempt is discovered, an admin needs to investigate whether any employees received or interacted with the malicious email. Identifying users who are at risk allows the admin to take immediate action, such as alerting affected users, blocking the threat, and securing the organization’s email environment. To address these concerns and maintain email security, Microsoft offers message trace, a powerful feature that tracks the mail flow within your Microsoft 365 environment. Previously available in the classic Exchange Admin Center (EAC), this feature has been significantly enhanced in the new EAC, offering more detailed insights into email delivery.
In this blog, we will cover everything you need to know about the message trace in the new EAC and walk you through the steps to configure and use it effectively.
Message Trace in the New Exchange Admin Center
Message trace in Exchange Online allows admins to search and track email flow within their organization over a specified period. It helps identify delivery issues, rejections, delays, redirections, or message delivery restrictions, such as when emails are routed to a Catch-All mailbox, a manager’s mailbox, or other specified destinations. It also provides a detailed list of the events that occurred to the message before it reached its final status.
Benefits of Message Trace:
With the information gained from a message trace, you can efficiently address malicious emails, troubleshoot mail flow issues, validate policy changes, and reduce the need for technical support. Here are some common questions that message trace can help answer:
- How to check if an email is sent or not?
- Why is my message taking so long to reach the recipient?
- Why did I get a non-delivery report?
- Why did my email message bounce back?
- Why didn’t I receive an expected email message?
- Why did I receive an unexpected message?
- Why didn’t someone receive my message?
- Was the message marked as spam?
- Was the message detected to contain malware?
- Which mail flow rule or DLP policy was applied to a message?
Prerequisites for Exchange Message Trace
License: Message trace feature is available for all Business, Enterprise, and Exchange Online plans according to Microsoft.
Permissions: You need to be a global administrator, Exchange admin, or a member of the organization management role group to access and use Message trace.
How to Run a Message Trace in Exchange Online?
To access message trace in the modern Exchange admin center, follow the steps below.
Step 1: Open the new Exchange Online admin center.
Step 2: Go to Mail flow -> Message trace. The different tabs within this page includes:
- Default Queries: It contains certain pre-built queries provided by Microsoft. These are commonly used to track email message flows within your organization.
- Custom Queries: These are specific message traces created and stored by admins in your organization.
- Autosaved Queries: The list of last 10 queries that were run but not saved manually. This feature helps you easily resume recent work by listing the most recently executed queries.
- Downloadable Queries: Displays downloadable report requests and shows the reports once they are downloaded. Message trace reports requested by your organization can be accessed here.
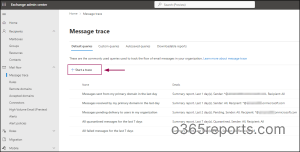
Step 3: To run a message trace, select “+Start a trace”. On clicking it, a flyout page will appear.
Now let’s discuss each option available in the flyout page in detail.
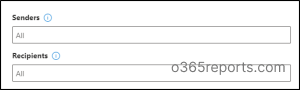
I ) Senders and Recipients:
This option lets you choose specific senders and recipients for message tracking. The default setting is ‘All’ and it tracks all email messages. To track certain user’s mail flow, specify their email addresses.
II) Time Range Slider:
You can select a time range of up to 90 days using the time range slider. The default is set to 2 days. If you need to specify custom details like time zone, start date, and end date, switch to the “Custom time range” view.
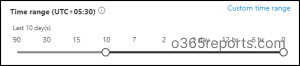
Custom time range:
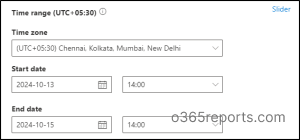
📝 Note: In the modern Exchange admin center (EAC), search results for messages that are less than 10 days old are displayed instantly. Messages older than 10 days are available as a downloadable CSV report. These reports are generated from archived data and may take hours to process, especially if multiple requests are queued.
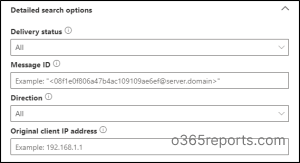
III) Detailed Search Options:
When you’re using message trace to track emails, you can filter results based on different delivery statuses and other details. Here’s a breakdown of the key options:
1. Delivery Status:
This shows the current state of an email and can help you figure out what happened to it. The main statuses are:
- All: Shows all statuses (default).
- Delivered: The email was successfully sent.
- Expanded: The email was sent to a group, and the group was broken down into individual members for delivery.
- Failed: The email delivery failed.
- Pending: The email is still being delivered or tried again.
- Quarantined: The email was flagged and held, possibly because it’s spam or phishing.
- Filtered as spam: The email was recognized as spam and blocked.
- Getting status: The system is still processing the email, and the status isn’t available yet.
Sometimes, emails fail to reach the recipient due to invalid email addresses, full storage mailboxes, or restrictions on the recipient’s domain. Under such situations, emails will get bounced and typically generate a Non-Delivery Report (NDR) back to the sender. Using message trace, admins can quickly identify and resolve email bounces to ensure a smooth and reliable email delivery experience across the organization.
2. Message ID:
Each email has a unique Message ID (Client ID) that is generated when the email is sent, and the ID remains the same throughout its lifetime. In Microsoft 365, this ID appears as a string within brackets (e.g., 12345@domain.com). You can find the Message ID in the email’s header under the “Message-ID:” token. To track or search for specific emails, make sure to include the entire ID, including the brackets. Users can provide this ID to assist in investigating specific messages.
3. Direction:
This helps you filter emails based on where they’re coming from or going to:
- All: Shows both inbound and outbound emails.
- Inbound: Emails sent to people in your organization.
- Outbound: Emails sent from people in your organization.
4. Original Client IP Address:
The original client IP address shows the sender’s device IP, which can help investigate issues like hacked computers sending spam. This information is available only in enhanced or extended reports, which can be downloaded. Note that these reports keep the data for up to 10 days.
IV) Report Type:
There are three main types of reports you can generate to see details about email delivery in your organization. Here’s a quick guide to each type:
1. Summary Report:
Use this report if you’re looking at emails from the last 10 days.
- This report gives you basic information about emails without needing any extra filters (like specific senders or recipients).
- You can get up to 20,000 results, and they show up almost instantly.
- Your last 10 summary report queries are automatically saved, so you can easily access them again.
2. Enhanced Summary Report:
This report includes everything in the summary report, plus additional details like the direction of the message (inbound or outbound) and the original sender’s IP address.
- This report is only available as a downloadable CSV file.
- It returns up to 100,000 results.
- You need to apply at least one filter (like senders, recipients, or Message ID) to generate this report.
- It can take several hours to generate because it uses older, archived data.
3. Extended Report:
This report includes everything in the Enhanced Summary Report but with more in-depth routing and event details like client IP, server IP, server hostnames, original server IP, etc.
- Available as a CSV file.
- This report gives you more detailed data but only up to 1,000 results.
- Similar to the Enhanced Summary Report, you need to filter by senders, recipients, or Message ID.
- Since it uses archived data, expect it to take several hours to generate.
- For both the Enhanced summary report and Extended report, archived data from the last 24 hours is typically unavailable for selection.
Step 4: After configuring all the above sections, click Search.
View the Message Trace Search Results in Exchange Admin Center
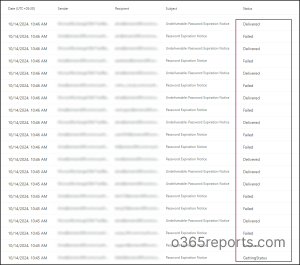
After you run the message trace, the results are sorted by descending date/time (most recent events first). Next to each message, you can verify its delivery status, including Delivered, Failed, GettingStatus, Pending, etc.
Click on any message and expand the Message events to see what happened to the message.
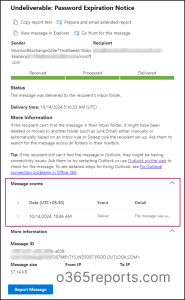
You can use the “Report Message” button to submit suspected spam, phish, suspicious URLs, legitimate email getting blocked, and email attachments to Microsoft.
If you’re concerned about potential data leaks, especially from outbound mail flow, it’s good practice to trace emails sent to external domains. This helps ensure sensitive information isn’t being unintentionally or maliciously shared outside the organization.
Track Emails with Office 365 Message Trace Using PowerShell
Similarly, you can also track emails using message trace in PowerShell by running cmdlets like Get-MessageTrace. Just make sure you’re connected to Exchange Online PowerShell.
That’s it! Thanks for reading. We hope this guide gave you a good starting point for using message trace in new Exchange admin center. In addition, make use of mailflow status reports in Microsoft 365 to further secure your emailing process. If you have any questions, feel free to drop them in the comments.