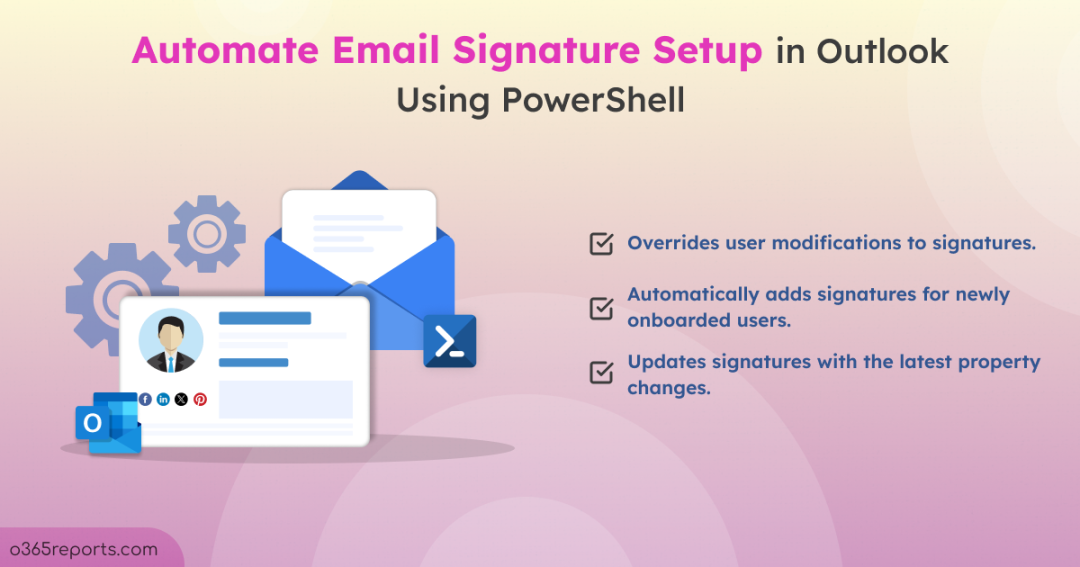
Email signatures in Microsoft Outlook play a critical role in maintaining your company’s branding and compliance, as they are automatically added to each message sent. Although these signatures can be configured organization-wide or customized for individual users, the possibility for users to override these settings could affect your brand’s consistency and professionalism. We have received significant feedback on our existing blog about ‘email signature configuration‘, with many expressing a strong desire for automated ways to create email signatures.
In response to the valuable feedback, we’ve developed a PowerShell script to automate Outlook email signature setup, ensuring signatures are applied consistently without manual interruption. This not only secures your brand’s consistency but also maintains professionalism in your communications.
Is it possible to stop users from modifying their corporate email signatures? While complete prevention isn’t feasible, our PowerShell script is designed to routinely override any user modifications, reapplying the standard signatures.
Let’s explore how admins can automate email signatures to maintain consistency and streamline email communications effectively.
Configure and Automate Email Signature in Microsoft 365
Microsoft 365 admins automate email signatures in Outlook to
- Ensure that users are stopped from manually changing the corporate email signature
- Automatically apply signature to onboarded users, and more.
Outlook signature automation helps to maintain consistency and increase efficiency. Configuring email signatures via the mail flow rule and further automating the process involves multiple steps and consumes more time. To simplify this task, we’ve automated Outlook signature using PowerShell script, which acts as a free email signature generator.
Script Highlights
- The script automatically verifies and installs the Exchange PowerShell module (if not installed already) upon your confirmation.
- Automates email signature deployment and makes it scheduler friendly.
- Provides the option to create default or custom text signatures.
- Provides the option to configure default or custom signatures using HTML templates.
- Automates email signature setup for all mailboxes or bulk mailboxes.
- Automates email signature configuration for user mailboxes alone.
- Exports signature deployment status to a CSV file.
- Supports certificate-based authentication (CBA) too.
Download Script: AutomateSignatureInOutlook.zip
Automate Email Signature in Outlook
Automating email signatures helps admins in many ways and reduces manual time and effort. It will be beneficial especially for larger organizations. Automating email signature configuration involves the following two steps:
- Configure email signature in Outlook – Execute the PowerShell script
- Automate email signature configuration
Step 1: Configure Email Signature in Outlook – Execute the PowerShell Script
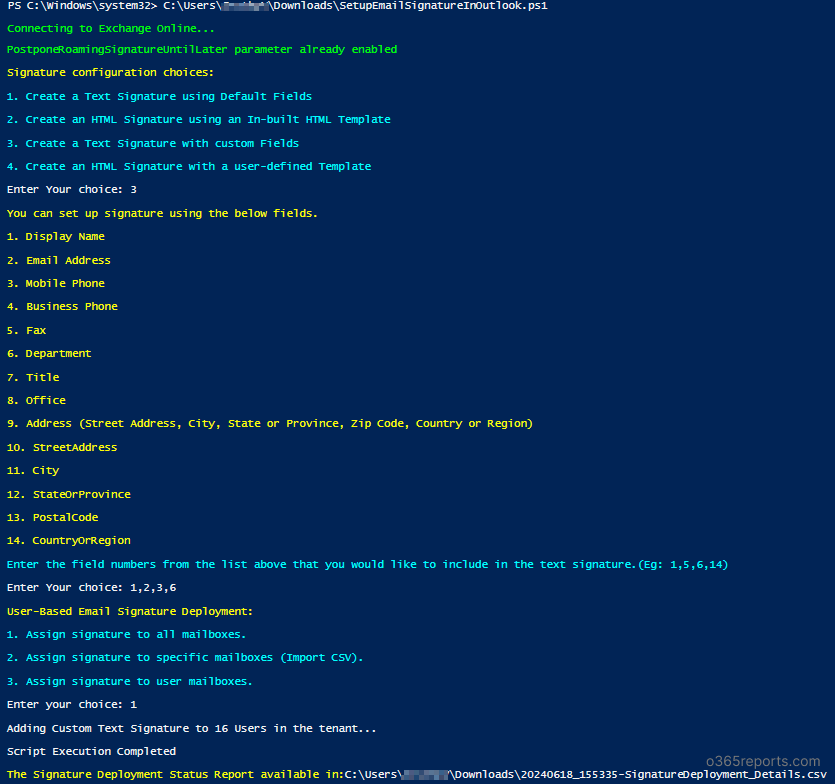
Before scheduling the script in the Task Scheduler or Azure Automation, you must manually run the script in PowerShell for choosing appropriate signature type and signature assignment options for your organization. Remember that what methods you choose here will be scheduled and run periodically. You can choose either default or customized signatures using text fields or HTML templates. Also, if you want to use CSV file, or you want to apply this configuration for user mailboxes alone, you should opt for the required method in this step itself.
Once executed, all the settings are saved as a configuration file. The file will be used as input during scheduled time.
Let’s see the steps to execute the automated Outlook signature script.
- Download the script.
- Start the Windows PowerShell.
- Run the script with MFA and non-MFA accounts.
|
1 |
./AutomateSignatureInOutlook.ps1 |
This cmdlet lets you configure and add an email signature to Exchange Online mailboxes. You can choose the desired method and proceed with further steps. For detailed script execution steps, refer to the ‘Set up email signature in Outlook’ blog.
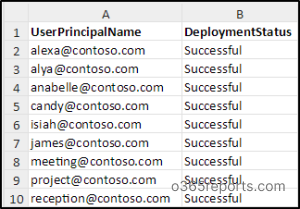
Email Signature Deployment Status – Sample Output
After the successful configuration of the email signature using the script, it automatically exports the email signature deployment status report into a CSV file, like below.
Step 2: Automate Email Signature Configuration
Once you successfully executed the script in the above step, you can proceed to automate the email signature. It helps you to schedule the script using task scheduler or Azure automation to run periodically, which automatically updates the signature with the latest changes of user properties done in the admin center.
For example, if you set up an org-wide email signature using default text fields, including display name, phone number, address, etc. If any of the property values change in the admin center, the script will run at the specified time and automatically update the respective user’s signature with the latest values. Also, the deployment status report will be generated after each schedule. Thus, automating email signatures is essential to minimize manual time and effort.
Let’s explore how to set up automatic email signatures in Outlook using the Task Scheduler.
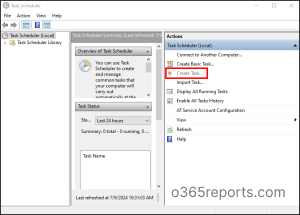
- Open the Task Scheduler in administrator mode.
- Click on the ‘Create Task’ option under ‘Actions’.
- In the ‘General’ tab, provide a name for the task and select ‘Run whether user is logged on or not’ under Security options.
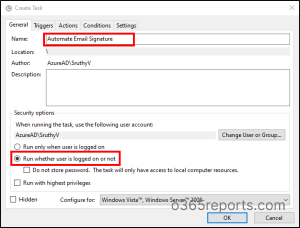
Note: Ensure that the system in which you schedule the task is ON with active network connectivity to avoid execution failures.
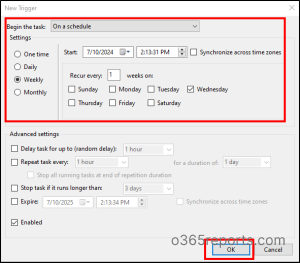
- Then, navigate to the ‘Triggers’ tab and click the ‘New’ button at the bottom. A popup appears in which you can configure the schedule duration.
- Enter the start date, time, and the schedule duration based on your requirements. Then, click OK.
- Then, navigate to the ‘Actions’ tab and click the ‘New’ button at the bottom. A popup appears for new action creation.
- In the ‘Program/script’ text box, browse or manually enter the ‘powershell.exe’ file name.
- In the ‘Add arguments (optional)’ text field, you must enter the path in which the script is saved, authorization details, and add the ‘Taskscheduler’ parameter as shown below. Click OK.
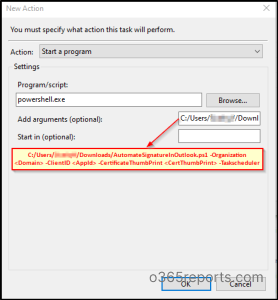
Note: For authorization requirements, you can use either credentials or certificate-based authentication method. For seamless authorization, certificate-based authentication is the go-to method.
-
- You can explicitly pass credentials (username and password) and execute the script as shown below. Remember that this method supports only non-MFA accounts.
|
1 |
./AutomateSignatureInOutlook.ps1 -UserName <UPN> -Password <Password> |
-
- You can use a certificate-based authentication method by registering the app in Azure AD.
|
1 |
./AutomateSignatureInOutlook.ps1 -Organization <Domain> -ClientID <AppId> -CertificateThumbPrint <CertThumbPrint> |
You can use either a certificate issued by a recognized certificate authority (CA) or create a self-signed SSL certificate.
- Then, click OK again on the Actions page. You might be asked to enter the user account credentials of the local system. Once successfully entered, the task will be created.
Benefits of Automating Email Signatures – Explore More Use Cases
As mentioned above, automating email signatures in Outlook will be beneficial in more ways for admins to enhance efficiency and security. Let’s see a few of them below.
1. Prevent Users from Manually Changing Email Signatures
Though admins configure email signatures for users, they can be able to manually change their signatures in Outlook settings. If a newbie inadvertently modifies the standard signature, it might lead to affecting professional communication and branding.
So, automating email signatures by scheduling the script to run frequently like weekly or daily ensures that the signature is standardized for all users. Also, it updates the signature in the same format that you configured using the script. In this way, we can avoid users manually changing their email signatures efficiently.
2. Automatically Add Signature to Onboarding Users
Admins often struggle to add email signatures to each onboarding user, especially in larger organizations. To streamline this process, you can prepare a CSV file and run the script by including the path of the CSV file in step 1. That’s all!
Hereafter, whenever new users are onboarded to your organization, you just need to update the CSV file with onboarded users’ UPN. The email signature tool automatically adds the signature to the onboarded user in the next schedule, or you can manually trigger the schedule to apply the signature instantly.
3. Efficiently Fulfill Compliance Requirements
Some industries strictly align with the regulatory compliance requirements, including health care, finance, etc. Automated signatures will help them ensure that all email messages include essential disclaimers or legal notices without fail, ensuring adherence to compliance standards.
Apart from configuration and automation, periodic monitoring of signature settings is essential for managing email signatures. AdminDroid’s Email signature settings report provides details like display name, auto-add signature status, signature text and HTML, etc., for each mailbox. Moreover, the tool provides 1800+ in-depth reports, 30+ stunning dashboards, and more outstanding features for efficiently managing all Microsoft 365 services.
Download AdminDroid today for enhanced tracking and management in Microsoft 365 environment!
I believe this blog provides detailed steps on configuring automatic email signatures and the benefits of signature automation in Outlook. For more queries, contact us through the comment section. Happy automating!


