Microsoft Outlook is the most popular email and calendar application used in the business world today. However, while most users have gotten the hang of basic features, not everyone knows how to get the most out of it. For example, do you know how to set up email signatures for Microsoft 365 user mailboxes and shared mailboxes in Outlook?
Having distinct Microsoft 365 email signatures for shared mailbox and user mailbox can be incredibly useful. They not only elevate professionalism but also contribute to a strong brand identity. Let’s get started with the steps to set up distinct signatures for user and shared mailboxes, ensuring seamless email communication.
How to Set Up Email Signature for Shared Mailboxes?
Creating email signatures for shared mailboxes can be accomplished through two methods: either directly within Outlook or via the Exchange admin center. Let’s dive into the detailed steps.
- Create email signatures for shared mailboxes in Outlook
- Create email signatures for shared mailboxes in Exchange admin center
Create Email Signatures for Shared Mailboxes in Outlook
End users can set up an email signature for Microsoft 365 shared mailboxes by following the steps mentioned below.
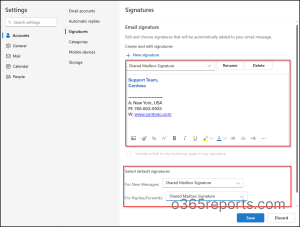
- Open shared mailbox in New Outlook Desktop client.
- Click on Settings (gear like icon) at the top right corner.
- Navigate to Accounts –> Signatures.
- Select New signature, then give it a distinct name.
- In the text box below, craft your signature and customize it with preferred font, color, and styles.
- Select Save once you are done.
- Proceed to Select default signatures for shared mailbox and indicate whether it should be applied to new messages, replies, and forwards automatically.
- Click Save.
Email Signature Permissions in Shared Mailboxes
Remember, when a user sends emails from a shared mailbox, the signature they use depends on their permissions.
- If the user has “Send as” or “Send on behalf of” rights for the shared mailbox, the emails will use their own signature.
Here are some points to consider:
- For users still utilizing the classic Outlook desktop client, to access email signatures you can head to File –> Options –> Mail tab –> Signatures.
- Alternatively, if you’re using Outlook for Web and haven’t transitioned to the new interface yet, navigate to Settings –> Mail –> Compose and reply –> Email signature.
Create Email Signatures for Shared Mailboxes in Exchange Admin Center
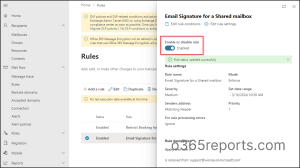
Admins can set up email signatures for shared mailboxes via mail flow rules in the Exchange admin center. Follow the steps below.
- Sign in to the Exchange admin center.
- Navigate to Mail Flow –> Rules.
- Click on Add a Rule and select Apply disclaimers from the drop down.
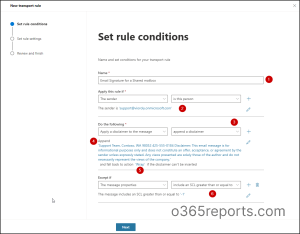
- Give your rule a descriptive name.
- Under Apply this rule if, choose ‘The sender’ from the first dropdown menu, and then select ‘is the person’ from the next dropdown. From there, you’ll be able to pick a shared mailbox.
- Ensure that the ‘Apply a disclaimer to the message’ and ‘append a disclaimer’ options are already selected in the Do the following section.
- Select Enter Text and type your desired disclaimer. You can specify disclaimer text either as plain text or using HTML code for formatting.
- Click on Select one, choose Wrap, and then Save it. Opting for Wrap as a fallback option will ensure the disclaimer is included even in cases of encryption or mail settings.
- Specify any exceptions under Except if for sender, recipient, attachment, etc.
- Choose Next.
- Choose Enforce under Rule mode to immediately enable the disclaimer.
- Select a Severity level according to the needs.
- Set the activation date and deactivation date for the rule as per the requirements.
- Choose Header to match sender address in the message. This ensures that the disclaimer is applied accurately based on the sender’s address as it appears in the message header.
- Then, select Next and Finish.
- Once created, the mail flow rule is disabled by default. Select it from the rules list and use the toggle to enable the rule.
Note: You can also configure org-wide email signatures to highlight the organization’s information in the emails.
How to Set Up Email Signature for User Mailboxes?
Like shared mailboxes, email signatures for user mailboxes will give recipients an immediate sense of who you are and what you do, setting the tone for everything that follows in your email. If you want to exclude any user from accessing email signature feature in their Outlook, you can be able to create and assign specific role assignment policy to users’ mailbox. To set up email signatures for user mailboxes, simply follow the same steps outlined above, but ensure you’re logged in with the user account in Outlook. You can check out the blog on setting up email signatures in Microsoft Outlook, to learn the steps in detail.
However, users can able to change their signatures in Outlook settings which is truly difficult to manage for admins to maintain brand consistency. To stop users from changing their signatures manually and to maintain standardized signature within organization, you can automate email signature setup in Outlook which can be scheduled to run periodically and it overrides the users’ manual changes.
By following the simple steps outlined in this guide, you can unlock the full potential of Outlook’s signature customization features. So, take advantage of this opportunity to leave a lasting impression with every email you send. Feel free to reach us in the comment section. We would be glad to assist you!