
Ever been in a situation where you need to change an existing external user to an internal user in your organization? This can be due to several reasons such as improved collaboration, reorganizations, mergers, and acquisitions. One notable method to convert Microsoft 365 externals users to internal users is the External User Conversion feature in Entra ID which is currently in preview. With this feature, admins are no longer required to delete existing user objects and create new ones.
Let’s get into the nitty-gritty!🚀
Difference Between External Users and Internal Users in Microsoft 365
| Internal Users | External Users |
|
|
What Happens During External User to Internal User Conversion in Microsoft 365?
Conversion of external users into internal members preserves the user objects, permissions, and group memberships. Thereby, keeping their original account without affecting their existing access. As a result, the user can sign in to the host tenant as an internal user and access resources as a member. Also, it’s worth noting that the userType of member vs guest that you see only controls a user’s permissions in the current tenant. While you can change their permission level, it won’t affect whether they’re internal or external users.
There are generally two types of user conversions that you can make:
Cloud user conversion: When transitioning a cloud user from an external to an internal status, administrators need to designate a user principal name (UPN) and password for the user. For cloud-only users, the user principal name should be non-federated.
Synced user conversion: If the user’s account is synced with on-premises systems (like if they use the same login for both their work computer and cloud services), administrators don’t need to worry about this because they’ll continue to use their existing credentials.
- Synced users & federated authentication:
-
- If Password Hash Sync (PHS) is enabled, administrators cannot set a new password during conversion.
- If the federated tenant doesn’t have PHS enabled, administrators can set a password.
- When dealing with managed tenants that utilize cloud authentication, administrators must provide a password during the conversion process.
How to Convert Microsoft 365 External Users to Internal Users?
Converting users from external to internal can be done from the Microsoft Entra ID portal and by leveraging MS Graph API.
- Convert external user using Microsoft Entra ID
- External user conversion using MS Graph API
- Convert external user to internal using PowerShell
For onboarding external users as internal users using the Microsoft Entra ID, make sure you fulfill the following requirements.
- You have at least a user administrator role assigned.
- Only people who are externally authenticated to your organization are eligible for conversion.
⚠️ Caution: When testing the external user conversion process, choose accounts that won’t disrupt users if they become inaccessible.
1. Convert External User Using Microsoft Entra ID
To convert external users to organization users using Microsoft Entra ID, follow the steps below.
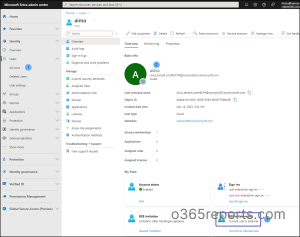
Step 1: Sign in to the Microsoft Entra admin center.
Step 2: Under Identity, select ‘Users’ -> ‘All users’.
Step 3: Select the required external Entra ID user you want to convert. In case you want to identify all office 365 external users, you can achieve it effortlessly using PowerShell.
Step 4: Click ‘Convert to internal user’ under ‘B2B collaboration’ tab. A flyout page appears.
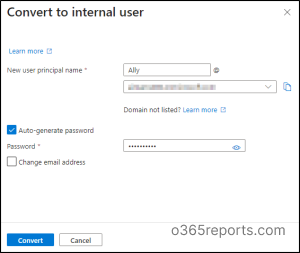
Step 5: Provide a new user principal name for the user and select the domain.
Step 6: Enter the new password or choose to use an auto-generated password.
Step 7: The ‘Change email address’ allows you to define an optional mail address for cloud users.
Step 8: After reviewing the changes made, click on ‘Convert’ to upgrade the external user to an internal user.
2. External User Conversion Using MS Graph API
To convert an externally authenticated user into an internal user using MS Graph API,
Step 1: Sign in to Microsoft Graph Explorer using your Microsoft 365 account.
Step 2: In the HTTP request bar, set the HTTP method to “POST” and select the version as “beta”.
Step 3: In the ‘Modify permissions’ tab, give consent to User-ConvertToInternal.ReadWrite.All permission.
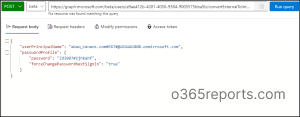
Step 4: In the HTTP request bar, enter the request by replacing the user id with the external user’s id.
|
1 |
https://graph.microsoft.com/beta/users/{userid}/convertExternalToInternalMemberUser |
Step 5: To convert a cloud user and require them to reset their password on the next sign–in, enter the given query in the ‘Request body’.
|
1 2 3 4 5 6 7 |
{ "userPrincipalName": "ally.com#EXT#@contoso.onmicrosoft.com", "passwordProfile": { "password": "Zdi087#2jhkahf", "forceChangePasswordNextSignIn": "true" } } |
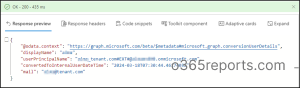
Step 6: Replace the UserPrincipalName in the above script with the external UserPrincipalName and click ‘Run Query’. The response object shows the following. If the execution returns a 200 OK response code, it indicates that the user is successfully converted into an internal user.
For converting a cloud user by changing their mail address, enter the following query as request.
|
1 2 3 4 5 6 7 8 |
{ "userPrincipalName": " ally.com#EXT#@contoso.onmicrosoft.com ", "passwordProfile": { "password": "Zdi087#2jhkahf", "forceChangePasswordNextSignIn": "true" }, "mail": "AllyInternal@contoso.onmicrosoftcom" } |
3. Convert External User to Internal Users Using PowerShell
While the Microsoft Entra admin center and Graph API work well for converting individual users, administrators often need to convert multiple external users at once. In such cases, Microsoft Graph PowerShell offers a more efficient and scalable approach for both single-user and bulk user conversion.
Before proceeding, ensure that you are connected to Microsoft Graph PowerShell.
Convert Single External User to Internal User With PowerShell
To convert a single external user, run the following command:
|
1 2 3 4 5 6 7 |
Convert-MgBetaUserExternalToInternalMemberUser ` -UserId "<UserId>" ` -UserPrincipalName "<UPN>" ` -PasswordProfile @{ Password = "TempPassword@123" ForceChangePasswordNextSignIn = $true } |
Make sure to replace the UserId, UserPrincipalName, and Password with the appropriate values for the user you want to convert.

This command converts the external user into an internal member while assigning a new password and forcing the user to reset it during the next sign-in.
Bulk Convert External Users to Internal Users Using CSV
For bulk conversion, prepare a CSV file with the following columns: UserId, UserPrincipalName, Password, and ForceChangePasswordNextSignIn.
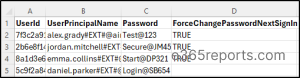
Then run the following script. Make sure to replace <CSVFilePath> with the actual path of your CSV file.
|
1 2 3 4 5 6 7 8 9 10 11 12 13 14 15 16 17 18 19 |
$Users = Import-Csv "<CSVFilePath>" foreach ($User in $Users) { $PasswordProfile = @{ Password = $User.Password ForceChangePasswordNextSignIn = ($User.ForceChangePasswordNextSignIn -eq "TRUE") } $Params = @{ UserId = $User.UserId UserPrincipalName = $User.UserPrincipalName PasswordProfile = $PasswordProfile } try { Convert-MgBetaUserExternalToInternalMemberUser @Params Write-Host "Converted: $($User.UserId)" -ForegroundColor Green } catch { Write-Host "Failed: $($User.UserId)" -ForegroundColor Red } } |
This script reads users from the CSV file and converts each external user into an internal member.
Manually setting passwords for each user is time‑consuming and often results in weak credentials, inconsistent formats, and delays. To avoid this, use the script to bulk convert external to internal users with auto-generated passwords and UPNs to maintain consistency. This approach enforces compliance, saves valuable admin time by providing a detailed, password-protected CSV log file with conversion status, errors, and updated user details.
Now that external users are on board, let’s solidify Microsoft 365 security with best practices.
We hope that this guide has helped you convert an externally authenticated user into an internal user. Thanks for reading! If you got any queries, feel free to reach us through the comments section.


