As we know, Microsoft does not allow emails to hit the inbox that are identified as malware or high-confidence phishing in order to keep your organization safe. By default, Microsoft uses Exchange Online Protection (EOP) to protect your M365 environment against spam, malware, and more such email threats. EOP filtering verdicts may sometimes end in the wrong way causing the bad message (a false negative) to get through to the users while the good message (a false positive) doesn’t. To overcome this, Microsoft came up with Tenant Allow/Block list to override the filtering verdicts.
Where to Create Tenant Allow/Block List?
There are two ways to create tenant allow or block lists, one via the Microsoft 365 Defender portal and one via PowerShell.
To access the Tenant Allow/Block list from the Microsoft 365 Defender portal,
Step 1: Open the Microsoft 365 admin center.
Step 2: Select Security under the list of admin centers.
Step 3: Choose Policies and Rules under the Email & Collaboration section.
Step 4: Navigate to Threat Policies –> Tenant Allow/Block Lists under the Rules category.
Note: Tenant Allow/Block entries can also be made on the Submissions page of the defender portal. In the tenant allow/block list, you can include,
Note As soon as an entry is created, it will get activated in 30 minutes. In rare cases, it may take up to 24 hours to get active.
Who can Create Tenant Allow/Block list?
Find the licensing requirements for implementing a Tenant Allow/Block list within an organization.
- Exchange Online Protection
- Microsoft Defender for Office 365 plan 1 and plan 2
- Microsoft 365 Defender
You must be a member of one of the following role groups to add or remove values from the Tenant Allow/Block List.
- Organization Management role group
- Security Administrator role group
- Security Operator role group
Members of the global reader, security reader, and view-only configuration role groups will have read access to the tenant allow/block list.
Tenant Allow/Block List Creation Limits
Find the new license plans for Tenant Allow/Block List entries.
For Microsoft Defender for Office 365 Plan 2 Customers:
- From early October 2023, subscribers of Microsoft Defender for Office 365 plan 2 will gain the ability to generate an impressive 10,000 block entries and 5,000 allow entries within the Tenant Allow Block List for each category (such as Domains & addresses, Files, and URLs) through administrative submissions.
For Microsoft Defender for Office 365 Plan 1 Customers:
- Customers utilizing Microsoft Defender for Office 365 plan 1 will have the option to create up to 1,000 block entries and 1,000 allow entries within the Tenant Allow Block List for each category through administrative submissions.
For Exchange Online Protection Customers:
- Subscribers to Exchange Online Protection will retain a limit of 500 block entries and 500 allow entries within the Tenant Allow Block List for each category through administrative submissions.
For All Service Plans (Regarding Spoofed Senders):
- It’s important to note that the cap for spoofed senders will remain consistent at a total of 1,024 entries, encompassing both block and allow entries, regardless of the chosen service plan.
This adjustment will have no impact on your current entries within the Tenant Allow Block List. If your existing limits are already higher, you will continue to enjoy these limits, and this modification will not alter them. If you have a mix of licenses, the highest service plan’s limits for your entire tenant’s Tenant Allow Block List will be considered.
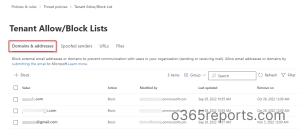
Tenant Allow/Block Entries for Domains & Emails
You can add domains and email addresses, up to a maximum of 20 characters. Also, after adding domains and addresses, you can set when to remove the block entry. The default value is 30 days, whereas you can set it up to 90 days. However, domain and email address allowed entries will expire after 30 days.
Additionally. Microsoft has recently introduced a new feature that shows the last used date for domains, email addresses, URLs, or files in the Microsoft Defender XDR Tenant Allow/Block List. The last used date is updated each time the system encounters the blocked/allowed entity, either during mail flow or when clicked.
Creating Block Entries
Using Defender Portal:
- Tenant Allow/Block List page – You can add the domains and email addresses that you want to block.
- Submissions page – Under the Email submission type, you can either add the valid email network message ID or can upload the email file in .msg or .eml format, and state the reason as ‘Should have been blocked’.
Using PowerShell:
Firstly, connect to the Exchange Online PowerShell, and run the below cmdlet.
|
1 |
New-TenantAllowBlockListItems -ListType Sender -Block -Entries test@spammingdomain.com -ExpirationDate 10/30/2022 |
You can provide a valid domain name or email address to the ‘Entries’ parameter to create block entries. For more targeted measures, such as blocking spam emails from onmicrosoft.com domains, consider using Exchange Online transport rules.
Creating Allow Entries
- You can use the submissions page to report the email addresses mentioning it should not have been blocked (False positive).
You can’t create allow entries directly in the Tenant Allow/Block list portal or PowerShell.
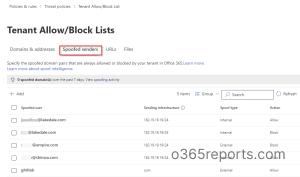
Tenant Allow/Block Entries for Spoofed Senders
As mentioned earlier, it is possible to have 1024 entries for spoofed senders. You need to make sure that the added spoofed sender entries are in the proper syntax.
Spoofed Sender Syntax: Domain pairs with wildcard include <Spoofed user>, <Sending infrastructure>. E.g., fakeuser@fakersdomain.com, psm.knowbe5.com
By default, both allow and block entries for spoofed senders never expire. If the spoofed sender belongs to your organization, select the spoof type as Internal. Select External if the sender is from an external domain.
Creating Block Entries
Using Defender Portal:
- Tenant Allow/Block List page – You can add the spoofed senders on this page and specify a spoof type. Then choose the action as Block.
- Submission page – You can block all emails from specific recipients to add a block entry for spoofed senders.
Using PowerShell:
You can connect to the Exchange Online PowerShell and run the below cmdlet to create block entries for spoofed senders in the tenant allow/block list.
|
1 |
New-TenantAllowBlockListSpoofItems -Identity Default -Action Block -SpoofedUser jonathan@lakedale.com -SendingInfrastructure 172.17.17.17/24 -SpoofType External |
Creating Allow Entries
Using Defender Portal:
- Tenant Allow/Block List Page – You can add the spoofed senders and specify a spoof type. Then choose the action as Allow.
Using PowerShell:
After connecting to Exchange Online, run the below mentioned cmdlet to add an allow entry for spoofed senders.
|
1 |
New-TenantAllowBlockListSpoofItems -Identity Default -Action Allow -SpoofedUser lara@lakedale.com -SendingInfrastructure 182.19.19.19/24 -SpoofType Internal |
In the above syntax, replace the spoofed user, sending infrastructure with valid entries.
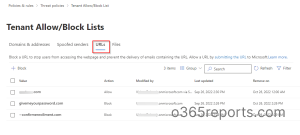
Tenant Allow/Block Entries for URLs
An URL entry can have a maximum of 250 characters. Email messages that contain blocked URLs are considered high confidence phishing.
Starting in late September 2023, users can also block website URLs based on their top-level domain (TLD). Users can specify TLDs using the format “*.<TLD>/”, where <TLD> can be any top-level domain like .net, .biz, .io, .movie, or even country codes like .in, .us, .ru., etc. This blocking applies during email processing (quarantining emails with blocked URLs) and when users click on links within Microsoft Teams and Office apps, if Safe Links is enabled.
URL Syntax: admindroid.com, xyz.abc.admindroid.com, admindroid.com/a, xyz.abc.admindroid.com/a/b/c, etc.
As mentioned for domain & address entries, the block URL entries can be held for up to 90 days and the allowed entries can be held for up to 30 days.
Improved URL Handling in Email Messages – It is true that sometimes legitimate emails containing a valid URL may get blocked, as it gets checked against a sub-path or portion of the URL. To solve this issue, Microsoft has improved the email blocking system by allowing partial matching behavior for URLs eliminating the need for wildcards or multiple URL submissions.
For example, if you receive an email with a URL http://www.admindroid.com/abc that has been blocked, all you need to do is submit the blocked False Positive URL to Microsoft for analysis. They’ll take a look and create an “allow” entry in the Tenant Allow/Block list. Once this entry has been created, any future emails containing URLs related to it won’t be blocked such as www.admindroid.com/abc?id=1 or www.admindroid.com/abc/def/gty/uyt?id=5.
Creating Block Entries
Using Defender Portal:
- Tenant Allow/Block List page – You can add the URLs you want to block anyone from accessing it.
- Submission page – Under the URL submission type, you can add the URL you want to block. State the reason as ‘Should have been blocked’ and do submit after categorizing.
Using PowerShell:
To add an URL block entry, run the following cmdlet after connecting to Exchange Online PowerShell.
|
1 |
New-TenantAllowBlockListItems -ListType Url -Block -Entries givemeyourpassword.com -NoExpiration |
Creating Allow Entries
- On the Submissions page, you can add the URLs by reasoning that they should not have been blocked and do submit.
It is not possible to create allowed URL entries directly in the tenant show/block list page or via PowerShell.
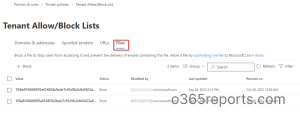
Tenant Allow/Block Entries for Files
A maximum of 64 characters are allowed in a file entry. Blocked files in email messages are referred to as Malware.
You have to add file hash value per line, up to a maximum of 20. Additionally, you can limit the block entry after adding Files. The default value is 30 days, but it can be set up to 90 days.
Creating Block Entries
Using Microsoft Defender Portal:
- Tenant Allow/Block List page – You can add files that should be blocked by separating each hash per line.
- Submission page – Under the Email Attachment submission type, you can upload the file you want to block. State the reason as ‘Should have been blocked’ and submit.
Using PowerShell:
|
1 |
New-TenantAllowBlockListItems -ListType FileHash -Block -Entries "768a813668695ef2483b2bde7cf5d1b2db0423a0d3e63e498f3ab6f2eb13ea3" -NoExpiration |
You can add a block entry for your specified files that will never expire using the syntax above.
Creating Allow Entries
- To report a false positive, upload the respective file in the Submissions portal.
Here also, you can’t directly create allowed entries in the tenant allow/block list page or via PowerShell.
I hope this blog has provided you with some insights into the process of creating an Allow/Block list for tenants in Microsoft 365. Additionally, I’d like to highlight that Microsoft Defender for Office 365 is introducing support for IPv6 allow/block entries, available to customers with certain service plans. The rollout is expected to start in late September 2024 and finish by the end of October 2024. For further queries, reach us in the comment section. We would be glad to assist you.

