Managing permissions in Exchange Online can be complex, especially when you need to grant or restrict access to certain features for different users. This is where Exchange Online role groups come into play. They allow you to assign specific permissions to different users, based on their roles and functions. This blog will walk you through how to create and manage role groups, thereby streamlining permission management in Exchange Online.
What are Role Groups in Exchange Online?
Role groups are a key part of the Role-Based Access Control (RBAC) permission model, allowing admins to group permissions into easily manageable units. These role groups, are universal security groups (USG) that grants all members the same permissions, ensuring effective Exchange Online mailbox management. Adding or removing users from role groups adjusts their permissions accordingly. Role groups specifically manage permissions related to mailbox access, compliance management, recipient management, and organization management, facilitating delegated control over various administrative tasks.
Key Role Types in Exchange Online Permissions:
Exchange Online permissions consist of three role types. These role types ensure efficient access control, empowering admins and users to manage their responsibilities effectively.
- Admin roles: These define tasks admins can perform. Admins gain permissions by being part of a role group that has specific roles assigned to it.
- User roles: By assigning role assignment policies to user mailbox, the assigned roles allow users to control their mailboxes and the distribution groups they manage.
- Outlook web app policies: Configuring Outlook web app policies is essential to control the availability of settings and features for Outlook users.
While these groups manage Exchange-specific roles, for broader directory roles across Microsoft 365, the modern delegation strategy involves using role-assignable groups in Entra ID.
Pre-requisites to Manage Role Groups in Exchange Online
Before managing Exchange Online role groups, ensure you have the following permissions.
- You should either be a Global administrator or an Exchange administrator.
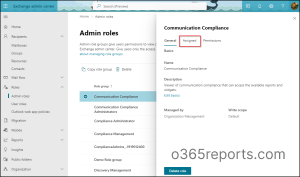
- You need to have the Role Management role, which is typically assigned to the Organization Management role group by default. You can find the Organization Management role group by navigating to Roles –> Admin roles in the Exchange admin center. This permission is necessary to create, change, or remove role assignments.
- Without these permissions, you may encounter errors when attempting to create or modify the role group, such as:
“Error executing request. You don’t have access to create, change, or remove the ‘XXX.onmicrosoft.com\ApplicationImpersonation-XXX’ management role assignment. You must be assigned a delegating role assignment to the management role or its parent in the hierarchy without a scope restriction.”
How to Create Exchange Online Role Groups?
Exchange Online has predefined role groups, each assigned specific roles. You can grant permissions to users by adding them to these role groups. If the built-in role groups don’t fit your admins’ needs, you can create custom role groups and assign roles to them.
Follow the steps mentioned below to create custom role groups in Exchange Online.
- Sign in to the Exchange admin center with admin credentials.
- Navigate to the Roles –> Admin roles.
- In the Admin Roles section, click on Add role group.
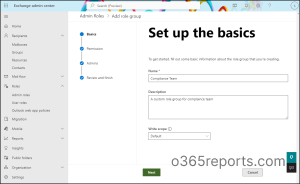
- Give your role group a name and description that reflects its purpose.
- For the Write scope, you can leave the default value as Default or choose a pre-existing write scope and select Next.
- In the Add permissions page, check in the required roles to be assigned and click on Next.
- In the Assign admins page, choose the admins to be assigned, and click Next.
- After verifying your selections on the Review role group and finish page, select Add role group to complete.
Creating Role Groups Using Exchange Online PowerShell
Firstly, make sure to connect to the Exchange Online PowerShell. Before creating a role group, you may want to view the available management roles. You can do this by using the Get-ManagementRole cmdlet.
Now, to create a new custom role group, you can use the New-RoleGroup cmdlet.
|
1 |
New-RoleGroup -Name "Name" -Description "Descriptive text" -Roles <"Role1","Role2"> -Members <Members> |
This script creates a new role group with a unique name, a description, assigned management roles, and members.
Here’s an example of how to create a custom role group for the marketing team:
|
1 |
New-RoleGroup -Name "Marketing Team Management" -Description "Role group for managing marketing team mailboxes" -Roles "Mail Recipients", "Distribution Groups" -Members "Charlie", "Mike" |

To replace all existing members from a role group in Exchange Online, run the below.
|
1 |
Update-RoleGroupMember -Identity "<Role Group Name>" -Members "Member1","Member2",..."MemberN" |
To selectively modify members from a role group, execute the following.
|
1 |
Update-RoleGroupMember -Identity "<Role Group Name>" -Members @{Add="Member1","Member2"...; Remove="Member3","Member4"...} |
Add Service Accounts to Existing Role Groups
If the necessary role group already exists, you can add service accounts to it. To add members to the existing default role groups, follow these steps:
- Sign in to the Exchange admin center.
- Navigate to Roles –> Admin roles.
- Find the role group that includes the role you need and click on it.
- Navigate to the Assigned tab, then click Add.
- Select the service accounts you want to assign to the role group and click Add.
Points to remember:
- You can’t change the name or description of a built-in role group.
- Once members are added to the role group, users may need to sign out and sign in again to apply the changes to their administrative access.
Copy a Role Group in Exchange Online
Copying a role group in Exchange Online allows you to create a new role group with the same permissions as an existing one. You can give it a different name and modify its assigned roles and members if needed. It also lets you add or remove specific roles or members without updating each one manually.
- Select the role group from the Admin roles page in the Exchange admin center.
- Click on the Copy role group.
- Provide the name and description of the role group.
- Modify the necessary permissions or members based on requirements.
- Confirm your selections on the Review role group and finish page, then select Add role group to complete the setup.
Copying Role Group Using Exchange Online PowerShell
You can also copy an existing role group in Exchange Online PowerShell. First, retrieve the role group you want to copy and store it in a variable.
|
1 |
$RoleGroup = Get-RoleGroup "<Existing Role Group Name>" |
Next, create the new role group using the New-RoleGroup cmdlet with this syntax:
|
1 |
New-RoleGroup -Name "<Unique Name>" -Roles $RoleGroup.Roles [-Members <Members>] |
Here’s an original example of copying a role group using Exchange Online PowerShell.
Let’s say you want to copy the roles from an existing role group called “Sales Management”.
|
1 2 |
$RoleGroup = Get-RoleGroup "Sales Management" New-RoleGroup -Name "Sales Operations Team" -Roles $RoleGroup.Roles -Members "Mike", "Harvey", "Blair" |

Thus, you’ve created a new role group called “Sales Operations Team” with the same roles as “Sales Management,” and added members Mike, Harvey, and Blair.
Modify Scopes for Role Groups in Exhange Online
In Exchange Online, the write scope of a role assignment determines which objects the members of a role group can manage. For instance, it can allow access to all users or restrict it to users based on specific criteria, like city (e.g., only users in City A).
To modify the scope of a role group, you can use Exchange Online PowerShell.
The Get-ManagementRoleAssignment cmdlet allows you to view the permissions assigned to a role group or user. You can use this command to modify all role assignments within a role group:
|
1 |
Get-ManagementRoleAssignment -RoleAssignee "<Role Group Name>" | Set-ManagementRoleAssignment -CustomRecipientWriteScope "<Scope Name>" |
To modify the scope for a specific role assignment, list the ‘Role Assignments’ first by running the below cmdlet,
|
1 |
Get-ManagementRoleAssignment -RoleAssignee "<Role Group Name>" | Format-List Name |
Then set the scope.
|
1 |
Set-ManagementRoleAssignment -Identity "<Role Assignment Name>" -CustomRecipientWriteScope "<Scope Name>" |
Remove Role Groups in Exchange Online
Built-in role groups cannot be removed, but you can delete the custom role groups in Exchange Online.
To remove a custom role group, follow the below-mentioned steps:
- Select the role group from the Admin roles page in the Exchange admin center.
- Choose the Delete option and confirm the removal.
- Removing Custom Role Groups Using Exchange Online PowerShell
To remove a custom role group using PowerShell, you can use the Remove-RoleGroup cmdlet.
|
1 |
Remove-RoleGroup -Identity "<Role Group Name>" |
For example,
|
1 |
Remove-RoleGroup -Identity "Sales Operations Team" |
After your confirmation, this command will permanently delete the “Sales Operations Team” role group from your Exchange Online environment.
Note: Always verify that you are removing the correct role group, as this action cannot be undone.
I hope this blog helped you understand how to create and manage role groups in Exchange Online. Feel free to reach us through the comment section if you have any queries.

")


