The Microsoft 365 defense report dropped a bombshell: the security team battles nearly 4,000 identity authentication threats every second😨. It’s a wake-up call to the relentless cyberattacks, highlighting the urgent need to strengthen Microsoft 365 security💯.
So, Microsoft stepped up its game and rolled out enhancements like number-matching MFA and notification suppression in Authenticator to defend against such identity attacks. But everything has a loophole. But not this time 😎! Yes, Microsoft brings a “Face Check”, which is generally available in the Verified ID service, to combat evolving identity attacks in Microsoft 365.
Let’s dive into the details about the new Microsoft Entra Verified ID Face Check feature in detail.
What is Microsoft Verified ID Face Check?
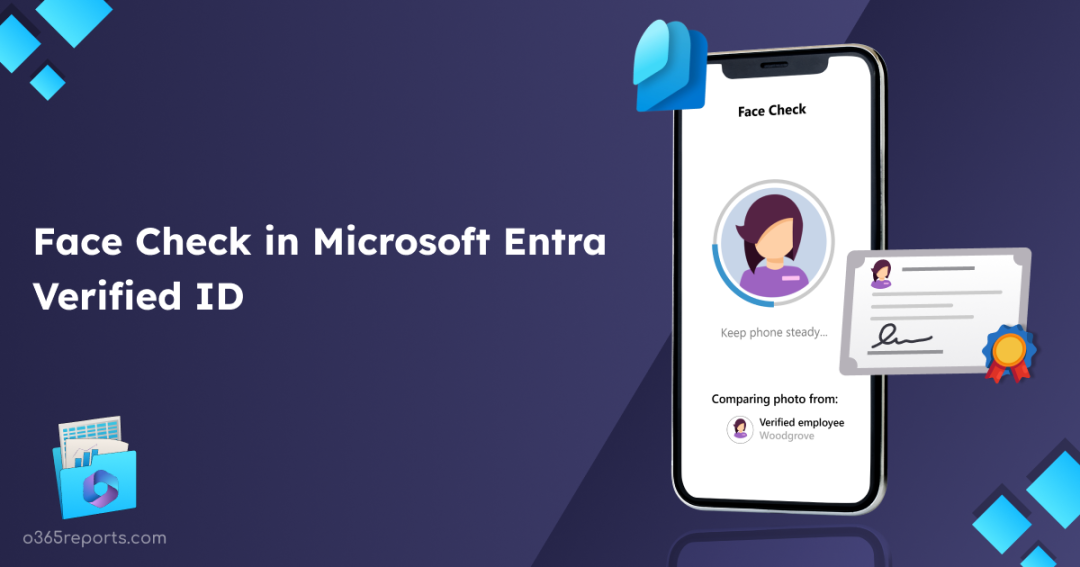
Face Check in Microsoft Entra Verified ID is a privacy-respecting digital identity verification feature. Built on the foundation of Microsoft 365’s advanced AI services, Face Check prioritizes high-assurance verification by comparing the real-time photo with a Verified ID. By using Azure AI Vision Face API, Face Check ensures accurate match detection, recognition, and essential checks, ensuring the authorized users’ access.
How the Facial Check Works in Microsoft Entra?
- Comparison: The Face Check compares a real-time photo of the Microsoft 365 user with the photo on their identity proof, such as a driver’s license, passport, or other government IDs tied with Verified ID.
- Liveliness Detection: The real time selfie then undergoes liveliness detection to ensure that no one is spoofing the verification process by using a static photo.
- Scoring: After that, a confidence score, also known as the face-matching score, is generated as a percentage. By default, a score of 70% indicates a match, but this threshold can be adjusted based on specific requirements. A higher match score, typically between 80-90%, is considered more reliable.
- Transmission: Once the verification process is complete, the score can be transmitted to the respective verifier/app.
Benefits of Adding Face Check Feature in Microsoft Entra Verified ID
Here are some of the benefits of Face Check in Microsoft Entra Verified ID.
- Streamlining Remote Onboarding – Face Check emerges as an indispensable feature for organizations involved in remote Microsoft 365 onboarding processes. With its ability to swiftly verify user identities online, it streamlines and accelerates the onboarding journey.
- Enhancing Microsoft 365 Security – For help desk services, Face Check stands as a formidable line of defense against unauthorized claims during password resets and passkey activations. By integrating facial recognition technology, it fortifies security measures and bolsters authentication protocols.
- Prioritizing User Privacy – In response to potential privacy concerns, Face Check ensures the utmost protection of user data. By sharing only match results and abstaining from transmitting sensitive identity information, it upholds stringent privacy standards.
Let’s dive into the steps to implement Face Check in Microsoft 365.
Prerequisites to Implement Face Check in Microsoft 365
Before proceeding, ensure the following prerequisites are met:
- The Microsoft Authenticator app must be installed, and users’ accounts should be added to the app.
- Admins must set up a Microsoft Entra Verified ID in the tenant.
How to Check Face Check Feature in Microsoft 365?
To check the Face Check feature in Microsoft 365, follow the steps below.
1. Create a VerifiedEmployee Credential in Microsoft Entra Verified ID
Upon configuring the Verified ID service, users gain the ability to create a VerifiedEmployee credential. This credential acts as the cornerstone, enabling real-time photo comparisons with the Verified ID linked to the user’s profile image.
2. Configure Credential Claiming Requests for Microsoft 365 Users
Once the Verified ID credential is created, specify which users can claim the credential. To do it, follow the steps below.
- Sign in to Microsoft Entra admin Center.
- Navigate to the Verified ID section and click “Credentials”.
- Now, click “Issuing credentials” and select one of the following options:
-
- Allow all users
- Allow users from selected groups
- Allow all users except for selected groups
3. Create a Test User in Microsoft 365
To validate the functionality, create a test user in Microsoft 365 and ensure that a profile photo is uploaded. This facilitates testing by providing a basis for comparison. Alternatively, you can use your own photo for testing purposes.
4. Obtain the Verified ID from MyAccount Portal
After configuration, you can claim your Verified ID by logging into “MyAccount” and selecting the “Get my verified ID” option. This retrieves the Verified ID credential for the user.
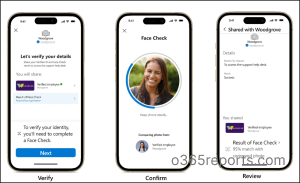
5. Present the VerifiedEmployee Credential Using Face Check
Once the Verified ID is obtained, you can proceed to utilize Microsoft’s public test app designed for Face Check testing. This app guides users through the verification process.
- As you already got that, click “I already have my card” and move to the next step.
- Once done, you need to scan the QR code, and it will ask for credentials. Then, the Microsoft Authenticator will activate the camera, capturing a selfie to be compared with the verified ID associated with the user’s photo.
- The matching score will be displayed on the Authenticator and the user needs to share the presented credential and score with the test app.
Once done, you can view the result in the test app.
Implement Face Check Using Request Resource API
With the Azure AD registered application, you can utilize the following API to facilitate facial check implementation:
https://verifiedid.did.msidentity.com/v1.0/verifiableCredentials/createIssuanceRequest
By using the above API, you can:
- Generate a Verified ID credential associated with a user’s photo.
- Issue Verified ID credential that includes Facial Check verification.
- Receive notifications for successful and failed Face Check events.
FAQs about Face Check in Microsoft Entra Verified ID
Here are some of the questions that might raise in your mind about the Microsoft AI Face Check Feature.
1. What is the Cost of the Face Check Feature?
During the preview period, Face Check is available free of charge and can be utilized within any Verified ID project at no cost. Post-preview period, Face Check within Verified ID incurs a fee of $0.25 per transaction. Microsoft Entra Verified ID Face Check is also included in the Microsoft Entra suite license.
2. Do we Need MS Authenticator for Face Check?
Yes, Face Check is currently available for usage with MS Authenticator only.
3. What is the Confidence Percentage Match?
The confidence percentage score represents the percentage of match found between the real-time photo and the photo in identity proofs. A higher score indicates a higher likelihood that the two photos belong to the same person.
4. What are the Requirements for the Photo in Verified ID?
- It should be clear in quality.
- The dimensions should be at least 200 pixels by 200 pixels.
- The face should be centered in the image.
- The background should be plain and uniform.
- You can wear jewelry but that shouldn’t hide your face.
- You should not wear any glasses, masks, hats, headphones, head coverings, and face coverings aren’t allowed.
- Only the respective users’ face with no shadows and no red eyes should be visible in the photo.
5. Are Face Check and Face ID Being Same?
No, Face ID is used to unlock Apple products. The Face Check in Microsoft Entra ID is used to check the identity by comparing the real-time image with the presented Verified ID. Both use the same vision-based AI technology but operate differently.
That’s it, I hope the Microsoft added Face recognition feature helps us prevent looming threats hereafter and enhance Microsoft 365 security! Give it a try! I hope this covers up the essential information about the Microsoft Entra Face Check feature. Furthermore, feel free to reach out to us in the comment section for further assistance.