Imagine how it would be if you were editing a file without others’ interruption. You are in your own world of sculpting the document without any interventions, right? How will you react, if I say this will be possible in reality? Yes, ‘Check out‘ in SharePoint Online allows you to edit a file without being interrupted. By checking out a file from a document library, you can prioritize your changes and restrict others from editing the file.
Let’s dive deep into this blog and discover how the ‘Check Out’ in SharePoint Online helps us to stay away from file editing conflicts!
How to Check out files in Microsoft 365 SharePoint Online?
The Check out in Microsoft SharePoint Online creates a virtual fence, allowing only one person to edit a file at a time.
Checking out a file in the SharePoint document library is simply reserving the file for yourself to make changes by restricting others from editing it. It allows an individual to make their desired changes in a standalone environment. Also, you can check out any number of files at a time in your SharePoint document library.
Follow the steps below to check out the file from the SharePoint site.
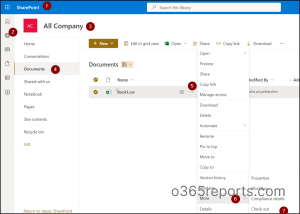
- First, open Microsoft 365 SharePoint Online and select the site where the file to be check out is located.
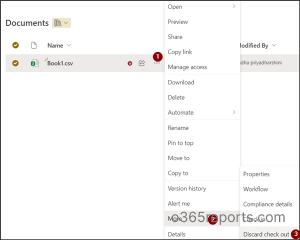
- Now, open the document library and select the ellipses (…) next to the desired file.
- Click the More option at the bottom. Finally, check out the file by clicking the ‘Check out’ option below.
Now that the file has been checked out, you can see that the respective file was marked below to represent that the file can’t be edited by other members of the site.
![]()
Important: Checking out a file will last for 24 hours. After the completion of this period, the check out will discard automatically.
Manage Editing a File in Offline Mode
After checking out a file, you can also download the file and edit it in offline mode. Once done with your editing, you can replace the old file with this newly edited file in the respective site library using the Upload option. Make sure to check that you shouldn’t delete the file before replacing it and remember both files must have the same name.
What Happens When Someone Overrides a Checked Out File?
Anyone who is a member of the site can make changes to a file in the SharePoint document library. When someone on the site overrides the file that you have checked out, they will be restricted and are allowed to access the file in read-only mode.
Users will be notified like the below while they try to open the checked-out file.
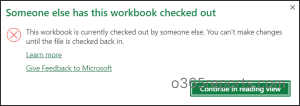
And this read-only mode reduces the clashes between members in editing and helps individuals to continue making changes undisturbed.
Note: Hover over the small checked-out icon to know who checked out the file. Instead of this, you can simply add the default column “Checked out by” in the SharePoint document library.
Check in the Document to Provide Access to Others on a SharePoint Site
Once you are done with your editing, make sure to check and save your file. Otherwise, the updates are no longer available in the file. Then, enable the Check in option and allow others to make changes in the file.
To check in a file, click the ellipses (…) and under More options click Check in.
After clicking the check in option, you will be prompted to fill in a dialogue box where you can type a brief description of what you changed in the checked-out file. These comments will help others to identify your changes easily.
Pro tip: You can use the Alert me option from the ellipses (…) as a reminder. Yes, it will notify you whenever other site members access the SharePoint file. You can also be able to specify how frequently you want to receive these notifications.
Additionally, whenever the file is subjected to editing, a new version of the respective file will be created. These versions help you to monitor the changes made in the file whenever they check out/check in.
Track the Changes Made to a File Using the Versioning Setting
Initially, enabling versioning will help you to track and restore the files that have been modified. In addition to that, it helps in retrieving the earlier versions of the documents.
Let’s see how to configure versioning to a file in Microsoft SharePoint Online,
Microsoft SharePoint Online → Respective SPO site → Settings → Library settings → More library settings → Versioning settings.
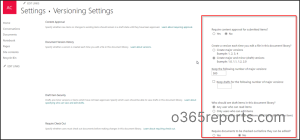
After selecting the versioning settings, you can configure the below options based on your needs in a SharePoint site.
- Require content approval.
- Create a version for each time a file undergoes editing.
- Limit the number of versions.
- Specify who can view the draft items using draft item security.
- Check out a file before editing.
Disable Checkout in SharePoint Online
Site administrators and site owners have the right to decide the check out settings for the SharePoint document library. They can permanently enable or disable the check out option for the site members.
To disable check out, set the Require Check Out option to ‘No’ in the versioning setting shown in the above image. This will allow users to edit the file without checking it out.
Also, to enable the checkout permanently, set ‘Yes‘ to this option. Thus, users will not be able to edit the file without checking them out from the document library.
View, Restore, and Delete Versions in Version History
Version history provides you with a record of all changes including the indication of the user who modified it. And you can see the previous versions of the file by following the steps below.
Microsoft SharePoint Online → Respective SPO site → Document library → Respective file → Ellipses (…) → Version History.
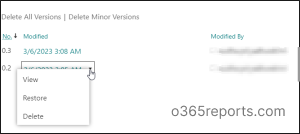
Now, you can see the versions of the file with the edited date and time. When you click the down arrow next to the date and time you will be given three options.
- View– You can see the different versions of a selected file.
- Restore– Restore the version to consider it as the latest version.
- Delete– Delete the version when not needed.
You can avail yourself of any of the above three options based on your requirements.
Discard Check Out Option in SharePoint Online
Furthermore, if you checked out a file and forget to check back it in, it will continue to restrict the other users from editing it. However, it allows them to access the file in read-only mode.
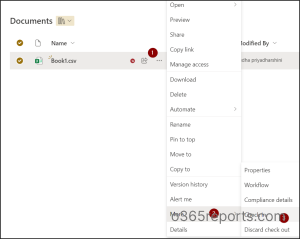
Site admins and site owners can override the check out using the Discard check out option to make the file available to other users who need to make changes to the file immediately.
They can discard a check out, by navigating to the
ellipses (…) next to the file and under More options click Discard check out.
After clicking the discard check out option, you will get a warning dialogue box to get confirmation of your decision. Therefore, you may click ‘Yes’ if you are sure to discard the check out.
Point to Remember:
Site members who are granted ‘full control’ permissions by site admin or site owner, can be able to take ownership of the checked out file in a SharePoint document library.
They can do this by navigating to the path below.
Microsoft SharePoint Online → Respective SPO site → Settings → Library settings → More library settings → ‘Manage files which have no checked in version‘ →Respective file → Take ownership of selection.
They can check in all the files that haven’t been checked in to the document library. However, they have to make sure that the checked out has made any changes to the file before checking in.
Get a Detailed SharePoint Online Checked-out Files Reports with AdminDroid
As monitoring check out files is crucial, you may rush to retrieve its statistics and reports in the native Microsoft 365 reporting tools. However, you will get only the overview of Check out files in the native reporting tool. It lacks detailed metrics such as when the files were checked out or checked in, performed users’ indepth stats, etc.
Do you think there will be no way to get clear-cut information on checkout files? Actually not. With the aim of binding this drawback, AdminDroid comes to the rescue! It offers valuable information regarding checked-out files such as count of checked-out files on an hourly/daily basis, users who performed check-outs, check out file status, and more.
Besides the above, you can also audit SharePoint file activities file modifications, checked in files, versioning of files, etc. with AdminDroid.
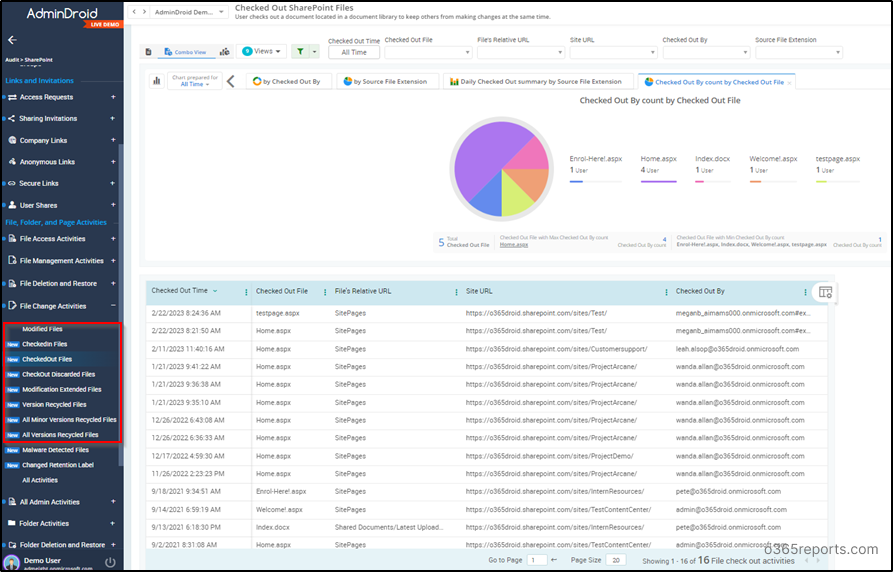
Here is the list of SharePoint file activities reports provided by AdminDroid.
- File Checkout Report– List of all checked out files along with the respective users performed the check out.
- File Check-in Report– Displays all the checked in files along with the respective site URL, checked in time and so on.
- Discarded Files’ Check-outs Report– List of all check out disabled files in SharePoint along with the user identity who have discarded the check out, check out discarded time, etc.
File Version Management Reports:
- Version Deleted SharePoint Files
- Minor Versions Deleted SharePoint Files
- All Versions Deleted SharePoint Files
Added to the above, you can gain reports on SharePoint folders/pages activities, site permissions and more, for effective SharePoint Online auditing.
Moreover, AdminDroid’s SharePoint Online reporter allows you to manage file activities by providing insights into daily user access to SharePoint files, summaries of external file sharing by users, count of active files and so on, which paves way for the better SharePoint Online management.
Furthermore, AdminDroid enables easy analyzation of SharePoint site collections, sites, lists, and document libraries by offering captivating SharePoint Online dashboard.
Admindroid – A One stop solution for effective SharePoint Online management!
So, why are you still waiting? Go and download AdminDroid for effortless management of check out files in SharePoint Online.
Let’s Give It a Try!
In conclusion, configure check out and manage collision-free editing using the steps given in this blog. Follow the above steps and prioritize your changes by leaving others away from editing. Besides, make use of the versioning setting to store and track your previous versions of the documents and manage checkout and check in on SharePoint Online.
I hope this blog will give you enough information about how to configure and manage the check out in Microsoft 365 SharePoint Online. For further suggestions and queries, feel free to reach us in the comments section.


