
SharePoint Online makes collaboration easy by allowing teams to share and access files from anywhere. However, this flexibility can sometimes lead to oversharing of site content, where unintended users may gain access to sensitive information. As a result, you often end up digging through permissions and sharing settings just to identify and revoke unwanted access.
That’s where Restricted Site Access in SharePoint Online offers a better approach. By leveraging Microsoft 365 groups or security groups, you can stop managing users individually and take back full control of who can access your site. This helps reduce the risk of data exposure and improves security. It also ensures that only approved users can access the site content.
In this blog, let’s explore how restricted site access control can elevate your site into a secure, exclusive, VIP-only space.
What is Restricted Site Access Control in SharePoint Online?
The standard SharePoint setup allows users to access content if they are granted permission through a sharing link or direct access. While convenient, this can leave sensitive sites vulnerable to accidental oversharing.
Site-level access restriction policy, a key feature of SharePoint advanced management, adds a second layer of validation. Think of it as a two-factor authentication for your SharePoint Online sites. Regardless of how high a user’s permission level is, they must also be a member of the specified Microsoft 365 or security group. If they aren’t, access is denied.
This helps prevent unauthorized users from viewing, editing, or sharing sensitive content, reducing the risk of data exposure in SharePoint Online. The site-level access restriction policy can be applied across Microsoft 365 group-connected sites, Teams-connected sites, communication sites, and other nongroup connected sites.
Important Points for Restricted Site Access Control in SharePoint Online
Before implementing restricted access control for SharePoint sites, here are a few important things you should be aware of.
- Existing permissions and shared links are removed to enforce group-based access.
- You can assign a maximum of 10 groups to control access for a SharePoint site.
- A user must be part of an allowed group to access the site, even if they are a site owner or site administrator.
- Shared and private channels sites must be configured separately, as they don’t inherit access restrictions from the parent team site.
- Users who previously had direct permissions still see files in search results, but access will be denied unless they meet the restricted access requirements.
- Users can still share site content with others. However, sharing alone does not grant access. Only users who are part of the specified group and have the required permissions can access shared files or folders in SharePoint Online.
How Restricted Site Access Control Works in SharePoint Online?
Here is a simple analogy to understand how this works. Consider a sensitive SharePoint site where access is restricted using a Microsoft 365 group. When a user tries to access the site, two checks are performed:
- Permission Check
This verifies whether the user has the required permissions to access the site. Permissions can come from SharePoint roles (Owners, Members, Visitors), shared links, or unique permissions on specific content. - Group Membership Check
This verifies whether the user is a member of the Microsoft 365 group or security group that is allowed to access the site.
Result
- Access Denied: If either check fails, access is blocked.
- Access Granted: If both checks pass, the user is allowed to access the site and can perform actions based on their assigned permission level.
In simple terms, access to a restricted SharePoint site requires both valid site or content-level permissions and membership in the authorized group.
Now that you understand how it works, let’s start setting up the site-level access restriction policy in SharePoint Online.
Prerequisites to Configure Site-Level Access Control in Microsoft SharePoint
- Your organization must have a base license such as Office 365 E3 or E5, or Microsoft 365 E1, E3, or E5.
- To enable site-level access restriction policy, you need one of the following additional licenses.
- Microsoft 365 Copilot License – At least one user in your organization mist be assigned a Copilot license to gain restricted site access control feature.
- SharePoint Advanced Management License – Every user who needs to access the restricted site must be licensed for SAM. This is a standalone “per-user” add-on license priced around $3 per user/month.
- The user must have at least the SharePoint Administrator role to enable site-level restrictions across sites or at the tenant level.
Enable Site-Level Access Restrictions for a Microsoft 365 Tenant
To restrict site-level access in SharePoint Online, you must first enable the restricted site access feature at the tenant level. This allows SharePoint admins to limit access to specific sites by permitting only selected Microsoft 365 groups.
Follow the steps below to enable site-level access restrictions for your Microsoft 365 organization.
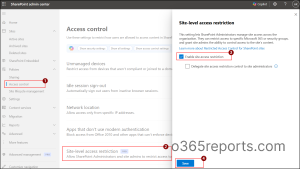
- Sign in to the SharePoint admin center and navigate to Policies →Access control.
- Select Site-level access restriction and choose Enable site access restriction.
- Here, you can also choose to allow site admins to manage site access restrictions by selection the check box “Delegate site access restriction control to site administrators”.
- Then, click Save to enable site-level access restriction in your organization.
To enable the site-level access restriction using PowerShell, you can run the cmdlet below.
|
1 |
Set-SPOTenant -EnableRestrictedAccessControl $true |
Set Up Restricted Site Access Using Microsoft 365 Groups in SharePoint Online
Once you have enabled the access restriction at the tenant level, you can begin locking down individual sites. By assigning a specific Microsoft 365 Groups or security group, you ensure that only approved members, along with valid permissions, can access the site.
Follow the steps below to restrict specific site access to Microsoft 365 or security groups.
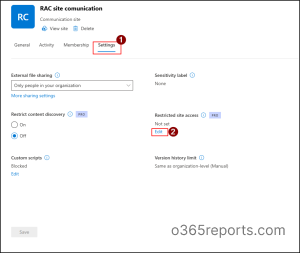
- Log in to the SharePoint admin center and navigate to Sites → Active sites.
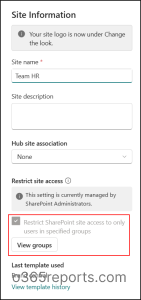
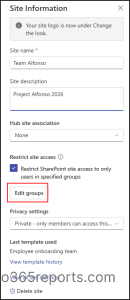
- Select the specific site you want to restrict and go to the Settings tab.
- Click Edit under Restricted site access section.
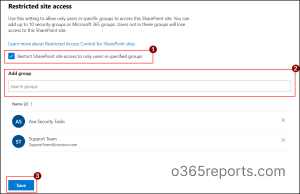
- Select Restrict SharePoint site access to only users in specified groups checkbox to restrict site access.
- Under Add group, search and select the groups you want to limit access to the site. You can choose up to 10 different Microsoft 365 or security groups.
- Once selected, click Save to enforce the access restriction for the specific site.
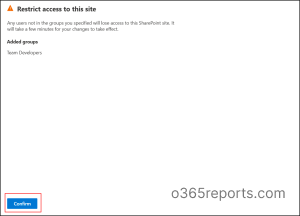
- Then, click Confirm to prevent access for users outside these groups.
Note: For Team sites, the default associated Microsoft 365 group is included automatically. You can add additional groups or replace it with other groups based on your requirement.
You can also restrict access to a site in SharePoint Online using PowerShell for a faster and more efficient alternative to navigating the SharePoint admin center.
Connect to SharePoint Online PowerShell and run the following cmdlet to bulk add groups for restricting site access. Replace <SiteURL1>, <SiteURL2> with actual site URL and <GrpID1>, <GrpID2> with the respective group IDs as comma separated values.
|
1 2 3 4 5 6 |
$sUrl = @("<SiteURL1>","<SiteURL2>") $gId = @("<GroupID1>","<GroupID2>") foreach ($sUrl in $sUrls) { Set-SPOSite -Identity $sUrl -RestrictedAccessControl $true Set-SPOSite -Identity $sUrl -AddRestrictedAccessControlGroups $gId } |
This ensures that only the specified groups are allowed access to all listed sites. For Teams-connected sites, the associated Microsoft 365 group is also included as part of the access control configuration.
User Experience: What Happens When a SharePoint Site Access is Restricted?
Once restricted site access is active, the experience changes depending on the user’s role. Here is exactly what your site users will see.
The End-User Experience
Any user who is not a member of the authorized groups will encounter a standard “Access Denied” error page when trying to enter the site.

Site Owner and Admin Experience
The site owner or the site admin will have read-only access to the groups and will not be able to make any modifications to the restricted groups.
The Delegated Site Admin Experience
If you enabled the “Delegate site access restriction control” option at the tenant level, site admins gain full control. They can manage the restricted group list themselves in the SharePoint site.
Audit SharePoint Site-Level Restrictions in Microsoft 365
Applying restrictions alone is not enough, as it does not show who changed access settings later. To ensure the restrictions remain intact and to detect any unauthorized or unexpected changes, auditing is essential.
You can generate the following three types of reports to audit restricted site access in SharePoint Online.
- Audit site restriction events in SharePoint Online
- Get restricted SharePoint Online sites in Microsoft 365
- Generate SharePoint site access denials report
Audit Site Restriction Events in SharePoint Online
Auditing site-level restriction actions is essential for security and governance in SharePoint Online. The site access restriction activity report tracks actions such as enabling, updating, and removing site access restrictions. This helps audit changes in the event of a security incident, data breach, or any suspicious activity related to site access or content.
Follow the steps below to monitor site-level restriction activities in Microsoft 365.
- Sign in to the Microsoft Purview portal and navigate to Solutions → Audit.
- Specify the start date and end date for the audit to define the time range of events you want to review.
- In Activity – friendly names dropdown, select the following activities under Site administration activities.
- Applied Restricted Access Control for site
- Removed Restricted Access Control for site
- Updated Restricted Access Control for site
- Applied Restricted Access Control for tenant
- Removed Restricted Access Control for tenant
- Updated Restricted Access Control for tenant
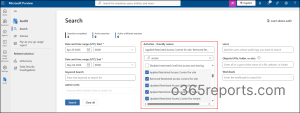
- Click on Search and to generate the audit report for restricted site control activities.
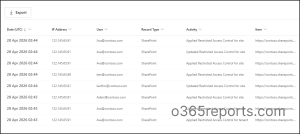
Once the search is completed, the report shows all access restriction activities at both site and tenant levels in Microsoft 365.
Track Restricted SharePoint Site Access with Microsoft 365 Reports
The RAC Protected sites report provides a single, unified view of all sites in the environment that are protected by the restricted site access control policy. It includes details such as the site name, URL, primary administrator, the configured restricted access control groups, and other relevant information. This helps admins understand how access restrictions are applied across the tenant.
Follow the steps below to view the sites protected by restricted site access policy report using PowerShell.
- Connect to the SharePoint Online module using the following cmdlet by replacing <TenantName> with your tenant name.
1Connect-SPOService -Url https://<TenantName>-admin.sharepoint.com - Run the following cmdlet to generate the list of SharePoint sites protected with the restricted site access policy.
1Start-SPORestrictedAccessForSitesInsights –RACProtectedSites
This cmdlet initiates report generation and returns a report ID, which is required to retrieve the report.

- Next, run the following cmdlet to get the generated protected SharePoint Online sites report. This report shows the top 100 sites that are protected by the policy.
1Get-SPORestrictedAccessForSitesInsights -RACProtectedSites -ReportId <ReportID>
Replace <ReportID> with the ID from the previous output.
- To download the protected sites report in CSV format, replace <ReportID> with actual report ID and run the following cmdlet in PowerShell as an administrator.
1Get-SPORestrictedAccessForSitesInsights -RACProtectedSites -ReportId <ReportID> -Action Download
The generated protected SharePoint sites report will be saved in the current working directory.
Note:
- Report generation may take some time. When you run the Get-SPORestrictedAccessForSitesInsights cmdlet, the status initially appears as “In Queue.” Once processing is complete, you can view or download the report.

- Only one report can be generated within a 24-hour window, so if any data appears missing, verify it in the next report cycle.
Generate Access Denials Reports Using PowerShell
The access denials report helps you identify users who were blocked from accessing protected sites in Microsoft 365. This report is useful for auditing security restrictions, troubleshooting access issues, and ensuring compliance with site-level policies.
Connect to the Microsoft SharePoint Online module and follow the steps below to generate the access denials report in Microsoft 365.
- Run the following cmdlet to start generating the access denials due to restricted site access policy report.
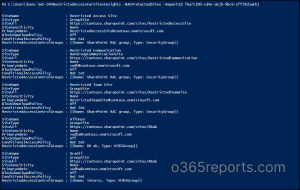
1Start-SPORestrictedAccessForSitesInsights –ActionsBlockedByPolicy - Next, run the following cmdlet to retrieve a list of the most recent 100 access denial events that occurred within the past 28 days. Replace the <ReportID> with the actual report ID.
1Get-SPORestrictedAccessForSitesInsights -ActionsBlockedByPolicy -ReportId <Report ID> -Content AllDenials - Use the following cmdlet to list the top 100 sites with the highest number of access denials by replacing <ReportID> with the appropriate value.
1Get-SPORestrictedAccessForSitesInsights -ActionsBlockedByPolicy -ReportId <Report ID> -Content TopSites
Other Ways to Control Access and Reduce Oversharing in SharePoint Online
Restricted SharePoint site access control requires either a Microsoft 365 Copilot license or a SharePoint Advanced Management (SAM) license. If these licenses aren’t available, you can still strengthen access control and minimize oversharing using the following measures.
While these do not replicate the same strict enforcement as restricted site access, they help build a well-governed and secure environment.
- Restrict external sharing by domain – Limit domain sharing at organizational level in SharePoint Online. This prevents users from sharing content with unauthorized external domains or personal email accounts.
- Apply sensitivity labels to control access – Applies classification-based protection to sites and content. This helps you enforce access policies automatically based on data sensitivity labels, such as Confidential or Highly Confidential.
- Set expiration for sharing links – Ensure temporary access by configuring expiry for sharing links in your organization. This revokes the permissions automatically after a defined period.
- Configure external sharing settings – Configure external sharing across sites and files in your organization to minimize the risk of data leaks. This includes allowing only specific users to share externally, setting expiration dates for guest access, enforcing verification codes for secure access, and more.
Restricted site access control in Microsoft SharePoint Online offers a powerful way to tightly govern who can access sensitive content and reduce the risk of oversharing. While it requires advanced licensing, it sets a clear standard for secure, controlled collaboration.
I hope this blog helped you understand and implement restricted site access in SharePoint Online. Feel free to reach out through the comments section if you have any questions.


