SharePoint Online is a collaboration hub in Microsoft 365, giving users a central place to store, share, and work on files. As more teams use it and more content moves into SharePoint, managing who can access and share those files can quickly become a challenge.
To keep this growing collaboration under control, SharePoint gives admins a range of settings to manage access, sharing, and external collaboration. But using these controls too restrictively can push users toward alternative ways of sharing files that are harder to monitor.
That’s why secure collaboration SharePoint isn’t about locking things down. It’s about applying the right level of control in the right places, so sensitive data stays protected without getting in the way of everyday work. In this blog, let’s explore how to find the right balance and plan a secure file collaboration environment in SharePoint Online.
Start Your Plan with the Right Collaboration Strategy in SharePoint Online
Every organization has different collaboration needs and different levels of data sensitivity. Therefore, planning to secure a file collaboration environment in SharePoint Online isn’t a one-size-fits-all task.
The right approach is to create a collaboration environment that meets your organization’s security requirements along with supporting the way your users work.
To achieve this, Microsoft recommends planning your collaboration environment in a way that balances data protection, self-service, and user experience. This helps you choose the right configuration for your organization without making collaboration unnecessarily difficult.
Let’s dive deeper into these areas so you can get a clear idea of what to consider while planning the configurations.
Protect Intellectual Property in Microsoft 365
Not every site in your organization needs the same level of protection. For example, a marketing team may need to share files with external vendors, while HR files may need to remain strictly within the organization. Applying the same level of restriction to both sites can either expose sensitive information or make collaboration difficult for users.
Therefore, while configuring any setting, first understand the type and sensitivity of the content stored and shared through the site. Based on the sensitivity of the data, configure the required security and auditing controls. This allows you to apply stronger controls where they are actually needed without restricting less-sensitive collaboration.
Key consideration: Match the level of protection to the sensitivity of the data.
Enable Self-Service in SharePoint Online
Microsoft 365 provides options that allow users to create teams, Microsoft 365 groups, and SharePoint sites. Allowing self-service in SharePoint Online can help teams collaborate without depending on admins for every request.
However, self-service should still work within your organization’s governance requirements. Configure the appropriate settings to maintain permission governance, manage site or group expiration, and control how collaboration spaces are created and managed.
Key consideration: Enable self-service while keeping collaboration spaces within your governance framework.
Create a Smooth User Experience in SharePoint Online
The final piece is making sure the security measures you put in place are easy for users to work with. A secure collaboration environment should protect information without creating unnecessary friction in everyday tasks. Too many restrictions can confuse users, increase dependency on the help desk, or even encourage them to look for other ways to share files.
For example, instead of completely blocking collaboration, you can use classification, sensitivity labels, and DLP policies to apply additional protection when sensitive information is involved. The goal is to create an environment where users can collaborate easily while the right safeguards are in place.
Key consideration: Build security into the user experience without creating unnecessary barriers.
With these three areas in mind, the next step is to put them into practice through the right SharePoint settings. Let’s look at the key configurations that help to secure file collaboration while keeping the environment practical for users.
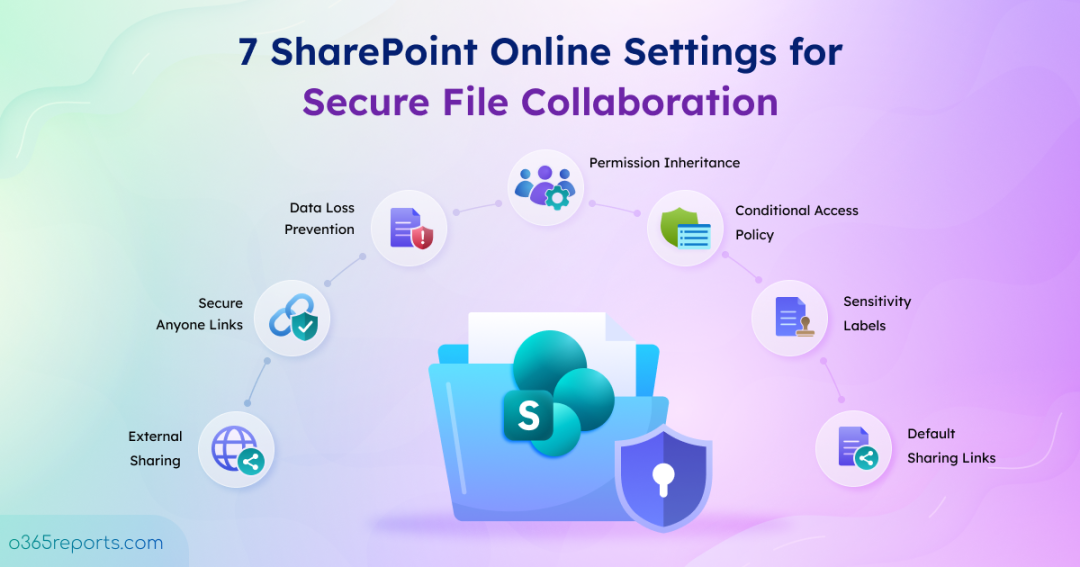
Key Settings to Secure File Collaboration in SharePoint Online
Based on the requirements of your organization and the sensitivity of your data, choose the right option for each setting and build a collaboration environment that keeps your files protected without making collaboration difficult.
- External sharing settings at the organization level
- Control external sharing at the SharePoint site level
- Set the default sharing link type in SharePoint Online
- Secure anyone links in SharePoint Online
- Protect SharePoint sites with sensitivity labels
- Use data loss prevention to secure file collaboration
- Apply CA policy for risky file access in SharePoint Online
1. Control External Sharing at the Organization Level in SharePoint
External sharing settings in Microsoft 365 help you define the scope for users to share SharePoint site content with people outside the organization. These are organization-wide settings, so based on your organization’s requirements, you can allow, restrict, or disable external sharing in SharePoint Online.
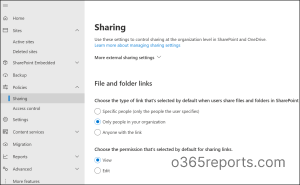
To configure the external sharing settings at the tenant level, sign in to the SharePoint admin center and go to Policies → Sharing.
Here, you can configure different settings to control external sharing in SharePoint Online:
- Sharing level – Define whether users can share SharePoint content with people outside the organization. You can choose from Anyone, New and existing guests, Existing guests, or Only people in your organization.
- Limit external sharing by domain – If your organization works with a specific set of external partners, you can restrict sharing to approved domains or block specific domains. This helps prevent users from sharing content with unauthorized external organizations.
- Allow only users in specific security groups to share externally – If only certain users need to share files externally, you can allow external sharing only for members of chosen security groups. This prevents everyone else from sharing SharePoint content outside the organization.
- Allow guests to share items they don’t own – By default, guests may be able to share SharePoint site contents, depending on their permissions. You can disable this option if you don’t want guests to share items they don’t own with other users.
- Guest access expiration – You can set an expiration period (from 30 to 730 days) for guest access so that external users don’t retain access indefinitely. This helps organizations regularly review whether guest access is still required.
- Require users who use a verification code to reauthenticate after this many days – If users access shared content using a verification code, you can specify how frequently they need to authenticate again. This provides an additional layer of control over external access.
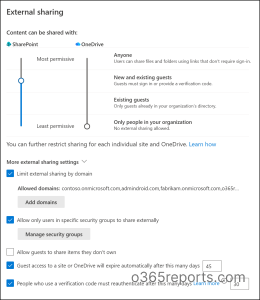
Review these sharing settings in SharePoint Online based on your organization’s requirements before finalizing the external sharing configuration.
| 💡 Recommendation: Set external sharing to New and existing guests as the organization-wide baseline. Pair this with domain restrictions and a 90-day guest access expiration to help reduce long-term external access. |
2. Restrict External Sharing at Specific SharePoint Online Site Level
When you configure external sharing at the organization level, the setting applies across all SharePoint sites. However, not every site in your organization needs the same level of external access. Some sites may need external collaboration, while sites with sensitive content may require stricter controls with no external sharing.
In such cases, you can configure the external sharing settings for a specific SharePoint site separately. This allows you to apply tighter sharing controls to sensitive sites without restricting external collaboration across the entire organization.
To configure external sharing settings for a SharePoint site, sign in to the SharePoint admin center, open the required site from Sites → Active sites, and select Settings → More sharing settings.
Here, you can configure settings such as the external sharing level, domain-based sharing restrictions, and guest access expiration based on the site’s requirements.
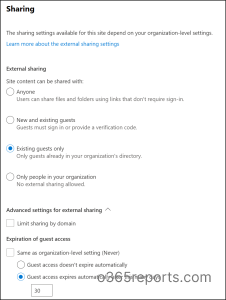
Note: The site-level external sharing setting takes precedence over the tenant-level SharePoint sharing setting. Therefore, the site-level setting can only be more restrictive than the organization-level setting. For example, if external sharing is allowed with new and existing guests at the organization level, you can configure a specific site to allow sharing only with existing guests or disable external sharing completely.
| 💡 Recommendation: Set sensitive SharePoint sites to Existing guests only or Only people in your organization, depending on the site’s collaboration requirements. Keep broader external sharing available only for sites that genuinely need it. |
3. Choose the Right Sharing Link Type in SharePoint Online
When a user shares a file or folder in SharePoint Online, they can choose from three different sharing link types:
- Anyone – Users from any domain with the link can access the content without signing in.
- People in your organization – The link works only for users in your organization who are signed in.
- Specific people – Only the people specified when creating the link can access the content.
The default sharing link type is automatically selected when a user clicks Share on a file or folder. For example, if the Anyone link type is configured as the default, the sharing dialog will automatically select the Anyone link when the user starts sharing. This makes sharing quick and convenient, but it can also increase the chance of accidental oversharing, especially when the file contains sensitive information.
To reduce this risk, you can configure a safer default link type, such as Specific people or People in your organization, based on your organization’s requirements. Users can then use a more permissive link type when it is actually required and allowed by your sharing policies.
Follow the steps below to configure the default sharing link type at the organization level:
- Sign in to the SharePoint admin center with appropriate admin permissions.
- Go to Policies à Sharing and scroll down to File and folder links.
- Here, choose the required link type as the default and the permission for the sharing links.
- Then, select Save to update the sharing link configurations.
Set the Default Link Type for a SharePoint Site
You can also configure a different default link type for a specific SharePoint site. To do this, open the specific site from Active sites, go to Settings → More sharing settings. Under Default sharing link type, uncheck “Same as organization-level setting” and choose the required link type. Then, select Save.
| 💡 Recommendation: Set the default sharing link type to Specific people. This follows a least-privilege approach by giving access only to the people explicitly selected by the user. |
4. Secure Anyone Links in SharePoint Online
Anyone links are convenient in scenarios where users need to quickly share files or folders with external users, as the recipients don’t need to authenticate. However, anyone who obtains the link can access the content, making this link type more open and vulnerable to unintended access.
To provide greater control over Anyone links, you can add additional restrictions such as setting an expiration period and limiting permissions. These controls help ensure that shared links remain accessible only for the required duration and with the intended level of access.
To secure Anyone links in SharePoint Online, follow the steps below:
- Go to Policies → Sharing in the SharePoint admin center.
- Under ‘Choose expiration and permissions options for Anyone links’, enable These links must expire within this many days and set the number of days.
- Then configure the permission (View or Edit) separately for files and folders.
- Once done, click Save to apply the changes to all sites.
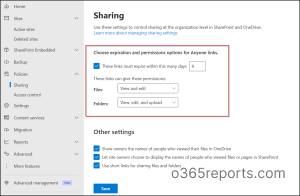
The same restrictions can be applied to a specific SharePoint site under Advanced settings for Anyone links.
| 💡 Recommendation: If Anyone links are required, set the maximum link expiration period to 30 days and use View permission by default. This helps limit how long anonymous access remains available and prevents recipients from modifying the shared content. |
For sites that contain highly sensitive information, consider avoiding Anyone links and using more controlled sharing options, such as Specific people links. You should also regularly review Anyone links shared from SharePoint Online and remove or revoke links that are no longer required.
Handy Tip: You can also configure expiration dates for all company links in SharePoint Online using the Set-SPOTenant cmdlet. You can configure the expiration time anywhere between 7 and 720 days.
5. Classify SharePoint Sites with Sensitivity Labels
Microsoft Purview sensitivity labels can help classify and protect SharePoint sites and files based on their sensitivity. For example, you could use labels such as General, Confidential, and Highly Confidential, and apply stronger protection to content that contains sensitive information.
Once a label is applied, it can automatically enforce the right level of protection behind the scenes, without requiring a user to remember which settings apply where. For instance, a site labeled Confidential can be forced to block external sharing outright or restrict access to unmanaged devices — all from the label itself, rather than an admin configuring each setting individually.
Here’s how to configure a sensitivity label for SharePoint sites:
- Open the Microsoft Purview portal.
- Go to Solutions → Information Protection → Sensitivity labels.
- Select Create label and enter the label name and description. Then, select Next.
- Under Scope, select Groups & sites and select Next.
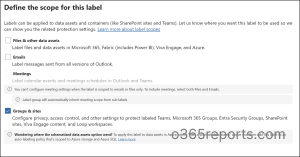
- On the Groups & sites page, select the protection options you want to configure, such as External sharing and Conditional Access.
- Configure the required settings for external sharing and unmanaged devices access.
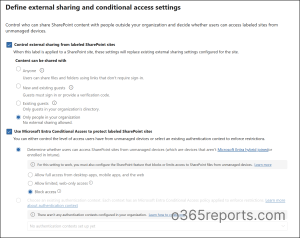
- Review the configuration and select Create label to complete the label creation.
Once the label is created, publish it through a label policy and apply it to the appropriate SharePoint sites.
| 💡 Recommendation: Configure the sensitivity label to disable external sharing and restrict access from unmanaged devices for sites containing sensitive information. |
6. Use Data Loss Prevention to Secure File Collaboration
Data Loss Prevention (DLP) in Microsoft 365 helps identify and protect sensitive information in SharePoint Online and OneDrive. It can detect sensitive content in files and apply actions based on the conditions defined in your DLP policy.
For example, if a document in a SharePoint site contains customer information, you can configure a DLP policy to prevent users from sharing that document with guests. You can also configure policies to block guests from accessing a document if it has already been shared with them.
You can create a DLP policy for SharePoint Online through the Microsoft Purview portal and configure it to detect sensitive information and restrict user actions. Once the policy is in place, when a user tries to share a document that matches the DLP conditions, the configured action can block the sharing attempt and show the user a policy tip explaining why the action isn’t allowed by their organization’s policy.
| 💡 Recommendation: Create DLP policies to detect sensitive information such as customer, financial, and regulated data, and configure the policy to block external sharing when defined sensitive-data conditions are met. This helps prevent sensitive content from being shared outside the organization. |
7. Apply Conditional Access for Risky File Access in SharePoint Online
So far, every setting in this guide has focused on one question: Should this person be allowed to access this file?
But having permission doesn’t always mean the access is safe. A user with valid access could be signing in from an unmanaged personal device, an untrusted location, or a compromised account. The controls covered so far don’t evaluate these conditions. They mainly determine whether the user is allowed to access the content.
This is where Conditional Access in Entra ID adds another layer of protection. It evaluates the context of each sign-in, such as the device, location, and risk signals, and can require additional verification or block access when the conditions aren’t met.
To create a Conditional Access policy for SharePoint Online, follow the steps below:
- Open the Microsoft Entra admin center.
- Go to Entra ID → Conditional Access → Policies.
- Select Create new policy and enter a name for the policy.
- Under Assignments, select the users or groups to which the policy should apply.
- Under Target resources, select Cloud resources and choose Office 365 SharePoint Online.
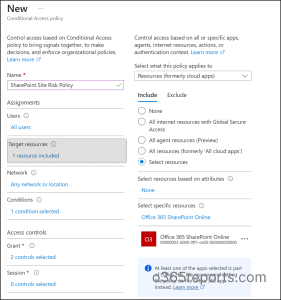
- Under Conditions, configure the required conditions, such as Locations, Device platforms, or Sign-in risk.
- Under Access controls → Grant, select the required control, such as “Require multifactor authentication or Require device to be marked as compliant”.
- Then, select Create to create the policy.
For external collaboration scenarios, you can also create separate Conditional Access policies for guest users and apply additional controls based on your organization’s requirements.
| 💡 Recommendation: Require MFA for SharePoint Online access and configure Conditional Access to restrict access from unmanaged devices. Start the policy in Report-only mode, review the impact, and then enforce it after validating the results. |
Monitor and Review File Collaboration in SharePoint Online Environment
Configuring security controls is only one part of maintaining a secure file collaboration environment. Regular monitoring helps you understand how users are accessing and sharing content. It also helps identify unexpected activity and verify that your security and governance controls continue to meet your organization’s needs.
SharePoint Online comes with several reporting capabilities that can help you maintain visibility across your collaboration environment. You can use these capabilities to review usage patterns, monitor security-related activity, and identify areas that may require further attention.
In this section, we’ll explore the key areas you can monitor to maintain a secure file collaboration environment.
1. Monitor File and Folder Activity in SharePoint Online
Microsoft 365 provides SharePoint usage and activity reports that give you an overview of how SharePoint sites are being used. Depending on the report, you can review information such as site activity, file activity, sharing activity, and storage usage over different reporting periods.
You can review these reports regularly to understand how users are collaborating and identify areas that may require further review.
Follow the steps below to view SharePoint usage reports:
- Sign in to the Microsoft 365 admin center.
- Go to Reports → Usage.
- Select SharePoint and review the available activity, site usage, and storage information.
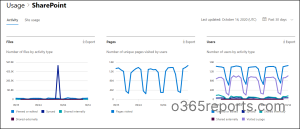
Regularly reviewing these reports can help you identify unusual activity and understand whether your existing collaboration controls are working as expected.
2. Monitor DLP for SharePoint Online Activity
DLP policies can generate useful information about sensitive content and the actions users take when working with it. Reviewing DLP activities helps you understand where sensitive information is being detected and whether your DLP policies are preventing unwanted actions.
Microsoft Purview provides DLP alerts, reports, and activity information that you can use to review policy matches and the actions taken by users.
To review DLP activity, follow the steps below:
- Open the Microsoft Purview portal.
- Go to Solutions → Data Loss Prevention.
- Review the available Alerts, Activity explorer, and Reports.
- Review policy matches and investigate activities that require attention.
Regularly monitoring DLP activity can help you identify repeated policy violations and fine-tune your protection policies when required.
3. Review Data Access Governance Reports in SharePoint Online
Data access governance reports provide a broader view of how data is being shared and protected across your SharePoint environment. These reports can help you identify unnecessary sharing links and understand how sensitive information is classified.
For example, you can use sharing link reports to review links created for SharePoint site contents and identify sharing links that may no longer be required. You can also use sensitivity label reports to get an overview of files across SharePoint sites that have sensitivity labels applied.
To access the data access governance reports, you can follow the steps below:
- Sign in to the SharePoint admin center.
- Go to Reports → Data access governance.
- Select the required report and review the available information.
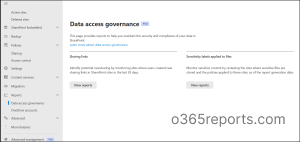
Regularly reviewing these reports gives you better visibility into how content is shared and protected. This makes it easier to identify areas that need attention and keep data access aligned with your organization’s security and governance requirements.
Additional Recommendations for Secure File Collaboration in SharePoint Online
The above settings and practices cover the key areas to consider when securing file collaboration in SharePoint Online. In addition to these, you can use the following controls to further strengthen the security of the collaboration environment.
- Enable idle session sign-out to automatically sign users out of SharePoint Online after a period of inactivity, helping protect files and site content from unattended browser sessions.
- Use permission inheritance in SharePoint wherever possible instead of assigning unique permissions to individual files and folders. This keeps access easier to manage and review.
- Use SharePoint’s standard permission levels and default groups wherever possible to simplify access management and permission reviews.
- For group-connected Team sites, manage membership through the associated Microsoft 365 group instead of adding users individually to the SharePoint site. This helps keep SharePoint access aligned with team membership.
- Use network location access control in SharePoint Online to limit access to defined IP address ranges. This can help limit access to trusted corporate networks.
- Regularly review SharePoint activities in the Microsoft Purview audit log, including file access, sharing, downloads, and permission changes. Use audit searches or alert policies for activities that require closer attention.
Together, these controls provide further protection for your SharePoint Online collaboration environment. They strengthen session security, simplifying permission management, and controlling how users access shared content.
Plan SharePoint Collaboration with Security in Mind
Securing file collaboration in SharePoint Online isn’t about applying the strictest settings everywhere. The right approach is to understand how your organization collaborates, how sensitive your data is, and where external access is actually required.
Start by setting the right organization-level sharing boundaries, then apply stricter controls to sites that need additional protection. Use the appropriate sharing links, sensitivity labels, DLP, and Conditional Access to protect sensitive content and control risky access. Finally, regularly review activity and governance reports to make sure these controls continue to meet your organization’s requirements.
By finding the right balance between security, self-service, and user experience, you can create a SharePoint Online collaboration environment where users can work efficiently while your organization’s data remains protected.
We hope this blog helped you plan a secure file collaboration environment in SharePoint Online. If you have any questions or doubts, feel free to share them in the comments below. We are happy to help! 🤝