Many Microsoft 365 admins assume that users cannot access the Entra admin portal and therefore do not need to restrict user access to Entra portal. However, by default, users can access the portal unless access is explicitly restricted. While they cannot modify most administrative settings, they can still view sensitive directory information and organizational structure. This level of visibility can still help attackers gather valuable organizational details if an account is compromised.
That’s why restricting access to the Entra admin center for non-admin users is an important step in hardening your Microsoft 365 attack surface. In this blog, let’s explore how to restrict user access to Entra portal using multiple ways and understand how this security measure helps protect your Microsoft 365 environment.
Risks of Allowing User Access to Directory Information in Microsoft 365
Imagine a scenario where a user account is compromised in Microsoft 365. Attackers can access the Entra portal with the default user permissions in Microsoft 365 and view the following details.
- View directory information: The attacker can view tenant information such as total users, groups, devices, and more. This helps them understand the organization’s size and structure, making it easier to plan targeted attacks.
- Users: Access to user profiles, email addresses, departments, roles, and group memberships, which can be used for phishing, domain impersonation, and identifying privileged accounts.
- Groups: Group membership and access structures can reveal high-privilege groups and potential privilege escalation paths within the organization.
- Devices: Device details such as join type, compliance status, and registered devices can expose endpoint security posture and help identify weakly protected devices.
Allowing non-admin users unrestricted access to the Entra portal is one of the key Microsoft 365 vulnerabilities. Here are some key reasons why limiting Entra admin center access is important.
Why Restricting Access to Microsoft Entra Admin Center is Important?
- Prevents Data Exposure: Restricts non-admin users from viewing users, groups, devices, applications, tenant details, administrative structures, and other sensitive organizational information.
- Reduces Security Risks from Compromised Accounts: Minimizes the risk of attackers using compromised accounts to gather organizational information and launch targeted phishing privilege escalation or identity-based attacks.
- Enforces Least Privilege Access: Ensures users only have the required access to the Microsoft Entra admin center based on the principle of least privilege.
Restrict Entra Admin Center Access to Users in Microsoft 365
In many organizations, access requirements to the Microsoft Entra admin center vary based on operational needs. For example, users may still need portal access to perform approved administrative tasks or activate Privileged Identity Management (PIM) roles. At the same time, access to PowerShell or other management tools may need to be restricted.
To address these varying scenarios, the following methods can be used to restrict Entra portal access based on your organization’s needs.
- Limit user access to Entra portal using user settings
- Set Intune device configuration policy to restrict access to Entra ID
- Restrict Microsoft 365 PowerShell access for non-admins
- Block user access to Entra portal using Conditional Access policy
How to Limit User Access to Entra Portal Using User Settings
To enforce this control and restrict user access to Entra portal, you can configure the setting directly from the Entra admin center. It is the quickest way to prevent non-admin users from opening the portal. Follow the below steps to apply the restriction.
- Open the Microsoft Entra admin center and navigate to Entra ID → Users.
- In the Users page, select User settings.
- Under Administration center, switch on the toggle “Restrict access to Microsoft Entra admin center” and click Save to apply the configuration.

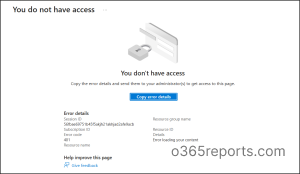
Once this setting is enabled, non admin users will no longer be able to access the Microsoft Entra admin center. If they open the portal, they will be blocked like the following image.
However, this setting only limits access to the Entra admin center interface. Users may still reach certain Entra-related pages, such as Privileged Identity Management, via direct links or alternative access methods. Therefore, this should be considered as a visibility restriction rather than a complete security control.
Restrict Browser-Based Access to Entra Portal Using Intune
While the previous method restricts access only to the Microsoft Entra admin center, other Microsoft 365 admin portals may still remain accessible to users.
In contrast, Intune device configuration policies allow organizations to block specific admin portal URLs directly in managed browsers on managed devices, providing more granular control. By configuring the required URLs, organizations can restrict access not only to the Entra portal but also to other Microsoft 365 admin portals as needed.
Use the steps below to configure limited access for unmanaged devices in Microsoft 365 and strengthen overall control.
- Open Intune admin center and navigate to Devices.
- Under Manage devices, select Configuration and choose +Create, and select New Policy from the dropdown.
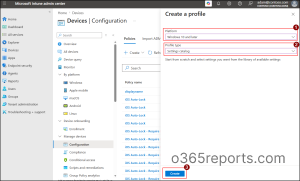
- In the Create a profile flyout, choose your desired Platform and Profile type as Settings catalog.
- Select Create to move to the next steps for creating a policy.
- Under the Basics section, provide the name and description of the policy, and click Next.
- In the Configuration settings section, choose +Add settings to open Settings picker.
- Search as blocklist and select the required browsers based on the requirement.
- Select the “option name” checkboxes and enable Block access to a list of URLs for each category.
- Then turn the toggle switch to Enabled for each selected category.
- Enter the following URL in the box for each category after enabling to restrict Entra ID access: https://entra.microsoft.com/
- Click Next and under Select scope tags, add any scope tags if needed.
- In the Assignments section, Include the users and devices for the policy.
- For selecting users and devices, choose Add groups and select the respective groups with the required user and devices.
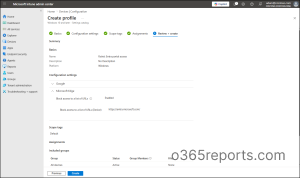
- Choose Next, review the details of the policy and click Create to add a new policy for devices.
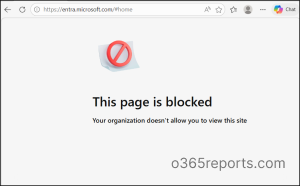
When a member of the assigned group tries to open the URL in a configured browser, they will see an error message indicating the page is blocked by organizational policy.
However, this method is limited to URL-based browser restrictions on managed devices. Users may still be able to access directory information through other methods such as PowerShell or Microsoft Graph API.
Restrict Microsoft 365 PowerShell Access for Non-Admins
Even though the above methods restrict user access to Entra portals, users can still retrieve directory data using PowerShell modules to access and query identity information. Controlling who can access PowerShell-based admin tools is therefore an important additional layer.
To control who can access PowerShell based admin tools in Microsoft 365, assigning users to specific PowerShell applications is an effective approach. However, to fully restrict access, it should be combined with the above methods. This ensures only authorized users are granted access, while all others are blocked. It provides strong protection, as attackers often target non-GUI methods like PowerShell to access directory data.
Use the following steps to configure user assignment for PowerShell applications in Microsoft 365 and strengthen your access security.
- Sign in to Microsoft Entra admin center and navigate to Enterprise apps.
- Search for Microsoft Graph Command Line Tools and select it.
- Under Manage, choose Properties, and for “Assignment required?” toggle the switch to Yes.
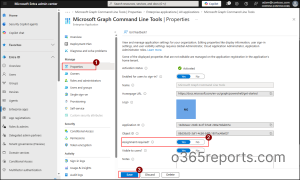
- Click Save to apply the configuration.
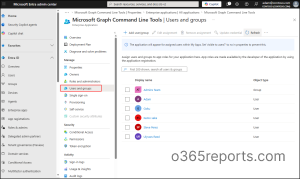
- Next navigate to Users and groups and choose +Add user/group.
- In the Add Assignment page select the desired users and groups to grant access for PowerShell application.
- Click Assign, to assign the specified users/groups to access the PowerShell application.
Tip: To block additional access paths and reduce exposure, organizations should review other PowerShell applications. They should apply similar assignment restrictions to apps like PnP PowerShell and related modules to tighter control.
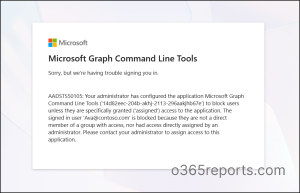
Once the restriction is enabled, the experience changes based on the PowerShell modules. Any user who is not assigned to the approved PowerShell application will be blocked from accessing it.
As a result, when restricted users try to access PowerShell, they will encounter error 50105. This error indicates that access is denied due to application assignment restrictions.
Does it Completely Block the Entra Portal Access to Users?
Not entirely! When the above methods are combined, they can achieve a higher level of restriction. However, attackers can still use other methods such as APIs or other access paths to retrieve directory data. These controls reduce exposure but do not fully block access to Entra ID information. In simple terms, one path is closed, but others may remain open, leaving some organizational information accessible even after restrictions are applied.
For the most comprehensive protection, a Conditional Access policy should be used alongside these methods, as it can block access across all entry points simultaneously.
Block User Access to Entra Portal Using Conditional Access policy
When an organization needs to fully block users from block users from accessing any admin interfaces they can use Conditional Access policies. This provides an additional layer of protection beyond simply restricting access to the Microsoft Entra admin center. Follow the steps below to configure the policy and enforce tighter control over Entra portal access.
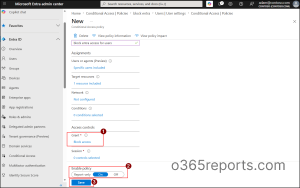
- Open Microsoft Entra admin center and navigate to Entra ID → Conditional Access.
- Click +Create new policy and provide the name for the policy.
- Next, under Assignments select the users and the target apps to apply this policy.
- Users or agents (Preview) – Include all required users to apply the policy, while excluding those with required PIM roles.
- Target Resources – Under Include, choose Select resource, then under “Select specific resources”, search and select Microsoft Admin Portals.
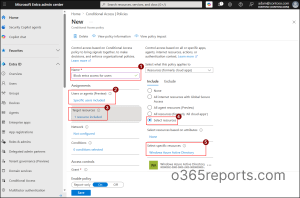
- And then, under the Access controls: Grant, choose Block access, and click Select.
- Set Enable policy to On and click Create to save the policy.
Tip: You can also use Windows Azure Active Directory in Target Resources to block users from accessing Entra-related cloud applications and APIs.
Once these restrictions are configured, users trying to access the Entra portal or retrieve directory related data using PowerShell, Microsoft Graph API, or other access methods will see a restriction message. This indicates that access is blocked or limited by organizational policies.
For included users, access will be denied with an “You don’t have access to this” message, while excluded users will continue to access the resources normally as defined by the policy. This acts as a complete protection setup, helping organizations control access across all entry points and reduce unauthorized access to directory information.

Conclusion
We hope this blog helped you understand the different ways to restrict user access to the Entra portal and when to apply each method. Using these layered restrictions helps control access, protect sensitive data, and strengthen governance in Microsoft 365.
Thanks for reading. If you have any questions or insights about controlling user access in Entra ID portals, feel free to share them in the comments.