When teams need to collaborate across M365 services like group mailboxes, calendars, and SharePoint sites together, Microsoft 365 groups are the go-to solution. However, if these groups are not managed properly, you may end up with empty groups lacking owners, inactive groups that still hold licenses, accidentally deleted important groups, etc. Most admins rely on the Microsoft 365 admin center or Entra admin center to create and manage Microsoft 365 groups. While these tools help, performing bulk actions to M365 groups through them can be time-consuming and involve a lot of manual effort.
To make things easier, we’ve developed an one-stop PowerShell script to perform 19 management actions for Microsoft 365 groups effortlessly. In this blog, we’ll walk you through how this script helps you streamline Microsoft 365 group management process.
Different Ways to Manage Microsoft 365 Groups
Before jumping into the script, let’s take a quick look at the common ways to manage Microsoft 365 groups and where they fall short.
- Microsoft 365 admin center – It is the most straightforward option. You can sign in to the Microsoft 365 admin center, go to Teams & groups → Active teams & groups, and manage your M365 groups from there. While this works well for organizations with only a few M365 groups, this approach does not support bulk operations. You have to add users one by one and switch between different sections, such as Billing, to manage licenses for these groups. In addition, advanced options such as creating role-assignable Microsoft 365 groups are not available, and the value is set to False by default.
- Microsoft Entra admin center – You can manage M365 groups by signing in to the Microsoft Entra admin center and navigating to Entra ID → Groups → Overview. Then, in M365 Groups, click the count to view all Microsoft 365 groups. From here, you can manage Microsoft 365 groups and also configure role-assignable groups during creation. However, it is not designed to handle group-based licensing, requiring you to switch to the M365 admin center for license management. Additionally, it lacks support for bulk operations, making large-scale management more time-consuming.
- PowerShell – Unlike the other two methods, this approach is powerful and flexible, especially for handling bulk operations. However, for those who are new to PowerShell, managing multiple M365 groups using cmdlets like New-MgGroup, Update-MgGroup, Set-MgGroupLicense, etc. can be overwhelming. Each action requires knowledge of which cmdlet to use and how to execute it correctly, making the process complex.
That’s exactly why we built this script. This PowerShell script simplifies Microsoft 365 group management by supporting various single and bulk operations. You need to simply select an action and provide the necessary inputs for tasks like role assignment, license managements, etc. and it is user-friendly as well.
Download Script: M365GroupManagement.ps1
Script Highlights
- Allows you to perform 19 actions to manage M365 groups.
- Supports 7 single management actions through prompts.
- Performs 12 bulk operations that require a CSV input file.
- Enables you to perform multiple actions without running the script repeatedly.
- Automatically installs the Microsoft Graph PowerShell module if it is not already available.
- Automatically exports an output CSV log after each execution for easy tracking and analysis.
- Supports Certificate-based authentication (CBA) as well.
- The script can be executed with an MFA enabled account too.
- The script is scheduler-friendly, making it easy to automate tasks.
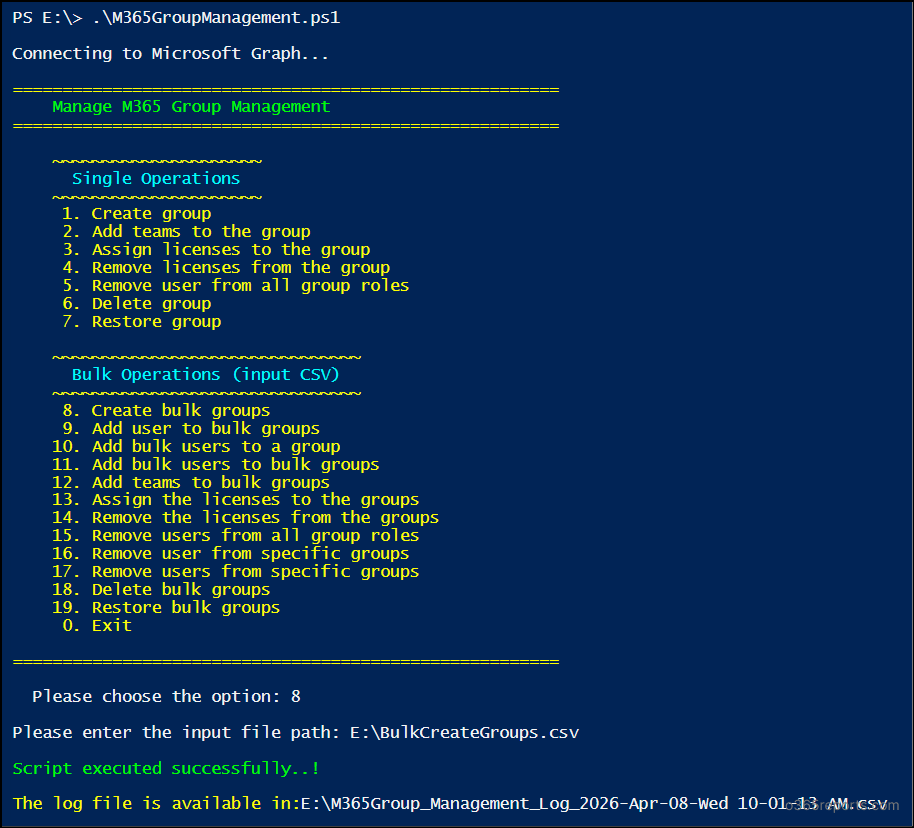
Microsoft 365 Group Management – Script Execution Methods
To get started, download the script and execute it using one of the methods below as per your needs in Windows PowerShell.
Method 1: Run the script interactively with MFA or non-MFA account.
|
1 |
.\M365GroupManagement.ps1 |
This method launches an interactive menu that displays all available management actions. You can select the required action, provide the necessary inputs, and execute it directly. After execution, the script generates an output CSV file with detailed results, including the status of each operation.
Method 2: Run the script for a single action.
You can directly execute a specific action directly using the -Action parameter.
|
1 |
.\M365GroupManagement.ps1 -Action 1 |
This skips all available action prompt and runs the selected action immediately.
If the action requires an input CSV file, you can either provide the file path when prompted or specify it during execution using the -InputCSVFilePath parameter:
|
1 |
.\M365GroupManagement.ps1 -Action 8 -InputCSVFilePath <InputCSVFilePath> |
Method 3:
By default, the script session ends after completing an action. This parameter allows admins to perform multiple operations within the same session without restarting the script.
To enable multiple execution mode, use the –MultipleActionsMode parameter when running the script:
|
1 |
.\M365GroupManagement.ps1 -MultipleActionsMode |
This allows the script to run consecutive actions without restarting, saving time and making bulk group management more efficient.
📝 Note: The main menu will keep appearing until the script is terminated by entering 0.
Method 4: Execute the script using certificate-based authentication.
For unattended execution, you can register an app in Microsoft Entra ID and connect to Microsoft Graph using a certificate. You can use a Certificate Authority (CA) or create a self-signed certificate based on your needs.
While registering the app, ensure the following Microsoft Graph API application permissions are granted:
- User.Read.All
- Group.ReadWrite.All
- Organization.Read.All
- RoleManagement.ReadWrite.Directory
|
1 |
.\M365GroupManagement.ps1 -TenantId "<TenantId>" -ClientId "<ClientId>" -CertificateThumbprint "<Thumbprint>" |
This method is ideal when automating the script using Task Scheduler or Azure Automation for managing Microsoft 365 groups.
Now, let’s take a closer look at how to use the script efficiently and execute each action.
Manage M365 Groups Using PowerShell: Get the Most Out of the Script
This script helps you manage Microsoft 365 groups by performing the following actions:
- Single Microsoft 365 group management actions (7 actions)
- Microsoft 365 Groups Management Bulk Operations (12 actions)
Single Microsoft 365 Group Management Actions
- Create a new Microsoft 365 group
- Add MS Teams to a Microsoft 365 group
- Assign licenses to a Microsoft 365 group
- Remove licenses from a Microsoft 365 group
- Remove a user from all Microsoft 365 groups
- Delete a Microsoft 365 group
- Restore a Microsoft 365 group
1. Create a New Microsoft 365 Group
When you need a group of people to collaborate and communicate, such as for a specific department or job role, you can create a Microsoft 365 group.
To create a Microsoft 365 group using PowerShell, run the script as shown below:
|
1 |
.\M365GroupManagement.ps1 -Action 1 |
Once executed, you’ll be prompted to provide the details like display name, description (optional), mail nickname, group owner UPN, members UPN (optional), and group privacy setting (Private or Public).
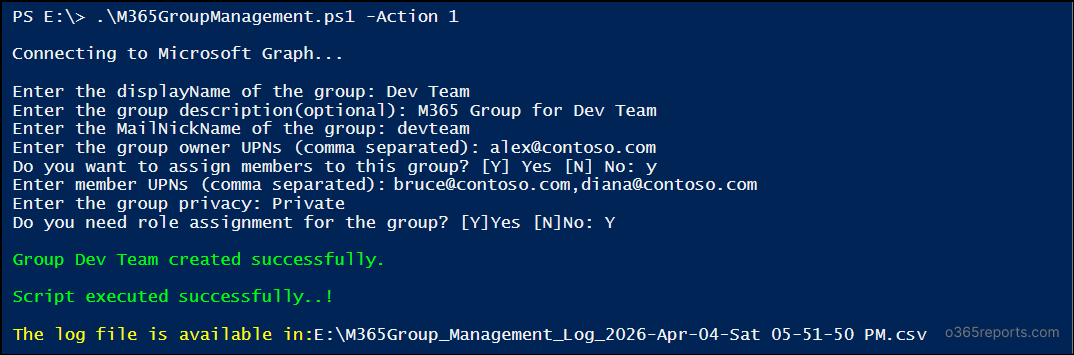
If you want to create a role-assignable group, ensure the group is set to Private, as Public groups do not support this feature.
Output CSV log

2. Add MS Teams to a Microsoft 365 Group
A Microsoft 365 group typically comes with a shared mailbox, SharePoint site, and calendar for its members. However, if users need to collaborate more interactively through chats, meetings, and channels, you need to manually enable Microsoft Teams for that group.
Before proceeding, ensure you identify Microsoft 365 groups that are not connected to Microsoft Teams to avoid execution failures.
To get a list of MS Teams disabled Microsoft 365 groups, connect to Exchange Online PowerShell and run the cmdlet below:
|
1 2 3 |
Get-UnifiedGroup -ResultSize Unlimited | Where-Object {$_.ResourceProvisioningOptions -notcontains "Team"} | Select-Object DisplayName, Alias, PrimarySmtpAddress |
Once done, you can add MS Teams to a Microsoft 365 group by running the script as below:
|
1 |
.\M365GroupManagement.ps1 -Action 2 |
After execution, enter the email address of the group for which you want to enable Teams when prompted. The group owners must have a Microsoft Teams license to connect MS Teams to Microsoft 365 groups.
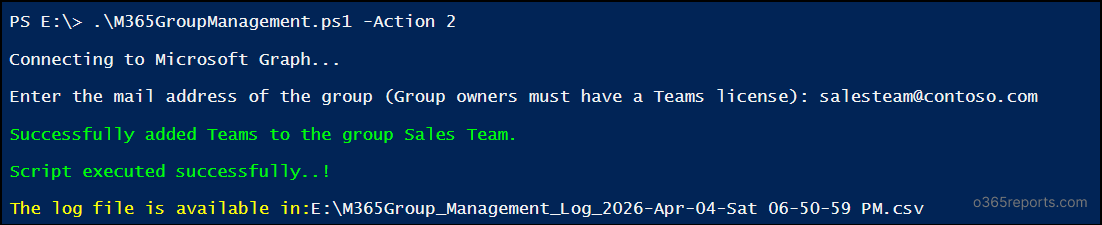
You cannot enable Microsoft Teams for role-assignable groups in Microsoft 365.
Output CSV log

3. Assign Licenses to a Microsoft 365 Group
When the members of a M365 group need access to specific M365 services or resources, they must be assigned the appropriate licenses. Instead of assigning licenses individually for each user, you can use the group-based licensing for better management.
Before getting started, it’s important to have the list of available licenses in your tenant and the number of consumed units.
To check the available licenses and the consumed units, you can use the PowerShell cmdlet below:
|
1 2 |
Connect-Graph -Scopes Organization.Read.All Get-MgSubscribedSku | Select -Property Sku*, ConsumedUnits -ExpandProperty PrepaidUnits | Format-Table |
Once you have this information, you can add licenses to a Microsoft 365 group, run the script as shown below:
|
1 |
.\M365GroupManagement 1.ps1 -Action 3 |
Upon execution, you will be prompted to enter the email address of the group and the license friendly name (e.g., Microsoft Copilot Studio Viral Trial). You can find the available licenses in the LicenseFriendlyName.csv file included with the script.

Once the details are provided, the specified license will be assigned to the group.
Output CSV log

Tip: To optimize license usage, identify users with duplicate license assignments from both direct and group-based licensing. Then, remove the direct license assignments and rely on group-based licensing instead to prevent duplicates.
4. Remove Licenses from a Microsoft 365 Group
When a project is completed or a Microsoft 365 group is no longer active, it’s important to remove the assigned licenses. Keeping unused licenses can result in users retaining access to resources that are no longer needed.
Here’s how you can run the script to remove group-based licensing from a Microsoft 365 group.
|
1 |
.\M365GroupManagement.ps1 -Action 4 |
When prompted, enter the email address of the target group and specify the licenses to be removed. Once the required details are provided, the licenses will be removed successfully.

Output CSV log

5. Remove a User from All Microsoft 365 Groups
During Microsoft 365 user offboarding or when a user is removed from an organization, their group memberships should also be removed to maintain secure access.
Instead of removing the user from each M365 group one by one, you can run the script below to remove them from all Microsoft 365 groups.
|
1 |
.\M365GroupManagement.ps1 -Action 5 |
After execution, you will be prompted to enter the UPN of the user for whom you want to remove Microsoft 365 group memberships. Whether the user is an owner or a member, this script will remove the user.

Exception: ⚠️ If the user is the only owner of a group, then they cant be removed since it will become an orphaned group.
Output CSV log

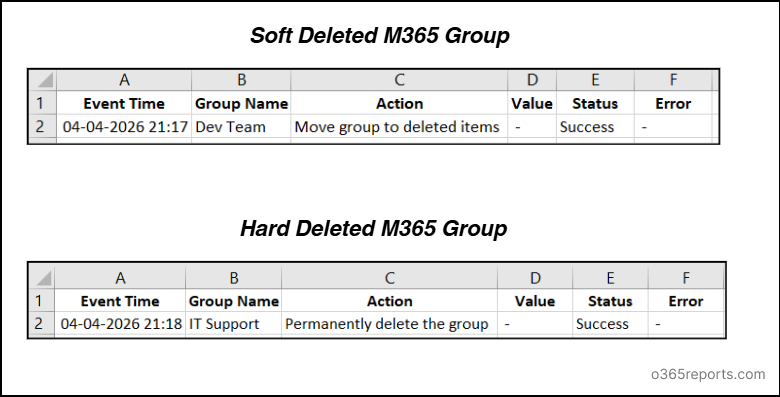
6. Delete a Microsoft 365 Group
If a M365 group is no longer needed or while cleaning the legacy data, you can delete it. You can delete a Microsoft 365 Group in two ways: soft delete and hard delete.
- A soft delete moves the group to the deleted groups list, allowing it to be restored within the retention period.
- In contrast, a hard delete permanently removes the group and it cannot be recovered.
You can soft delete as well as hard delete a Microsoft 365 group using PowerShell script as below:
|
1 |
.\M365GroupManagement.ps1 -Action 6 |
When prompted, enter the email address of the group you want to delete and choose the type of deletion (soft or hard). If no deletion type is specified, the group will be soft-deleted by default.
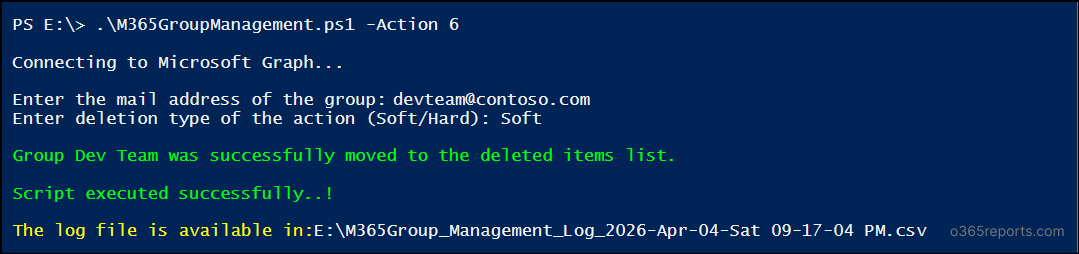
Note: Microsoft 365 groups with active licenses cannot be deleted. To delete such groups, unassign the licenses and then proceed.
Output CSV log
7. Restore a Microsoft 365 Group
If you’ve accidentally deleted a Microsoft 365 group or need to recover a soft deleted M365 group, restoration is possible as long as it is within the retention period.
To restore a soft-deleted Microsoft 365 group, run the script as below:
|
1 |
.\M365GroupManagement.ps1 -Action 7 |
While executing, you’ll be prompted to enter the email ID of the group. Once provided, the group will be restored successfully.

Output CSV log

Microsoft 365 Groups Management Bulk Operations (Requires CSV input)
- Create multiple Microsoft 365 groups
- Add a user to multiple Microsoft 365 groups
- Add multiple users to a Microsoft 365 group
- Add bulk users to multiple Microsoft 365 groups
- Add MS Teams to multiple Microsoft 365 groups
- Bulk assign licenses to Microsoft 365 groups
- Bulk unassign licenses from Microsoft 365 groups
- Bulk remove users from all Microsoft 365 groups
- Remove a user from specific Microsoft 365 groups
- Bulk remove users from multiple Microsoft 365 groups
- Delete bulk Microsoft 365 groups
- Bulk restore Microsoft 365 groups
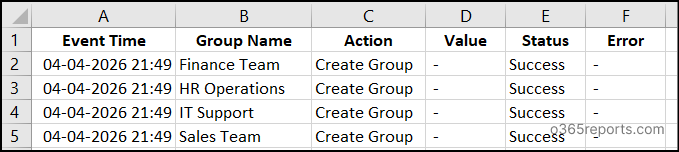
1. Create Multiple Microsoft 365 Groups
During M365 user onboarding, you may need to create multiple Microsoft 365 groups for different teams, such as Finance, Support, or IT. In such cases, creating groups one by one can be time-consuming. Instead, you can use this script to create multiple groups in a single run.
Before running the script, create an input CSV file with the required columns: DisplayName, MailNickName, GroupOwnerUPN, and Privacy. Ensure the column headers in the input CSV are correctly formatted to prevent execution errors.
Input CSV log

After preparing the CSV file, run the script by replacing <InputCSVFilePath> with the input file path as shown below to bulk create M365 groups:
|
1 |
.\M365GroupManagement.ps1 -Action 8 -InputCSVFilePath "<InputCSVFilePath>" |

Output CSV log
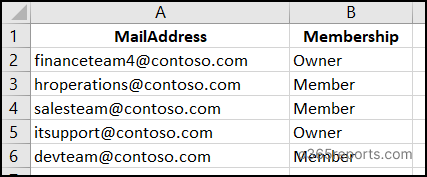
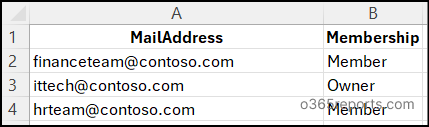
2. Add a User to Multiple Microsoft 365 Groups
When users need to collaborate across multiple departments, for e.g., an IT developer collaborating with IT, sales and finance teams, they require access to relevant M365 groups. Instead of manually adding them to each group, you can streamline the process by adding multiple groups in one go.
For this, prepare a CSV file with the required columns such as MailAddress (group’s email address) and Membership (Owner/Member). Ensure the headers are correctly formatted as the image below:
Input CSV log
Then, run the script as below to add multiple Microsoft 365 groups to a user:
|
1 |
.\M365GroupManagement.ps1 -Action 9 -InputCSVFilePath <InputCSVFilePath> |
You will be prompted to enter the user’s UPN, and the script will handle the rest.

Output CSV report
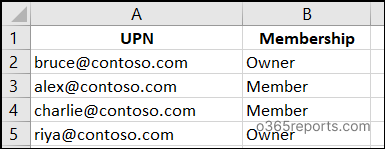
3. Add Multiple Users to a Microsoft 365 Group
In certain scenarios, users from various departments may need to receive the same announcements, messages, or updates. In such cases, you need to add multiple users to a single Microsoft 365 group and manage communication more efficiently.
For this, first you need to create a CSV file including columns, such as the UPN of the users and the Membership (Owner or Member).
Input CSV log
Once the file is ready, you can add multiple users to a Microsoft 365 group by running the script below:
|
1 |
.\M365GroupManagement.ps1 -Action 10 -InputCSVFilePath <InputCSVFilePath> |
When you run the script, it will prompt you to provide the group email address along with the path to the input CSV file.

Output CSV log

If you enter an invalid user UPN or if the user already exists in the Microsoft 365 group, the status will be shown as Failure.
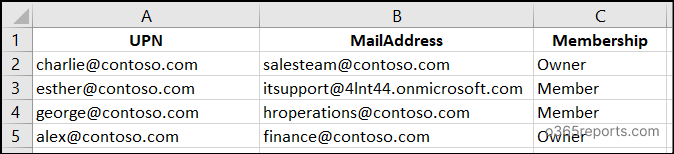
4. Add Bulk Users to Multiple Microsoft 365 Groups
During bulk hiring, a large set of users needs to be assigned to various M365 groups. In such cases, you don’t have to add each user to every target M365 group individually.
Instead, prepare a CSV file with the required details, including the users’ UPN, groups’ MailAddress and the required Membership.
Input CSV log
Now, you can bulk update Microsoft 365 groups with members by running the script as below:
|
1 |
.\M365GroupManagement.ps1 -Action 11 -InputCSVFilePath <InputCSVFilePath> |

Output CSV log

5. Add MS Teams to Multiple Microsoft 365 Groups
When migrating distribution lists to Microsoft 365 groups, you want to enable MS Teams for those groups so users can start collaborating through chats, meetings, and channels. In this case, you can add Teams to bulk Microsoft 365 groups.
To do this, begin by preparing a CSV file with column MailAddress containing the email of the groups for which you need to add Teams, as shown in the image below.
Input CSV log

Once completed, you can add Microsoft Teams to multiple M365 groups by running the script below:
|
1 |
.\M365GroupManagement.ps1 -Action 12 -InputCSVFilePath <InputCSVFilePath> |
Upon execution, the script will prompt you to provide the path to the input CSV file.

Output CSV log

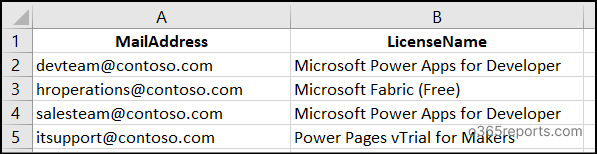
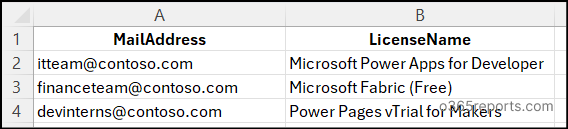
6. Bulk Assign Licenses to Microsoft 365 Groups
When your organization adopts new plans or migrates to new licensing services, you need to assign licenses to multiple department-based M365 groups at once. In such instance, you can assign licenses to multiple Microsoft 365 groups in a single run.
To get started, create a CSV file with columns MailAddress and LicenseName containing the email addresses of the target M365 groups and the required licenses, as shown in the image below.
Input CSV log
After the file is prepared, run the script as below to assign multiple licenses for multiple M365 groups:
|
1 |
.\M365GroupManagement.ps1 -Action 13 -InputCSVFilePath "<InputCSVFilePath>" |

Output CSV log

7. Bulk Unassign Licenses from Microsoft 365 Groups
For short-term hires such as interns or contractors, licenses assigned to their groups should be removed once their engagement ends. By doing this, you reduce costs, avoid accumulation of unused licenses, and limit access to premium services.
Start by creating a CSV file with a MailAddress and LicenseName column containing the group email addresses and the license friendly names, as shown in the image below:
Input CSV log
After preparing the file, run the script as below to remove licenses from multiple Microsoft 365 groups.
|
1 |
.\M365GroupManagement.ps1 -Action 14 -InputCSVFilePath "<InputCSVFilePath>" |

Output CSV log

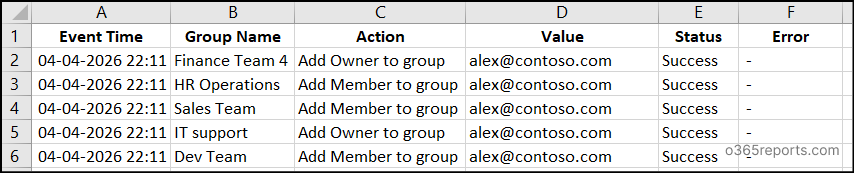
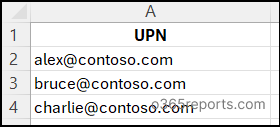
8. Bulk Remove Users from All Microsoft 365 Groups
During a compliance cleanup or contract expiration, you need to remove multiple external or temporary users from all Microsoft 365 groups in one go to prevent lingering access.
To do so, prepare a CSV file that includes the UPN column with the required User Principal Names of the target users for whom you need to remove all assigned M365 groups.
Input CSV log
After preparing the file, run the script as below to unassign multiple users from all Microsoft 365 groups.
|
1 |
.\M365GroupManagement.ps1 -Action 15 -InputCSVFilePath "<InputCSVFilePath>" |

Output CSV log
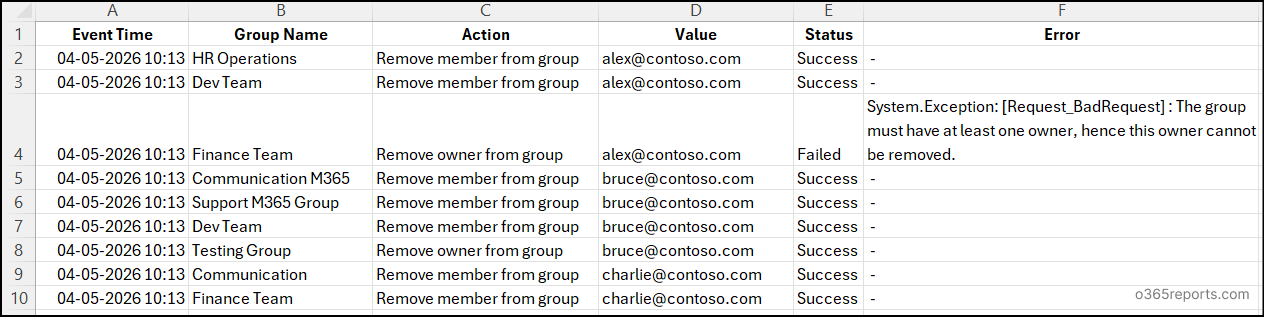
In the output log, you can view the status of removing a user from each group. In the example shown, since the Finance Team has Alex as the only owner in the group, the execution status is shown as failed.
9. Remove a User from Specific Microsoft 365 Groups
When a user changes roles within the organization, you remove them a single or multiple Microsoft 365 groups that are no longer relevant to them. This ensures that they no longer have access to restricted resources.
As a first step, prepare a CSV file with MailAddress and Membership columns, representing the group email address and membership type, as shown in the image below.
Input CSV log
Once everything is in place, execute the script as below to unassign user from specific M365 groups.
|
1 |
.\M365GroupManagement.ps1 -Action 16 -InputCSVFilePath "<InputCSVFilePath>" |
As the script runs, enter the UPN of the target user when prompted.

Output CSV log

10. Bulk Remove Users from Multiple Microsoft 365 Groups
During a team restructuring, you may need to remove multiple members from Microsoft 365 groups while keeping them active in other relevant groups.
To do this, prepare your prepare an input CSV file with the columns user’s UPN, group’s MailAddress, and Membership:
Input CSV log

When the file is ready, use the script as below to unassign users from specific Microsoft 365 groups.
|
1 |
.\M365GroupManagement.ps1 -Action 17 -InputCSVFilePath "<InputCSVFilePath>" |

Output CSV log

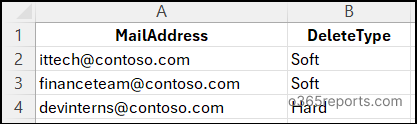
11. Delete Bulk Microsoft 365 Groups
After identifying unused groups through reports, you perform a bulk cleanup to delete them and keep the environment organized. In such cases, you can use this script to perform the cleanup process. This will save your time and effort seamlessly.
Initially, create a CSV file and populate the MailAddress and DeleteType columns with group emails and deletion type respectively, as illustrated in the image below:
Input CSV log
After setting up the CSV, you can delete multiple M365 groups by executing the script as below:
|
1 |
.\M365GroupManagement.ps1 -Action 18 -InputCSVFilePath "<InputCSVFilePath>" |

Output CSV log

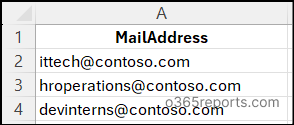
12. Bulk Restore Microsoft 365 Groups
If important groups were accidentally deleted during cleanup, you can restore them in bulk to recover access to associated resources. Remember that only soft-deleted groups can be recovered, and only within their retention period.
To get started, build a CSV file with a MailAddress column listing the email IDs of the required groups, as depicted in the image below:
Input CSV log
After completing the CSV setup, you can restore multiple Microsoft 365 groups by running the script as below:
|
1 |
.\M365GroupManagement.ps1 -Action 19 -InputCSVFilePath "<InputCSVFilePath>" |

Output CSV log

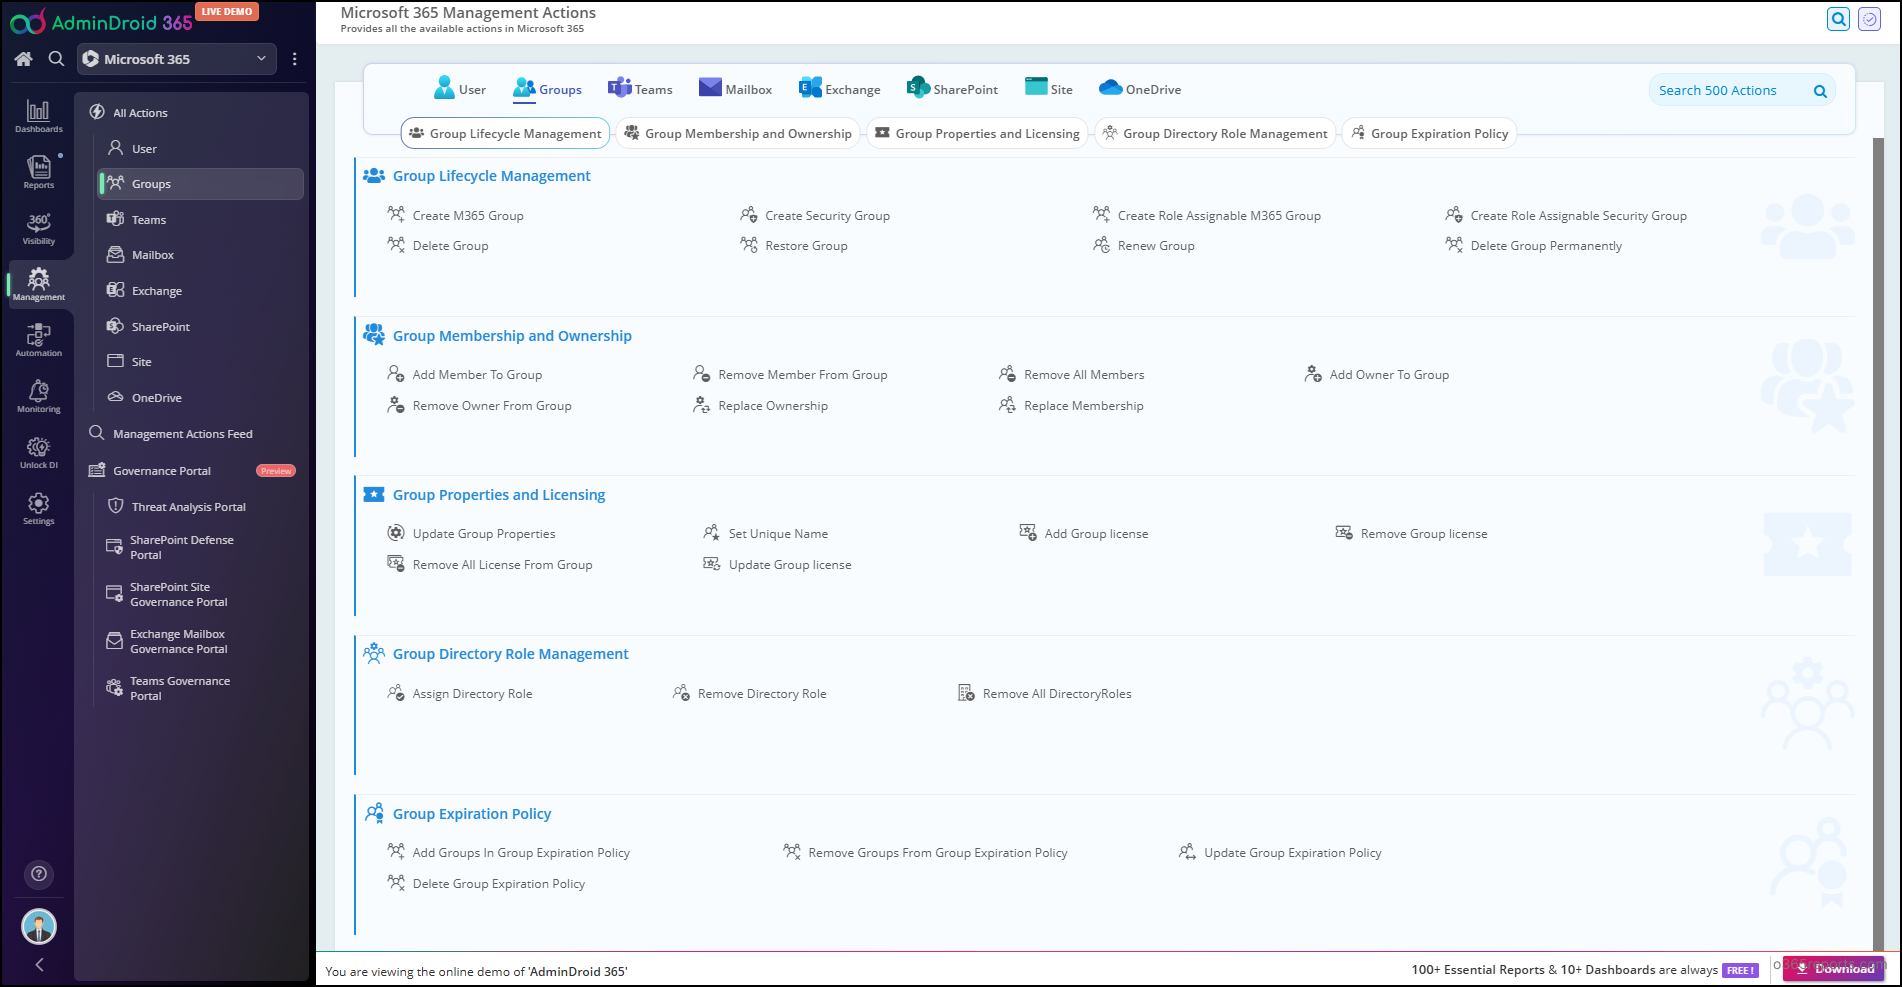
Simplify Microsoft 365 Group Management with AdminDroid!
Managing Microsoft 365 groups using manual methods or even PowerShell scripts does get the job done, but let’s be honest, it’s not always convenient. Executing the PowerShell script for bulk operations requires creating CSV files, which can be time-consuming and frustrating.
But what if you could manage all your Microsoft 365 groups with just a few mouse clicks? That’s exactly where AdminDroid 365 comes in. It simplifies the entire process with an intuitive interface, allowing you to perform any management actions easily – just select what you need!
AdminDroid’s group management actions transform the way you manage Microsoft 365 groups with its intuitive and interactive dashboard. You can perform both single and bulk management actions effortlessly. No complex scripting, just a few clicks!
With this powerful capability, you can perform the following actions:
- Create M365 groups/role-assignable M365 groups
- Delete and restore groups
- Add/remove members from group
- Add/remove owners from group
- Replace group membership or ownership
- Update group properties & set unique group names
- Add/remove licenses to a group
- Add/remove directory roles to a group
- Manage group expiration policies
AdminDroid doesn’t just simplify management, it completely transforms reporting and auditing too. It offers visually rich dashboards filled with insightful charts and tables that make analysing Microsoft 365 groups much easier and faster. You can also export reports in multiple formats, schedule reports, set up real-time alerts and customize columns based on your needs.
Beyond this, AdminDroid 365 offers 3500+ pre-built reports, 100+ interactive dashboards, and 450+ management actions. It covers all major Microsoft 365 services, including SharePoint Online, Exchange Online, OneDrive, Microsoft Teams, and more, giving you complete administrative control from a single platform.
🚀 Start your journey with AdminDroid today using 15-day free trial and experience a smarter way to manage and report on Microsoft 365.
Closing Lines
And that’s a wrap! 🎉 We hope this blog made Microsoft 365 group management simpler and more streamlined using an all-in-one PowerShell script. Give the script a try and see the difference for yourself. We’d love to hear how it works for you. Share your experiences, questions, or feedback in the comments section below. Stay tuned for more Microsoft 365 blogs.