PowerShell script reduces manually doing repetitive tasks. If you are frequently executing scripts at pre-defined times or specified time intervals, you may be tired of executing scripts repeatedly. Then, you can utilize Windows’ Task Scheduler to automate script execution for you. It will save your time and effort in executing script daily/weekly basis. Let’s see how to schedule PowerShell script through Task scheduler.
It can be done in two ways.
1.Schedule PowerShell script using Task Scheduler GUI
2.Schedule PowerShell script from Task Scheduler using PowerShell
Method 1: Schedule PowerShell Script using Task Scheduler
Open Task Scheduler (it can be found in the ‘Administrative tools’ or by pressing ‘Windows+R’ to open run and then type “taskschd.msc”.)
To run a script from Task Scheduler, follow these steps.
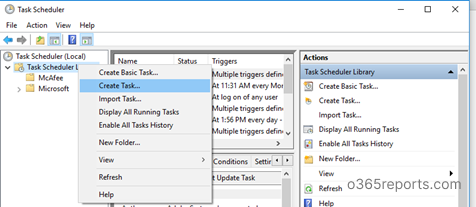
1.Open Task scheduler –> Task Scheduler Library –> Create Task
2.In General tab, you can set scheduler name and description about the task like for what purpose the task has created.
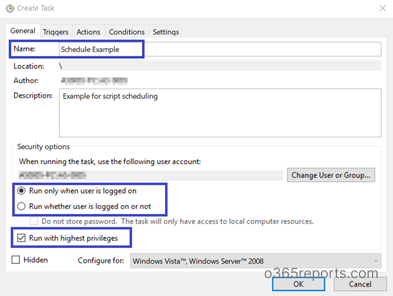
Available security options explained below.
- Specify the user on whose behalf the task will be run.
- You can specify that a task should run . It can be done by selecting a radio button labeled ‘Run Whether the user is logged on not’. If this radio button selected, the task will not run interactively. To make a task run interactively, select the ’Run only when user is logged on’ radio button.
- When the ‘Run whether user is logged on or not’ is selected, you may prompt to supply the credentials of the account, regardless of whether you select the checkbox ‘Do not store password’ or not. If the account is not logged on during task execution, saved credentials will be used.
- If the task requires elevated privileges, then select the option ‘Run with highest privileges.’
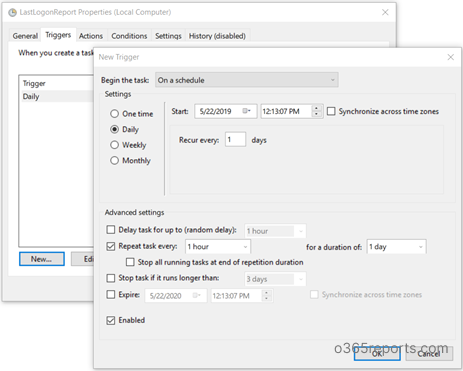
3.Switch to the Trigger tab and click the New button. Here, you can set conditions that trigger a task.
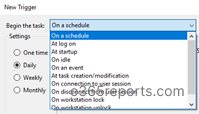
- You can specify when to start the task. For example, you can have it executed on a schedule, at startup, at logon or whenever a particular event occurs by selecting ‘Begin the task’ drop-down menu.
- You can configure whether you want to run this task once or daily or weekly or monthly according to your scenario.
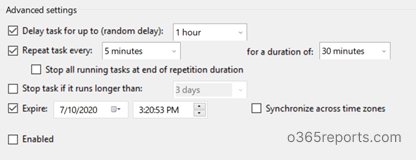
- In the “Advanced settings”, you can choose to delay task, repeat task, stop task if it runs longer than the specified time period and expiry date.
- Delay task for up to – This adds a random delay, so the task won’t stat at the exact time of the day.
- Repeat task every – It shows the number of times a task should run after a trigger is fired.
- Repeat task every – Time interval between each task repetition
- For a duration of- How long a task should continue to repeat
- Stop task if it runs longer than- If the task runs longer than the expected time or never quit, task will automatically stop if it reaches the mentioned time limit.
- Expire – After the time period specified, the schedule won’t be triggered.
4.Then open the next tab ‘Actions’ and click the ‘New’ button.
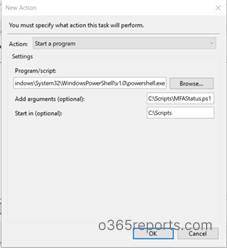
- In the Action drop-down, “Start a program” is set by default. You can change it if required.
- Using Browse, select program/script field. To schedule a script, we need to select powershell.exe.
You can find powershell.exe in your system32\WindowsPowerShell\v1.0 folder.
- In ‘Add arguments’, -File parameter is the default one so simply specify the script path. For example, I am going to schedule a script that exports Office 365 users MFA status report.
|
1 |
c:\GetMFAStatus.ps1 |
If the path contains any blank space, it should be enclosed with quotes.
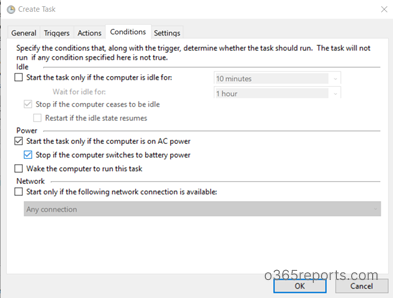
5.Once configured, you can specify conditions to determine whether the task should run. The task will not run if any condition specified here is not true.
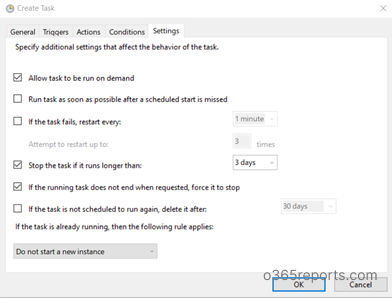
6.On the Settings tab, you can set additional advanced settings to control the task execution.
Finally, click Ok to create a scheduled script.
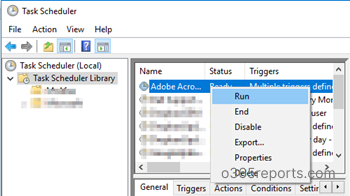
Scheduled script will run as expected according to your schedule without any issue. If you want to check script execution, you can click Run by right-clicking task name.
Automate PowerShell Script from Task Scheduler with Parameters
If you want to schedule the PowerShell script with parameters, use the below format.
|
1 |
Script path -Param 1 Value1 -Param2 “Value 2” |
For example, I am going to automate one of our PowerShell script: Export Office 365 Users MFA status report
During schedule, you can explicitly pass the credential as parameters as shown below:
|
1 |
C:\GetMFAStatus.ps1 -UserName "XXX XX" -Password **** |
If the parameter value has blank space, values should be enclosed with quotes.
Note: If you want a more secure alternative to passing passwords as plain text, consider using certificates. Admins can easily create self-signed certificates for internal purposes, eliminating the need for expensive third-party CA certificates.
If you want to pass a switch parameter, you can use below syntax.
|
1 |
C:\GetMFAStatus.ps1 -EnabledOnly |
Above script exports Office 365 users MFA status whose MFA status is enabled. Here -EnabledOnly is a switch parameter.
Note: For cloud-based tasks, you can schedule scripts with Azure Automation, which allows you to monitor the execution history with enhanced visibility into failed jobs. This includes obtaining detailed error messages and outputs in the console for better analysis.
For more Office 365 related PowerShell scripts, you can refer O365Reports.com blog.
Method 2: Schedule PowerShell Script from Task Scheduler Using PowerShell
Instead of the detailed GUI approach to schedule PowerShell scripts, you can also employ PowerShell cmdlets to create a scheduled task. It involves the following steps:
1.Define time for scheduler
2.Set Actions to be performed during execution
3.Save scheduler
Define Time for Scheduler:
New-SchdeuledTaskTrigger
creates a scheduled task trigger object. Using this cmdlet, you can specify starting time of a task or starting a task multiple times on a daily or weekly basis.
|
1 |
$Time=New-ScheduledTaskTrigger -At 4.00PM -Once |
Above cmd creates a scheduled task trigger that starts at 4PM and run once.
|
1 |
$Time=New-ScheduledTaskTrigger -At 4.00PM -Daily -DaysInterval 2 |
Above cmd creates a scheduled task trigger that starts every 2 days at 4PM
Set Actions to be Performed During Execution:
New-SchdeuledTaskAction
represent actions that executed when Task Scheduler runs the task. A task can have single action or a maximum of 32 actions. When you specify multiple actions, task Scheduler executes a task sequentially.
|
1 |
$Action=New-ScheduledTaskAction -Execute PowerShell.exe -WorkingDirectory C:/Scripts -Argument “C:\Scripts\MFAStatus.ps1 -UserName XXXX -Password YYYY” |
This command opens a PowerShell and change the directory to C:/Scripts and then invoke the MFAStatus.ps1 script.
Save Scheduler:
Register-ScheduledTask
saves the scheduled task on a local computer.
|
1 |
Register-ScheduledTask -TaskName "Schedule MFA Status Report" -Trigger $Time -Action $Action -RunLevel Highest |
The above cmd saves a scheduled task with a name “Schedule MFA Status Report” in the root folder. The saved task uses the pre-created action and trigger values that are specified by $Action and $Time variables.
Use Cases:
Using Task Scheduler, you can schedule a PowerShell script to run periodically. So that you don’t need to manually run a script on daily/Weekly/monthly basis. There are more scripts available on the internet which are scheduler friendly (Credentials can be passed as a parameter instead of saving inside the script). To keep those credentials protected, you can choose from several secure storage methods, ensuring sensitive information isn’t exposed during automation. I have given some examples here.
- Track Office 365 users’ login history – Keep audit log for more than 90 days
- Periodic report of Office 365 users MFA status
- Schedule Office 365 users’ last logon time report
- Schedule Office 365 Mailbox Permission report
- Schedule Office 365 users’ license report
- Schedule Distribution Group membership PowerShell script
- Schedule Dynamic Distribution Group Membership PowerShell script
- Periodic report on Office 365 users’ last activity report
- Schedule Office 365 users’ login history PowerShell report
- Export shared mailbox permission report periodically
- Schedule non-owner mailbox access report
- Office 365 users’ password expiry report
In this blog, we have seen how to automate a PowerShell script using Task Scheduler.What’s your preferred approach when it comes to scheduling – GUI or PowerShell? Let us know in the comments section.

