Identifying risky users in Microsoft Entra is more than just a security best practice. It’s a vital step in defending your organization against modern identity-based threats.
Even in well-protected environments with strong security controls like MFA, attackers continue to exploit human behavior through techniques such as MFA fatigue, social engineering, and phishing. These tactics can lead to compromised accounts despite layered defenses.
To stay ahead of these threats, Microsoft Entra gives you visibility into accounts that show signs of compromise, allowing you to take action before damage occurs. In this blog, we’ll explore how Entra identifies risky users and how to retrieve them. This allows you to prioritize remediation efforts and strengthen your identity security posture.
How Entra ID Protection Investigates Risky Users in Microsoft 365
Microsoft Entra leverages real-time threat intelligence and behavioral analytics to detect anomalous activity that may indicate a compromised identity. It monitors risky sign-in signals such as:
- Use of anonymous IP addresses
- Atypical travel or unfamiliar locations
- Sign-ins from infected or suspicious devices
- Credentials found in data breaches, and more…
These detections are based on attack patterns observed across Microsoft’s global threat intelligence network. When a user exhibits risky behavior, Entra flags the account, enabling automated remediation or manual investigation, depending on your configured policies.
By surfacing risks early, Entra shifts your identity protection strategy from reactive cleanup to proactive defense. Now, without any further delay, let’s dive into how to identify all risky users in Microsoft Entra.
Monitor Risky Users in Microsoft Entra ID
Manually tracking all user sign-ins in Microsoft 365 to identify risky users is impractical for organizations with many users. Instead of filtering massive volumes of sign-in data, Microsoft Entra ID provides a built-in report to detect and monitor risky users based on advanced risk signals.
The following are the available methods to track risky users in Microsoft 365:
1. Track Risky Users with Microsoft Entra Admin Center
Follow these steps to access the risky users report in Microsoft Entra ID Protection.
- Sign in to the Microsoft Entra admin center.
- Go to Identity –> Protection –> Risky Activities.
- Under the Reports section, select Risky users.
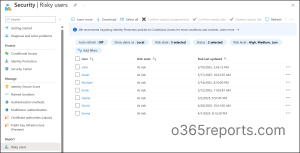
Here, you will see all users who are currently flagged as risky based on Microsoft’s threat intelligence. In addition, you can also view these risky users in the Identity Threat Detection and Response dashboard in Microsoft Defender. It also shows related identity incidents, giving you a broader view for investigation and response.
2. Get Entra ID Risky Users with PowerShell
You can follow the steps below to retrieve all risky users using Microsoft Graph PowerShell.
- Connect to the Microsoft Graph PowerShell using the cmdlet below.
1Connect-MgGraph -Scopes "AuditLog.Read.All", "Directory.Read.All" - Run the following cmdlet to get all risky users in Microsoft Entra.
1Get-MgRiskyUser
This retrieves all users currently flagged as risky, along with those who were previously at risk and are now in a remediated state. However, it does not provide detailed insight into the specific risk events or reasons that triggered the user’s risky status.
The Microsoft Entra portal or basic PowerShell commands can help identify risky users. However, they often fall short when it comes to retrieving risky users across multiple risk levels, risk states, and other filters, especially in large volumes of data. To make this process easier and more reliable, we developed a custom PowerShell script. It offers a more complete, flexible, and automated way to track risky users in Microsoft 365.
Download Script: GetRiskyUsersReport.ps1
Script Highlights:
- Exports all risky users in your organization to a CSV file.
- Lists all users who have a history of risky activity.
- Finds users based on specific risk levels and risk states.
- Supports exporting risky users over a specified time.
- Automatically verifies and installs the Microsoft Graph PowerShell SDK module (if not installed already) upon your confirmation.
- The script can be executed with an MFA-enabled account too.
- Supports certificate-based authentication (CBA) too.
- The script is scheduler friendly.
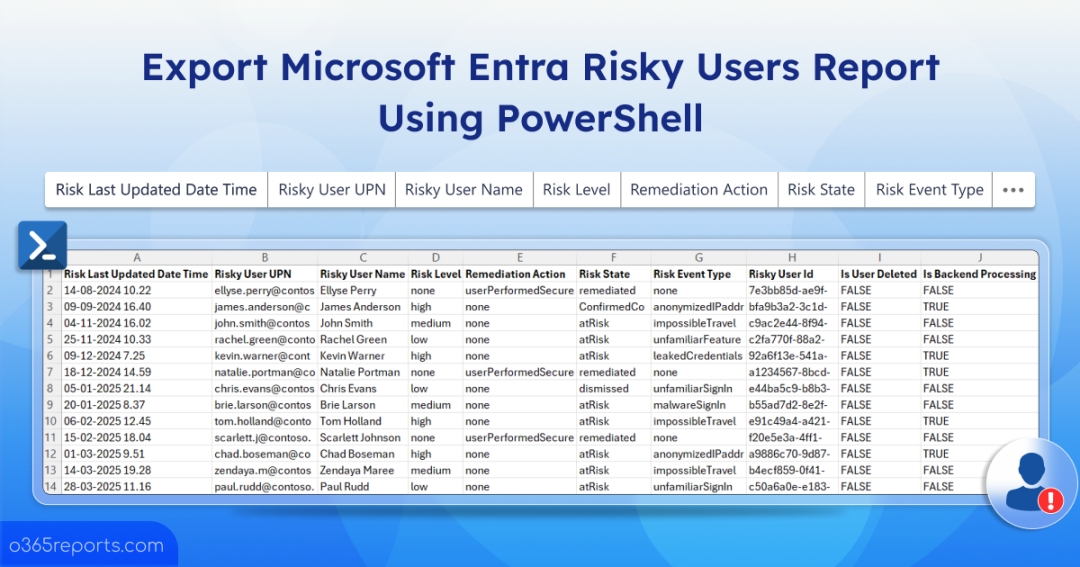
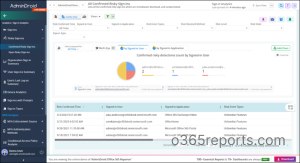
Risky Users Report in Microsoft Entra ID – Sample Output
The Microsoft Entra risky users report looks like the screenshot below.
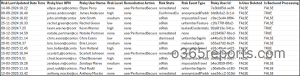
The script exports all risky users along with the attributes like Risky User Name, Risky User UPN, Risky User ID, Risk Level, Risk State, Risk Last Updated Date Time, Remediation Action, Risk Event Type, Is User Deleted, Is Backend Processing.
Microsoft 365 Risky User Report – Script Execution Steps
- Download the script.
- Start Windows PowerShell.
- Select any of the methods below to execute the script.
Method 1:
Execute the script with an MFA or non-MFA account.
|
1 |
.\GetRiskyUsersReport.ps1 |
The above format exports a detailed report of all risky users in your organization.
Method 2: Execute the script using certificate-based authentication.
To use certificate-based authentication, you must register an app in Entra ID, which helps you connect to Microsoft Graph PowerShell. Depending on your needs, you can choose to use a certificate authority (CA) or create a self-signed certificate.
|
1 |
.\GetRiskyUsersReport.ps1 -TenantId <TenantId> -ClientId <ClientId> -CertificateThumbprint <CertificateThumbprint> |
You can also schedule this script using Task Scheduler or Azure Automation to periodically detect and export risky users report.
Unlock the Full Power of Risky Users Report Script
The script includes built-in filters designed to address common reporting scenarios. Here’s how they can help tackle your specific challenges.
- Export all risky users for a custom period
- Track risky users by specific risk level
- Filter risky users based on risk state
1. Export All Risky Users for a Custom Period in Microsoft 365
By default, the script fetches all risky users from the past 90 days. However, you can refine your search using the -ShowRiskyUsersFromLastNDays parameter. With this option, you can export risky users for any custom period you choose.
|
1 |
.\GetRiskyUsersReport.ps1 -ShowRiskyUsersFromLastNDays 30 |
The above command retrieves all risky users from the past 30 days. This makes it easier to quickly locate users whose behavior triggered risk signals during a specific period. Once identified, you can investigate and take the necessary remediation actions.
Handy Tip: You can also automate risky sign-in remediation using risk-based access policy in Microsoft Entra. These policies can automatically restrict access for risky users, helping protect sensitive data in your organization.
2. Track Entra Risky Users by Specific Risk Level
While all risky users should be monitored, users with a high-risk level must be prioritized for immediate action. Microsoft only assigns a “high” risk level when there’s strong evidence that an account has been compromised or is exhibiting risky behavior.
By default, the script exports all risky users across low, medium, and high-risk levels. For organizations with many risky users, identifying high-risk users manually can be time-consuming. That’s where the -RiskLevel parameter becomes useful.
|
1 |
.\GetRiskyUsersReport.ps1 -RiskLevel High |
The command above exports only high-risk users in Microsoft 365, helping your security team focus on the most critical accounts that require immediate investigation and response. You can also choose values like Low, Medium, or None to find users with low risk, medium risk, or those already remediated.
Handy Tip: If you notice any user account with a mailbox marked as high-risk, take immediate action to secure the compromised account in Microsoft 365. Such accounts pose a serious threat, as they could be used to send malicious emails to other users indefinitely.
3. Filter Risky Users Based on Risk State in Microsoft Entra
The risk state in the risky users report indicates the current status of the users flagged as risky. When a user is first detected, they are marked as AtRisk. Administrators can then investigate and update the risk state to ConfirmedCompromised, ConfirmedSafe, or more, depending on the outcome of the investigation.
If the user performs a self-service password reset or an admin initiates a password reset, the risk state is updated to Remediated. Identifying the risk state of each user is crucial to deciding the next course of action. You can use the -RiskState parameter to filter users by a specific state.
|
1 |
.\GetRiskyUsersReport.ps1 -RiskState ConfirmedCompromised |
The above format exports only those users whose accounts are verified as compromised. With this information at hand, you can quickly take necessary actions to remediate a compromised account and protect your environment.
You can also set the “-RiskState” parameter to the following values:
- ConfirmedSafe – To identify users who are confirmed as safe by admins.
- Remediated – To identify users who were previously marked as risky, but remediation actions (such as a password reset) have been completed.
- Dismissed – Used when the detected risk is valid but not malicious (e.g., a known penetration test).
- AtRisk – Indicates that the user is currently at risk, but no action has been taken yet by the admins.
- None – No risk state is currently associated with the user.
🚨 Take Risky User Detection to the Next Level with AdminDroid
We’ve explored ways to get all risky users in your organization. But what if there’s a smarter way, one that puts you one step ahead, detecting users the moment they become risky due to malicious sign-ins?
Curious? Meet AdminDroid’s Microsoft Entra reporting tool, your smarter way to stay ahead of risky users.
With over 50+ dedicated reports, AdminDroid gives you deep visibility into every risky sign-in event. The reports are even categorized and filtered, so you can take action exactly where it matters most. Here are a few powerful reports that help you stay ahead:
📊 Risky Sign-In Detection Analytics Reports
- By Risk Level (High, Medium, Low, Hidden)
- By Detection Timing (Real-Time, Near Real-Time, Offline)
- By Suspicious Behaviour:
- Unlikely travel
- Anonymous IP address
- Malware-Infected IP
- Password Spray
- Suspicious Inbox Forwarding
- Anomalous User Activity, and more
- By Risk Status:
- Sign-ins Marked as Compromised
- Marked as Remediated
- Marked as Dismissed
- Marked as Safe
But that’s not all! AdminDroid offers alerts for 50+ risky sign-ins and 5 built-in alert policies that automatically notify you whenever a risk is detected on user sign-ins. Let’s have a look at those default policies.
🔔 Default Risk Detection Alert Policies:
- High-risk sign-ins
- Admin-confirmed user compromise
- Resolved risky sign-ins
- Risky sign-ins with detailed info
- Confirmed risky user activity
More than just risky sign-in detection, AdminDroid offers over 1900+ reports and 30+ interactive dashboards, along with powerful auditing and management features across all Microsoft 365 services, including Exchange Online, Teams, Entra ID, SharePoint, OneDrive, and more.
🚀 Don’t wait — try AdminDroid today! Experience a new level of user management. Start your 15-day free trial and discover how our smart platform can redefine Microsoft 365 management.
We hope this blog helps you identify and export the risky users report in Microsoft 365 effectively. If you have any questions or feedback, feel free to share them with us in the comment section.