Email signatures in Microsoft Outlook, configured by either admins or users and are automatically added to every new message sent from Outlook. These can be standardized across the organization or customized for each user, depending on the organization’s policy. However, users have the option to override these defaults and create their own signatures. Email signatures not only reinforce company branding but also help to have professional communication, legal compliance, etc. Thus, configuring them effectively can enhance communication efficiency.
Create Organization-wide Email Signature in Microsoft 365
Setting up company-wide email signatures in Microsoft 365 helps ensure a standard signature for all users as well as sharing contact information. This is especially useful for marketing and promotional purposes. You can configure email signature via mail flow rule in native tool which requires multiple steps. To simplify this process, we have developed a PowerShell script that creates organization-wide signatures to all mailboxes or specific mailboxes and verifies their deployment status.
Script Highlights
- The script automatically verifies and installs the Exchange PowerShell module (if not installed already) upon your confirmation.
- Provides the option to create text signature.
- Provides the option to create email signatures using HTML templates.
- Provides the option to use default or customized fields and templates.
- Allows to create an email signature for all mailboxes.
- Allows to filter and set up email signatures for user mailboxes alone.
- Allow to set up an email signature for bulk users.
- Exports signature deployment status to a CSV file.
- Supports certificate-based authentication (CBA) too.
Download Script: SetupEmailSignatureInOutlook.zip
Create Email Signature in Outlook – Script Execution Methods
- Download the script.
- Start the Windows PowerShell.
- Select any of the methods provided to execute the script.
Method 1: You can run the script with MFA and non-MFA accounts.
|
1 |
./SetupEmailSignatureInOutlook.ps1 |
This example lets you create and add an email signature to all the Exchange Online mailboxes and export the email signature deployment status into a CSV file.
Method 2: You can explicitly pass credentials (username and password) and execute the script.
|
1 |
./SetupEmailSignatureInOutlook.ps1 -UserName <UPN> -Password <Password> |
Method 3: You can use a certificate-based authentication method by registering the app in Azure AD.
|
1 |
./SetupEmailSignatureInOutlook.ps1 -Orgnaization <Domain> -ClientID <AppId> -CertificateThumbPrint <CertThumbPrint> |
You can use either a certificate issued by a recognized certificate authority (CA) or create a self-signed SSL certificate.
View Email Signature Deployment Status
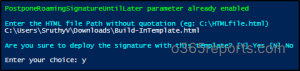
After successfully connecting to Exchange Online, the script checks the ‘Postpone Roaming Signature’ status. Roaming signature is enabled in EXO to synchronize email signatures across Outlook interfaces which creates uniformity in every email sent using any of the Outlook clients. When this feature is enabled, the ‘Set-MailboxMessageConfiguration’ cmdlet will not work properly. Thus, Microsoft introduced the ‘PostponeRoamingSignatureUntilLater’ parameter which disables roaming signatures in Outlook and is essential for the script to work correctly.
If ‘roaming signature’ is enabled in your organization, the script will request to disable it via ‘PostponeRoamingSignatureUntilLater’ parameter.
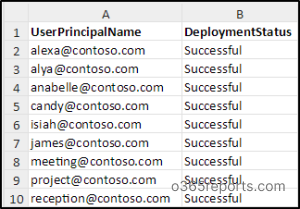
After script completion, it automatically exports the email signature deployment status report as a CSV file, as shown below.
Explore More Cases for Configuring Email Signature in Outlook
- Configure default text signature in Outlook
- Configure custom text signature in Outlook
- Setup HTML signature using in-built HTML template
- Setup HTML signature using custom HTML template
- Create an email signature for all Microsoft 365 mailboxes
- Set up an email signature for bulk mailboxes
- Set up an email signature for Microsoft 365 user mailboxes
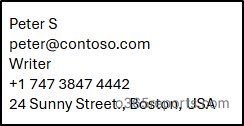
1. Configure Default Text Signature in Outlook
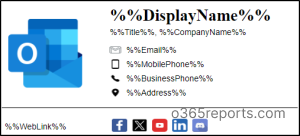
You can create and add built-in plain text signature available in this script with user properties provided like display name, UPN, title, mobile phone, telephone, and address. The signature will look like the below image. If you want to customize the signature, you can go with the next method.
Sample Signature:
Follow the steps below to create and add plain text signature using default fields.
Step 1: Run the script.
|
1 |
./SetupEmailSignatureInOutlook.ps1 -AssignDefault_TextSignature |
Step 2: Then, you must choose if you want to deploy the signature for all mailboxes, specific mailboxes, or only user mailboxes. Enter the respective number and the signature will be deployed. These choices can also be passed as parameters.

The signature deployment status report will be exported as a CSV file upon your confirmation.
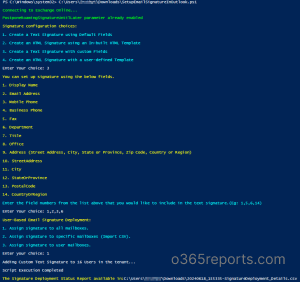
2. Configure Custom Text Signature in Outlook
If you don’t require to configure signature with the above default fields, you can customize the user fields and add an email signature as per your requirements in the organization.
Follow the steps to set up Outlook signatures with customized plain text signature.
Step 1: Run the script.
|
1 |
./SetupEmailSignatureInOutlook.ps1 -AssignCustom_TextSignature |
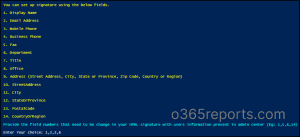
Step 2: Then choose the required custom text signature fields from the given list. Enter the respective field numbers in a comma-separated value as shown below.
Step 3: Now, choose if you want to deploy signature to all mailboxes, specific mailboxes, or only user mailboxes by entering the required number from the choices. Also, you can view the signature deployment status report if required.
Sample Signature:

3. Setup HTML Signature Using In-built HTML Template
You can set up an email signature using the in-built html file downloaded along with the script. Before proceeding, ensure that the in-built HTML template file is saved in the same location where this script is saved in your system.
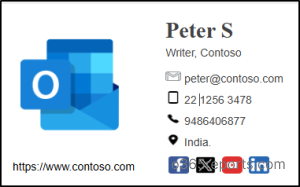
Sample Output:
The output of the default HTML template will be displayed as shown below.
Step 1: Run the script.
|
1 |
./SetupEmailSignatureInOutlook.ps1 -AssignDefault_HTMLSignature |
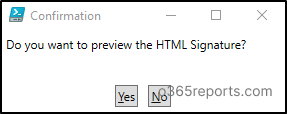
Step 2: A popup appears asking for previewing the in-built HTML signature. Click ‘Yes’ if you want to preview the signature. Else, click ‘No’.
Signature Preview:
Step 3: Then, type ‘Y/y’ to confirm that you want to use the in-built template to deploy email signature. If you don’t want to use the template, click ‘N/n’.

Step 4: Provide the values for the fields as links to include them in the email signature. It includes links for the company logo, website, Facebook, Twitter, YouTube, LinkedIn, and Discord. You can simply paste the required link and press enter to paste the next link.
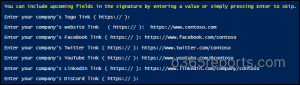
If you don’t want to include any of the fields in the signature, you can simply press Enter without pasting the link. For instance, in the above image, I didn’t provide a link for the company’s logo and Discord community.
Step 5: Now, choose if you want to deploy signatures for all mailboxes, specific mailboxes or user mailboxes alone by entering the desired number from signature deployment choices. The signature will be created successfully using HTML template.
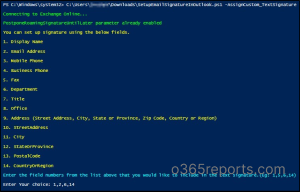
4. Setup HTML Signature Using Custom HTML Template
To set up an email signature using your customized HTML template, follow the steps below.
Step 1: Run the script.
|
1 |
./SetupEmailSignatureInOutlook.ps1 -AssignCustom_HTMLSignature |
Step 2: You can provide the path of your custom HTML template file.
Step 3: A popup appears, asking for previewing the custom template. Click Yes or No as you wish.
Step 4: Type ‘Y/y’ for confirming the deployment of signature using the given template.
Step 5: Then, you will be provided with a list of custom fields in which you can choose the required fields. The fields you are choosing here will override the customized value provided in the custom template file and replace the values available in the Microsoft 365 admin center.
For example, if the department is set as ‘Technology’ in the HTML template, all users’ email signature will display ‘Technology’ as their department. However, if you want individual users to show their specific departments in their signatures, you can select the ‘department’ field during setup. This way, each user’s department from the M365 admin center will be displayed in their signature.
Custom HTML File:

Now, let’s see how to modify the ‘name, email address, department, and phone number’ based on each user’s details and the other properties like address, office name, website, etc., remain same.
Enter the respective field numbers in the given choices as shown below.
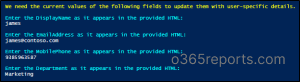
Step 6: Then, you must manually enter the value given in the custom HTML template for the fields you chose in the previous step.
For example, In the above step, I entered 1, 2,3, & 6. So, I must enter the values of ‘display name’, ‘email address’, ‘mobile phone’, and ‘department’ provided in the custom HTML template file.
Sample Signature:

The display name, email address, department, and mobile phone are modified based on the respective user properties.
5. Create an Email Signature for all Microsoft 365 Mailboxes
Creating an org-wide email signature will be helpful when admins want to bring a common signature, branding, etc., in the signature which will be added to every email sent from any mailboxes in the organization.
Step 1: Run the script.
|
1 |
./SetupEmailSignatureInOutlook.ps1 -AllUsers |
Step 2: Enter your choice on the configuration methods available and proceed with the steps explained in previous use cases.
Then, the email signature will be successfully added to all the mailboxes in the Microsoft 365 environment.
6. Set Up an Email Signature for Bulk Mailboxes
When new users are added to the organization, you don’t need to set up an email signature for each user. You can provide a list of newly added users in the CSV file and setup signature for them easily. For creating and adding email signatures for multiple mailboxes in the organization, you should provide the path of your CSV file.
Step 1: Run the script.
|
1 |
./SetupEmailSignatureInOutlook.ps1 -UserListCsvPath “<filepath> |
Replace <filepath> with the path of your saved CSV file.
Step 2: Choose any of the configuration methods by entering the desired number and proceed with the steps as explained in previous use cases.
Sample Input:
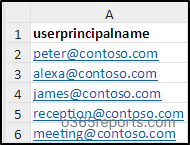
Remember that the column name in the CSV file must be ‘userprincipalname’ as shown below.
7. Set Up Email Signature for Microsoft 365 User Mailboxes
Shared mailboxes are used by multiple users. So, adding a signature to a shared mailbox will create complexity as the signature will vary based on the permission of the respective user. Instead, you can configure signature for user mailboxes alone, by following the below steps.
Step 1: Run the script
|
1 |
./SetupEmailSignatureInOutlook.ps1 -UserMailboxesOnly |
Step 2: Choose the desired configuration method by entering the number and proceed with the steps as explained in previous use cases.
After setting up email signatures, the desired signature will be added while sending messages as shown below.

Note: You can also set up email signatures for shared mailboxes using Outlook and Exchange admin center as per your requirements.
Automate Email Signature
In manual deployment of email signature, when any of the user properties gets modified, the signature will not be updated. For example, if a user’s phone number is modified, the signature will not be updated automatically, instead we must do it manually. It is a tedious task especially in larger organizations. So, if we automate email signature, the modified user properties will be automatically updated in the email signature efficiently.
Though the script is not supporting automation, we have heard your feedback and developed the script for automating email signature setup in Outlook.
Admins can also monitor the signature settings of all mailboxes in the organization using AdminDroid. The ‘Email Signature Settings’ report in AdminDroid lets you track the signature settings of each mailbox along with details like auto-add signature status, signature text and HTML, display name, and more. Apart from that, the tool provides 1800+ reports, 30+ dashboards, and more outstanding features for Microsoft 365 reporting and auditing. Download AdminDroid today for enhanced monitoring and management!
I hope this blog provides the detailed steps for creating and setting up the email signature in Outlook. For any doubts and queries, contact us through the comment section.