Managing organizational data at scale requires a balance between automation and control. While auto-apply retention labels in Microsoft 365 help administrators efficiently classify and manage large volumes of SharePoint, OneDrive, and Exchange Online content, they also introduce risk when deletion is automated. A retention label with a delete action can remove content permanently without any human oversight, which may result in data loss.
To reduce this risk, disposition review in Microsoft Purview was introduced as a controlled decision step before permanent deletion. This approach ensures that each item is reviewed and validated before disposal.
Let’s delve into the blog to understand the disposition review and its importance.
Need to Set Up Disposition Review in Microsoft 365
Disposition review is a key capability within Microsoft Purview Records Management that helps organizations control how content is deleted after its retention period ends. By validating content before deletion, organizations can proactively minimize the risks listed below:
- Prevents accidental data loss: Adds a review step before permanent deletion, which helps avoid removing important files or emails due to automated retention actions.
- Supports audits, investigations, and legal requirements: Ensures records that may still be needed for compliance or legal review remain available even after the retention period ends.
- Adds accountability to deletion decisions: Assigns reviewers who must approve disposal actions, creating ownership and traceability for every deletion.
- Enables informed and defensible disposal: Helps organizations to justify why content was deleted, which is important during audits or regulatory reviews.
- Allows retention extension when required: Enables reviewers to extend retention or relabel content when it still holds business or regulatory value.
- Reduces risk from misconfigured retention labels: Acts as a safeguard when labels are misconfigured to auto-delete items after retention.
Now, let’s look at how the disposition review process works.
How Disposition Review Works?
Before diving into the creation of disposition reviews, lets understand how the disposition review process works.
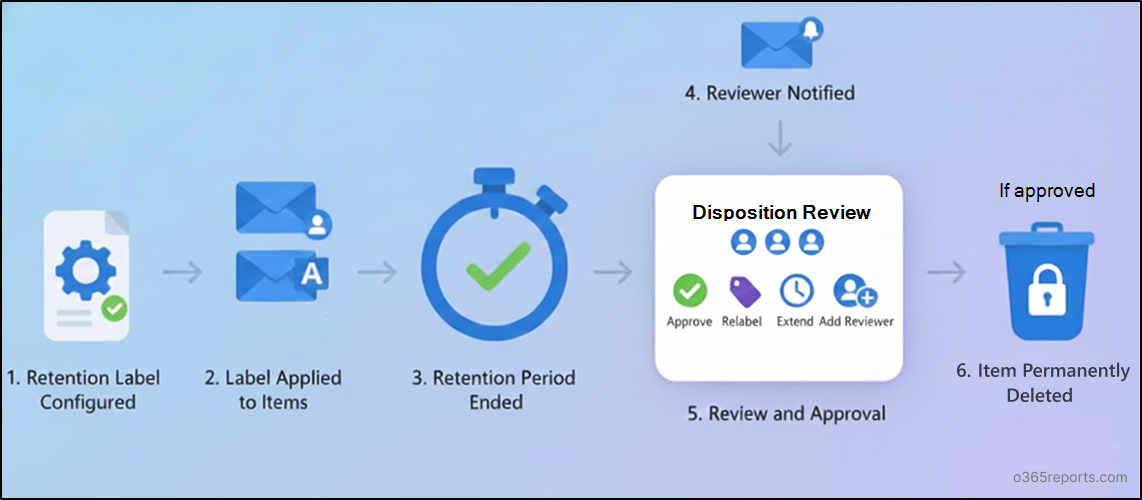
- At first, admins need to create retention labels that triggers a disposition review at the end of the configured period.
- Then, the labels need to be published and applied to emails, as well as to files or folders in SharePoint and OneDrive, either automatically or manually.
- When the retention period of the specific file ends, reviewers will receive an email notification per label to start the disposition review.
- Once reviewers clicked the link from the mail, it redirects to the disposition page in the Microsoft Purview, which shows only the items assigned for them. After reviewing each item, reviewers can approve disposal, extend the retention period, apply a different retention label, or add another reviewer based on the requirement.
Hope, you are clear now! Let’s see what roles are required for the disposition review in Microsoft purview.
Permissions Needed to Configure and Review Disposition Reviews
To configure or manage disposition review, administrators must ensure the correct permissions are applied to manage the disposition reviews. Let’s have a look into the required permissions.
| Role Group | Access |
| Records Management group
|
Assign this to users so that they can create and access disposition reviews in Microsoft Purview.
This also allows users to edit the customized email for disposition review.
|
| [Custom]-Disposition Management Role group | Granting the Records Management role group gives users access to several record management features. So, create a custom role group with the Disposition Management role to limit users to reviewing their assigned disposition items alone. |
| Content Explorer Content Viewer | Assign this role to the user for viewing the item’s content in the mini-preview pane from the disposition page. Even without this role, users can complete disposition review actions. However, content preview in Microsoft Purview is not available to them. |
Note: By default, Global Administrators do not have the Disposition Management role assigned and must be explicitly granted this role to manage disposition reviews.
View All Disposition Review Items in Microsoft Purview
By default, each user can able to view only the items assigned to them. If an admin wants to see all items assigned to users in disposition review, proceed with below steps.
- Firstly, create a mail-enabled security group and add the required admins who should have visibility into all disposition review items. Note that, only mail enabled security groups are supported.
- Next, navigate to the Microsoft purview portal and go to Settings > Solution settings > Records Management > Disposition.
There enable the mail-enabled security group with list of admins you created. This allows the selected admins from the group to view all disposition review items.
Note: Access is granted only to the members of the mail-enabled security group. Group owners are not included unless explicitly added as members.
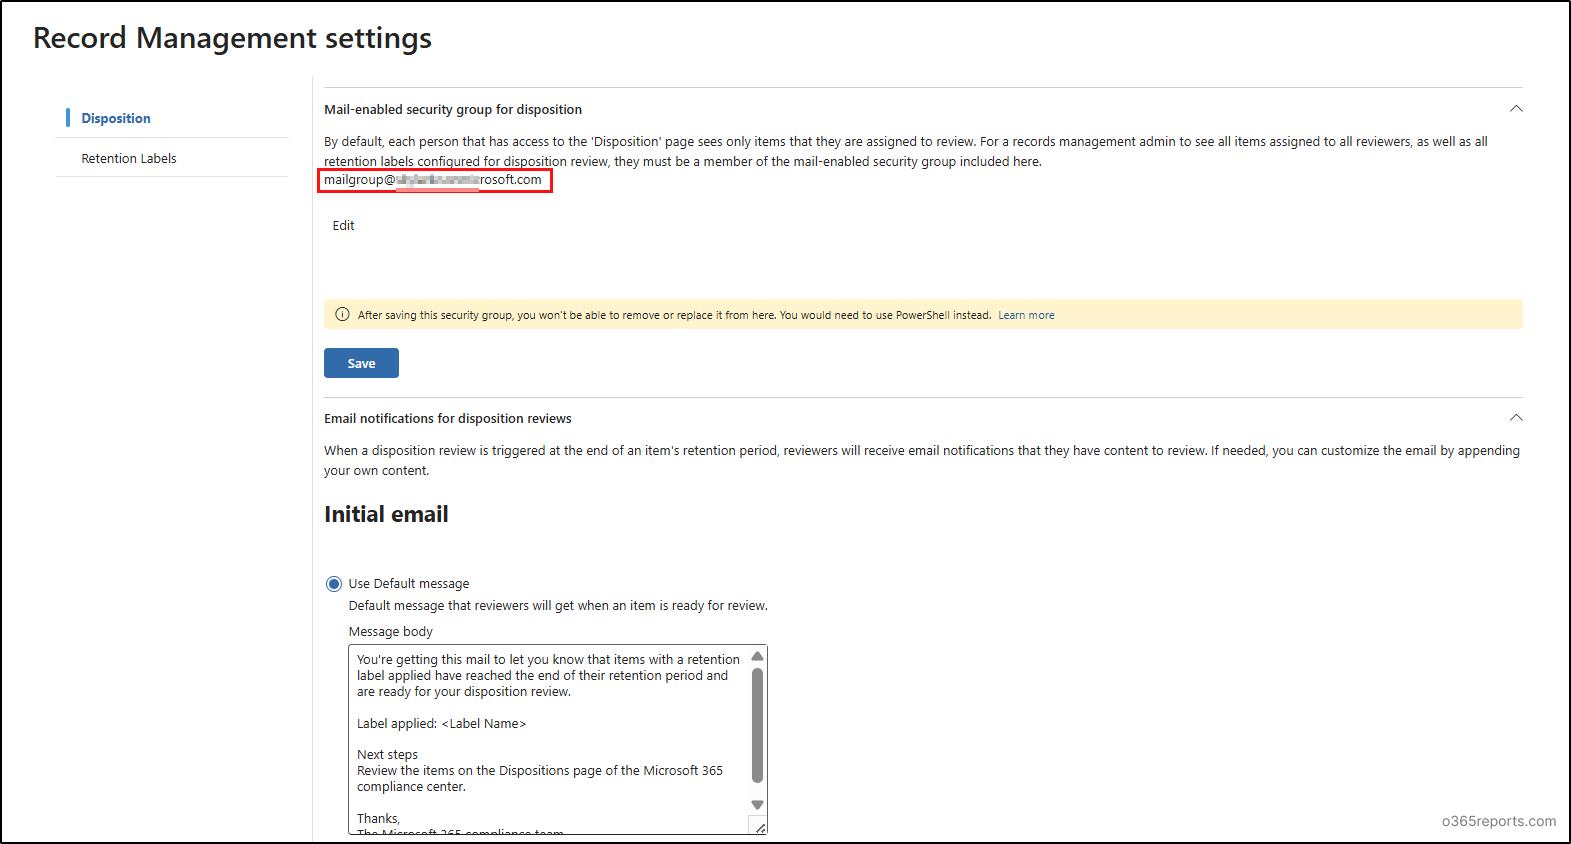 Note: You can’t either remove or edit the added mail enabled security group in UI. However, you can be able to add another group using the below cmdlet with group mail.
|
1 |
Enable-ComplianceTagStorage -RecordsManagementSecurityGroupEmail <GroupMail> |
How to Create the Disposition Review in Microsoft Purview
Disposition reviews are created as part of retention label configuration. Once the retention label is created with disposition review enabled, it initiates the review process in Microsoft Purview. So, now let’s jump into the process of creating retention label with disposition review.
Create a Retention Label with Disposition Review
Follow the steps to create a retention label with disposition review.
Navigate to Microsoft purview > Solutions > Data Lifecycle Management > Retention labels.
Step 1: Configure the basics of your label:
- click on the Create a label option and start by providing the suitable name and description for your retention label.
- Once done, click next to proceed the process.
Step 2: Define label setting:
- Choose the Retain items forever or for a specific period option in the define label settings to create the disposition review. The other options are not supported because they either trigger automatic deletion or apply labels only for classification respectively.
- Then, click Next to proceed with retention period.
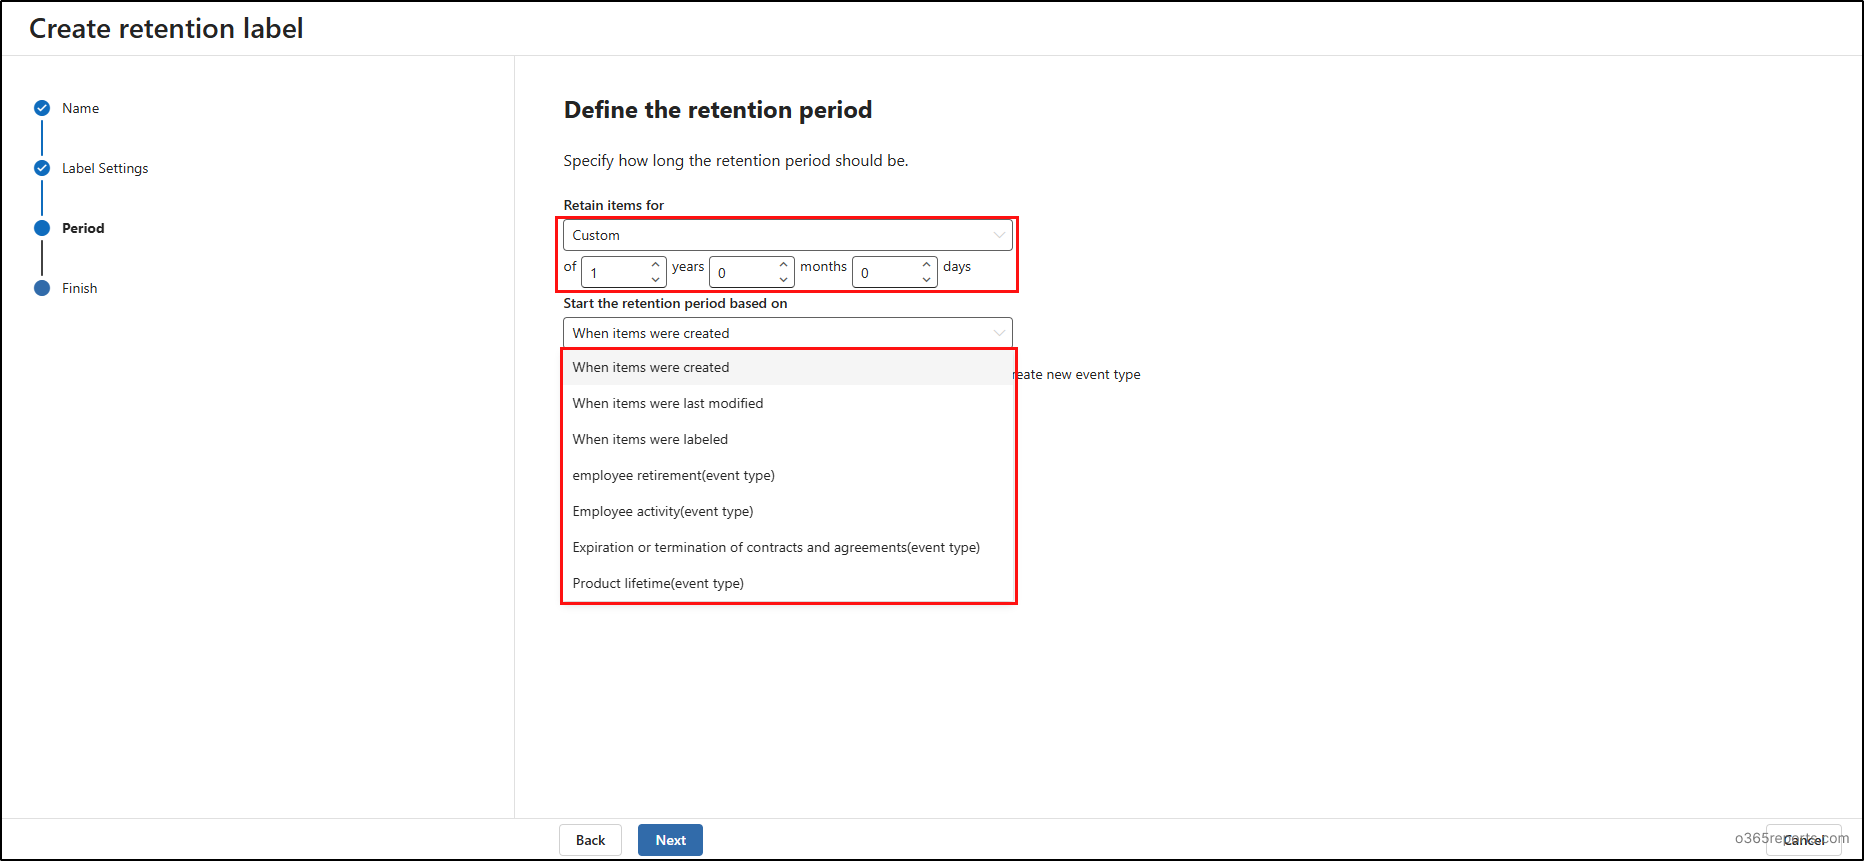
Step 3: Define the retention period:
- Here, specify the retention period for your label.
- Then, configure the event type that determines when the retention period starts and click Next.
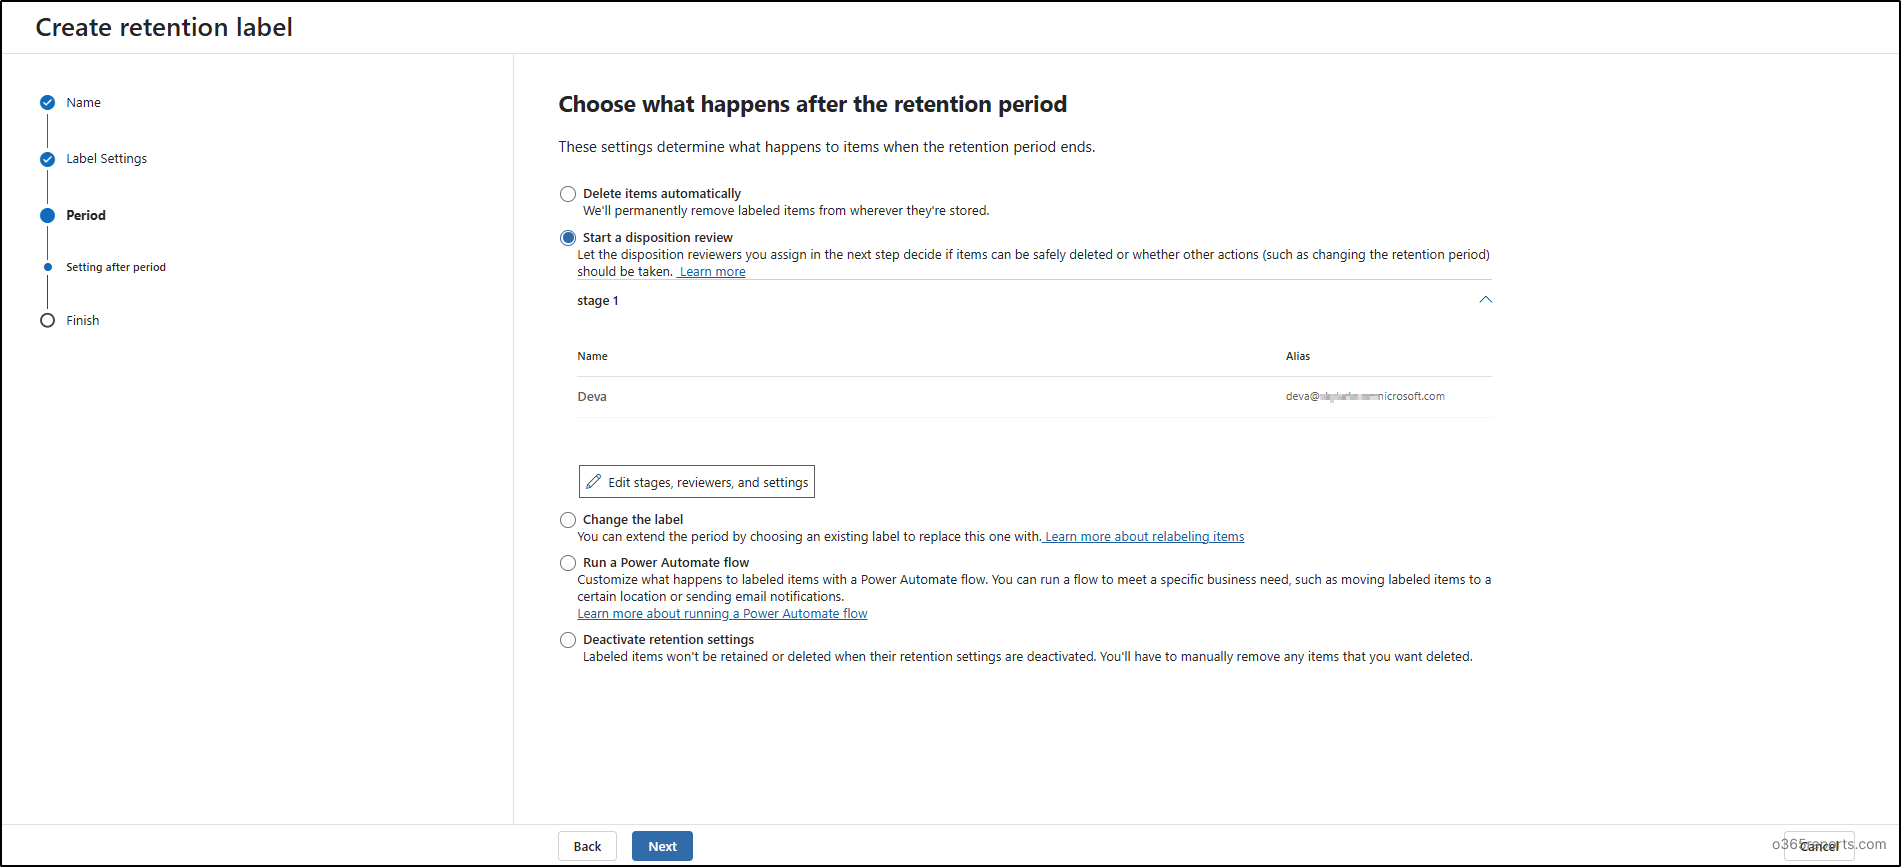
Step 4: Disposition review:
- Here comes with main part! Click the “Start a disposition review” option to initiate the disposition review configuration. Once clicked, you will be given an option to configure the review stages and approvers.
- From there, add a stage by providing a name and assigning a reviewer or a mail-enabled security group. You can configure up to five stages. During this setup, you can also rename, reorder, or remove stages as needed.
- Then you can also configure an auto-approval period ranging from 7 to 365 days, with 14 days set as the default.
-
- For example, if you have set the auto-approval period to 15 days and a reviewer does not take any action within that time, the item automatically moves to the next review stage. If the current stage is the final one, the item is automatically approved for disposal.
- Once configuring the stages and reviewers, you can proceed to next step.
Note: If this auto-approval policy is enabled while items are already in disposition review, those items are automatically approved based on the defined retention period.
Step 5: Review and create retention label:
- Finally, review all the configurations and proceed with Create label to create the retention label.
You can use the policy lookup tool to identify which retention label policies are applied to a specific site, user, or group, helping you avoid conflicting policies before configuring a new one.
Auto Apply the Retention Labels to the Files and Folders
After the retention label is created, publish it to apply the label automatically on the files and emails.
Step 1: Auto-apply a label:
- To publish the retention label, either select Auto-apply this label to a specific type of content once after creating it (or) choose to Auto-apply a label under Label policies for an existing label, then complete the below configuration and click Done.
Step 2: Configure the basics of the label policy:
- After selecting the auto-apply option, you are redirected to the auto-labeling policy. Here, give a name and description for the label policy and proceed to Next.
Step 3: Specify the content:
- At this stage, select one of the following options depending on how the content should be labelled:
- Use Apply label to content that contains sensitive info when labelling should rely on predefined or custom sensitive information types.
- Choose Apply label to content that contains specific words or phrases or properties when labelling depends on keywords, phrases, or metadata values.
- Select Apply label to content that matches a trainable classifier when classification is driven by machine-learned content patterns.
- Apply label to cloud attachments and links shared in Exchange, Teams, Viva Engage, and Copilot when labels must apply to shared files and links across Microsoft 365 apps.
- After completing this configuration, proceed to the next step to select the scopes where you want to apply the label.

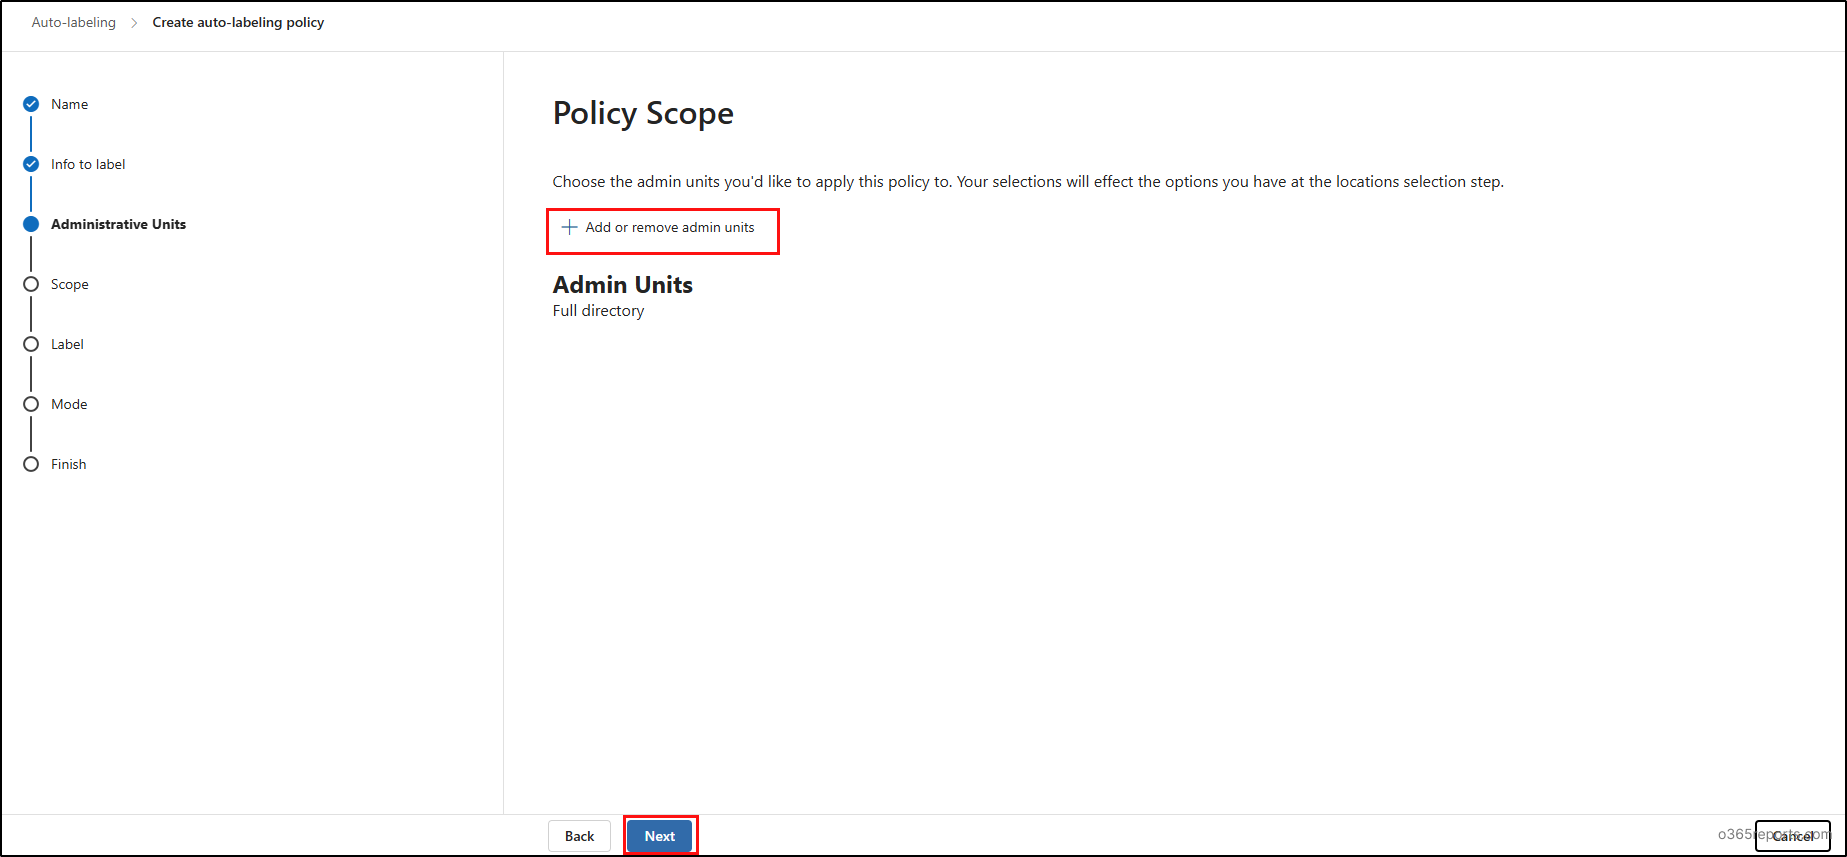
Step 4: Select the Policy Scope:
- Select a specific admin unit in the policy scope when you need to apply the label to that admin unit. To apply the policy to the entire directory, leave the admin unit option unselected and select Next.
Step 5: Select the Scopes:
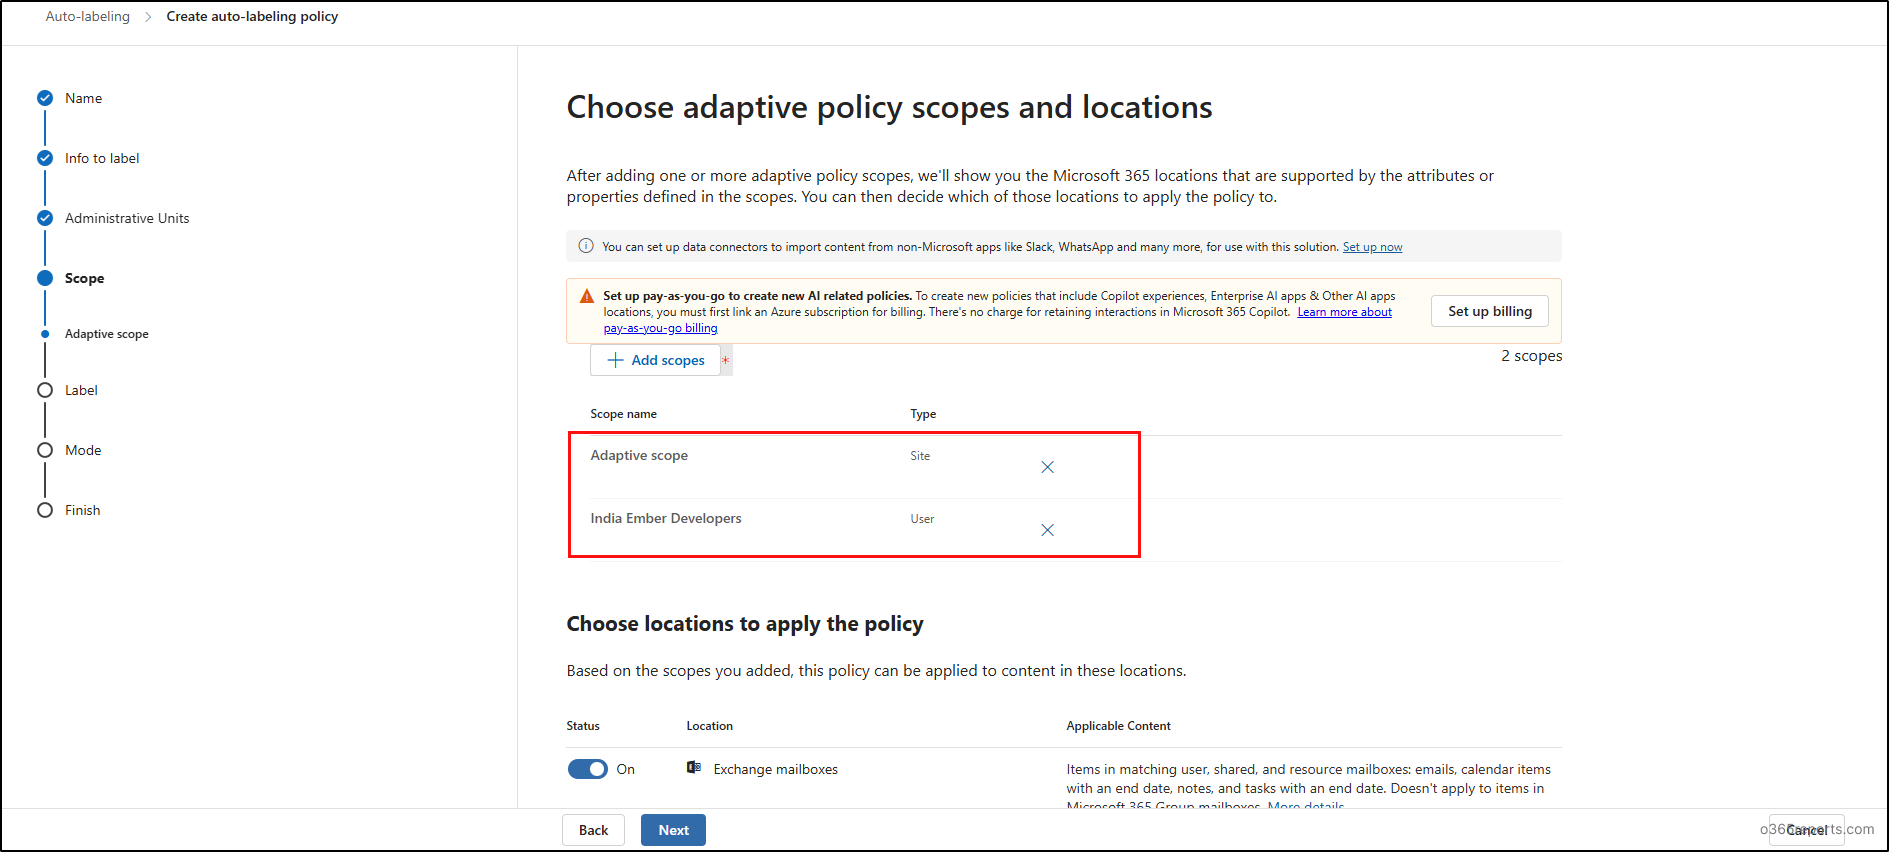
- Then, choose the type of retention policy to create, either adaptive scopes or static scopes. Select adaptive scope when the policy must apply based on properties or attributes such as department, location, etc..

Step 6: Choose the scopes and locations:
- If you have chosen to use adaptive scopes, then select the adaptive scopes and select the locations as mailboxes, SharePoint sites and OneDrive accounts where you want to apply the retention label. If you have chosen static scope, select only the specific locations where the label should apply.
Step 7: Confirm the retention label:
- After selecting the locations and scopes, confirm the retention label to auto-apply it.
Step 8: Review the retention label policy:
- Before applying the policy, run it in simulation mode to test the configuration, then select Turn on the policy to apply it automatically based on the configured requirements.
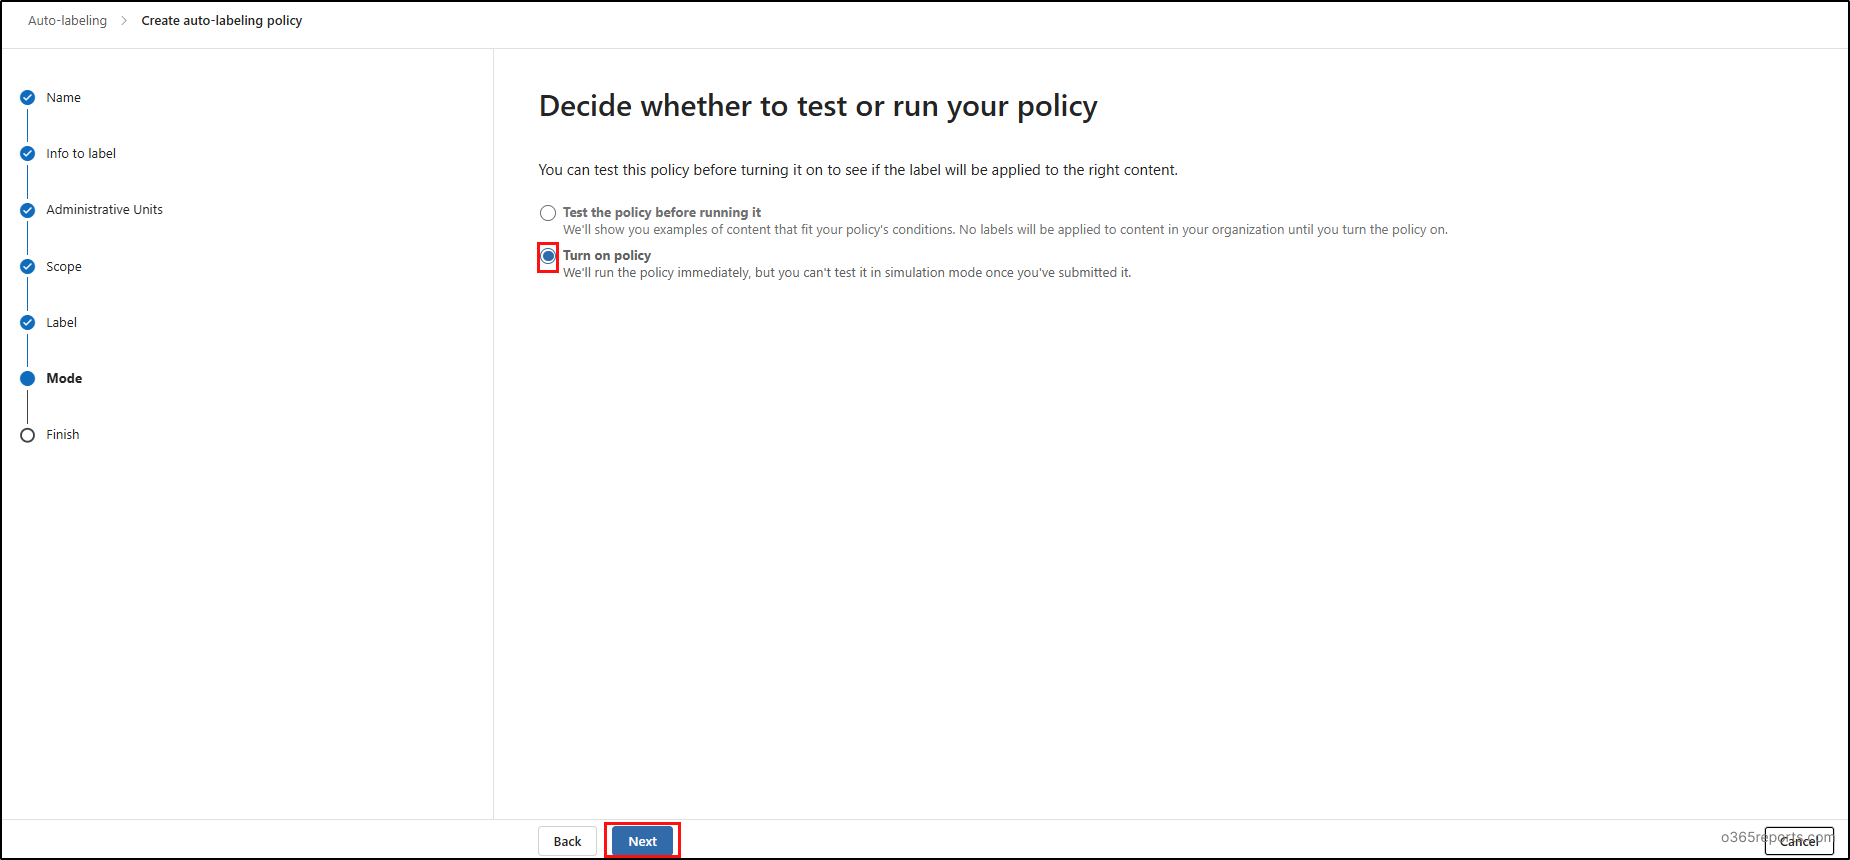
- At last, review all the configuration and proceed with submit to create the auto-labeling policy. This policy will automatically apply the label based on the defined conditions.
Note:
Static scopes are fixed at the time of creation and cannot be edited or modified later. If the scope needs to change, a new label policy must be created with the updated locations or users.
How to Validate the Disposition Reviews in Microsoft Purview
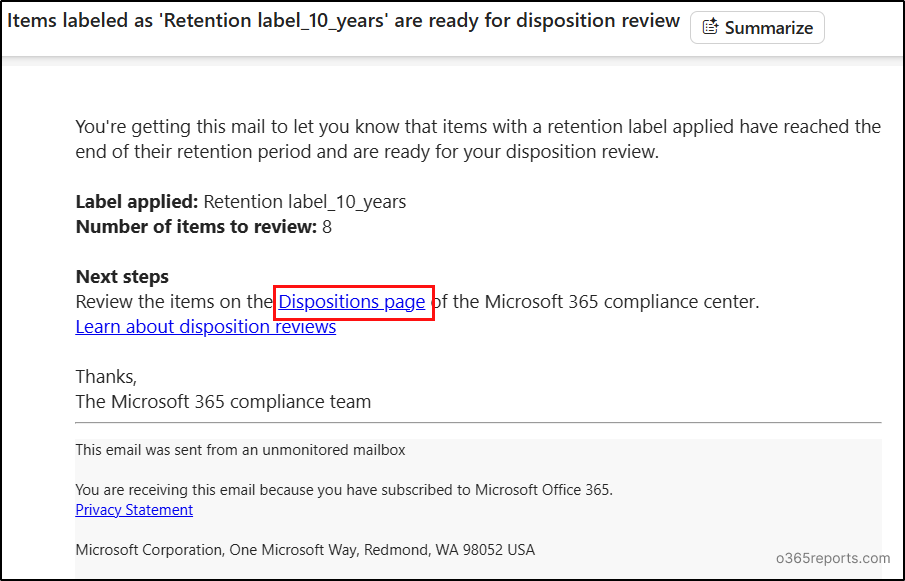
After the retention period ends, the assigned reviewer receives an initial email notification indicating that items are ready for disposition review.
- Once the reviewer clicks the “Dispositions page” link in the mail, it redirects them to the disposition page in Microsoft purview.
- On the Disposition review page, reviewers can select the required files or emails and choose an action such as Approve disposal, Relabel, Extend, or Add reviewer. Each action works as follows:
- Approve Disposal: When a reviewer clicks this option, the item moves to the next review stage if the reviewer is part of an intermediate stage. If the reviewer is the final approver, the file or folder is marked for permanent deletion and appears under the “Disposed items” tab. The actual deletion from its original location can take up to 15 days.
- Re-Label: When Relabel is selected, reviewers can apply a different retention label to replace the existing one.
- Extend: Reviewers can choose extend action to increase the retention period of the selected item.
- Add reviewer: Reviewer can select this action to add another reviewer for the specific item.

Audit Disposition Review in Microsoft Purview
As part of governance and compliance, we need to monitor the actions performed during disposition reviews. This ensures accountability, support audits, and maintain a clear record of reviewer decisions.
These actions can be tracked by searching the audit logs using the steps below.
- Navigate to the Audit section from solutions in the Microsoft purview.
- Select the start date and end date for the audit log search.
- Choose the activity friendly names Approved disposal, Extended retention period, Relabeled item, and Added reviewer.
- Click Search to run the audit query. After running the query, you can view all actions performed during the selected time period.
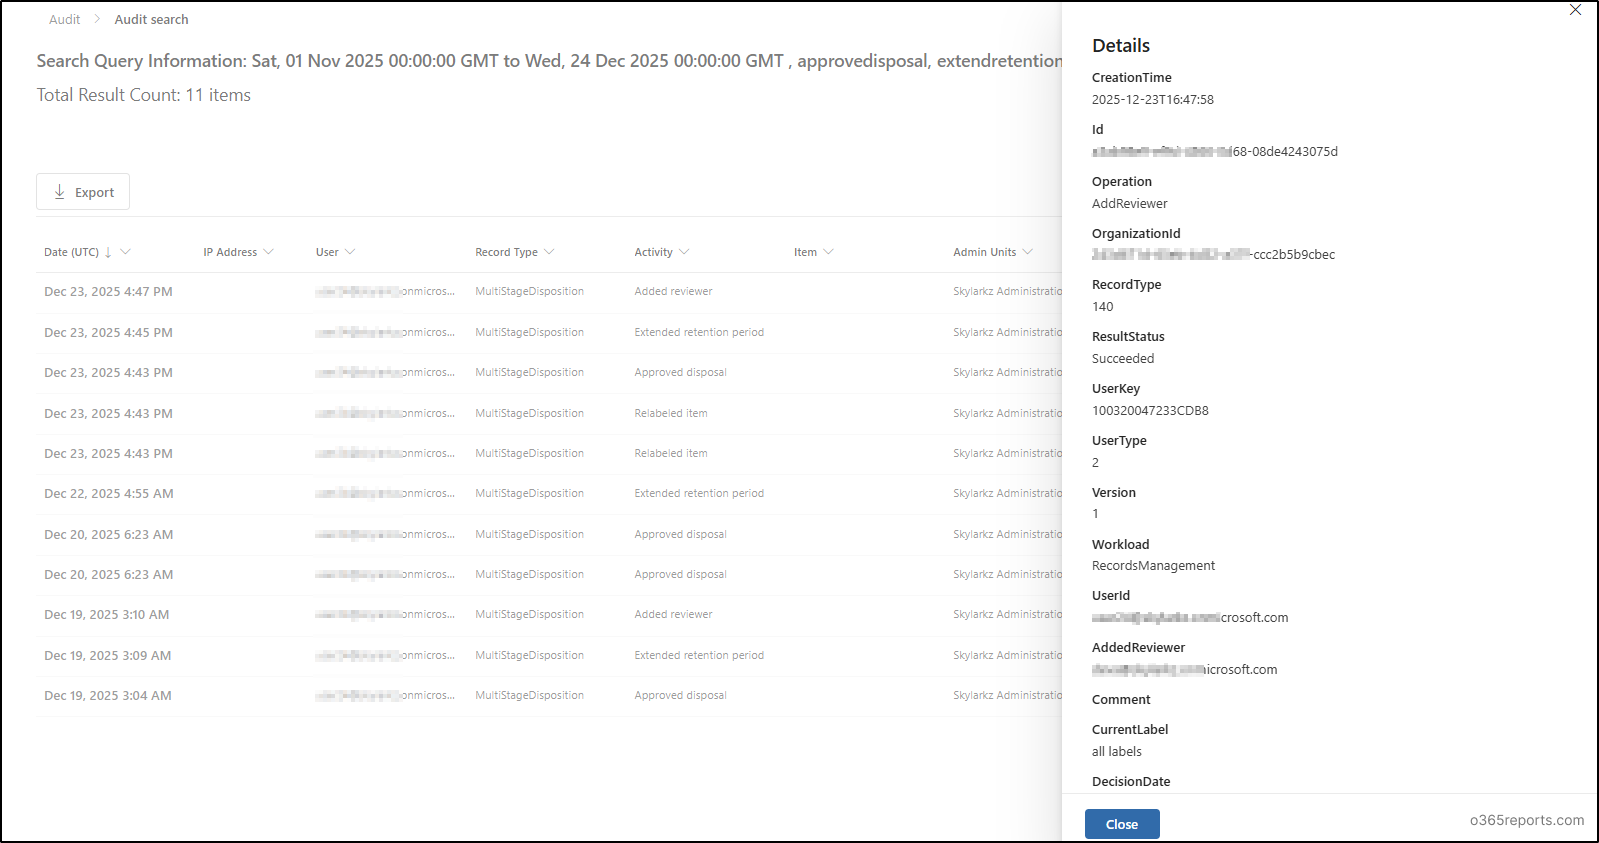
Here,you can view the details such as label name, record type, creation time, userId who performed and more which helps in for accountability and compliance.
Limitation of Disposition Reviews
Even though disposition review adds strong control and accountability, it is important to understand its limitations and practical constraints.
- The disposition review page can display only up to 16,000,000 items.
- You can assign only up to 10 reviewers, either as individual users, mail-enabled security groups, or a combination of both.
- Adding reviewers automatically doesn’t give the permissions, as users must also be assigned the Disposition Management role to perform disposition review actions.
- Disposition review is supported only for mailboxes with at least 10 MB of data.
- For SharePoint and OneDrive, retention labels can take a minimum of 1 day to apply.
- For Exchange mail, retention labels can take a minimum of 7 days to apply.
I hope this blog helped you understand how disposition review works in Microsoft Purview. Feel free to share your questions or thoughts in the comments section.