
A common requirement in SharePoint environments is allowing users to access documents without allowing them to download copies. The default Read permission also includes the ability to download files. Because of this, organizations often need alternative ways to let partners or consultants review documents without allowing downloads in SharePoint. SharePoint Online provides several options to block file downloads of sensitive documents in the organization. Let’s look at what these options are and which method should be preferred for a more granular approach.
Different Ways to Block File Downloads in SharePoint Online
Let’s understand the different ways to block file downloads in SharePoint, using a common scenario. A SharePoint administrator may need to allow external consultants or Site Visitors to review documents in the browser without allowing downloads.
- Block Download in Sharing Links: When sharing a file, users can select “Can’t Download” option, which allows recipients to view the file but prevents them from downloading it. This works well for individual sharing scenarios, but the restriction applies only to the specific sharing link.

- Block File Downloads Using CA Policies: Use Entra ID CA policy to restrict downloads in SharePoint based on user risk, device, or network, enforcing browser-only access. This approach does not support site-level control and requires Microsoft Entra ID Premium (P1 or P2) since it relies on Conditional Access policy. It is typically used for broader security policies.
- Block Downloads Using a Site-Level PowerShell Policy: A site-level block download policy prevents users from downloading, printing, syncing, or moving files and restricts access to browser-only viewing. But this feature requires Microsoft Syntex SharePoint Advanced Management license.
- Stop Downloads With IRM: Administrators can configure Information Rights Management (IRM) on document libraries to restrict actions such as downloading or printing. However, it disables features like coauthoring and Office Online editing, requires additional configuration through Purview Information Protection, and may also cause access issues on unsupported apps or devices.
- Create Custom “No Download” Permission Level (Recommended):
Although creating custom permission levels is not recommended as a standard practice, it can be useful in restricting downloads at the SharePoint permission level. A key advantage is licensing. This method works with standard SharePoint Online capabilities and does not require premium features such as Microsoft Entra ID Premium or SharePoint Advanced Management. As a result, organizations can enforce download restrictions without incurring additional licensing costs.
By creating a custom permission level based on Read or Edit permissions, administrators can allow users to view or edit documents directly in the browser while blocking downloads. This approach provides granular, membership-based control without applying restrictions across the entire site or relying on sharing links.
Create Custom Permission Levels to Block File Downloads in SharePoint
SharePoint Online includes default permission levels such as Read, Contribute, Edit, and Full Control. To prevent users from downloading files while still allowing them to read/edit, you can create custom permission levels. This is done by:
- Copying the default SharePoint permissions levels (such as Read or Edit)
- Modifying specific permission level to remove the ability to download files.
- Applying the custom permission level to the required SharePoint users or groups.
Both Read and Edit permission levels in SharePoint allow users to download documents by default. In scenarios where users should still be able to view or edit files but not download them, administrators can modify these permission levels to remove the download capability.
Below are the steps to configure SharePoint permissions so users can view or edit files without downloading them:
- Allow users to view files but cannot download them
- Allow users to edit files without downloading them
Who Can Create Custom Permission Levels in SharePoint?
Before proceeding further, know who can create custom permission levels in SharePoint Online.
Site Collection Administrators: They have the highest level of authority within a site collection and can manage all permissions and settings.
Site Owners: Users in the default Owners group (with Full Control) can create and modify permission levels for their specific site.
SharePoint/Global Administrators: Global Admins or SharePoint Admins can manage SharePoint permissions at the organizational level, but they cannot directly create custom permission levels on a site unless they add themselves to that site with Full Control.
SharePoint Permission Level to Allow Read Only, But No Download
As discussed earlier, administrators may need users to view documents without downloading them. A custom permission level based on Read can address this requirement.
Follow the steps below to create a permission level that allows users to view files but remove download option from SharePoint file library.
- Navigate to the SharePoint site where you want to apply download restrictions.
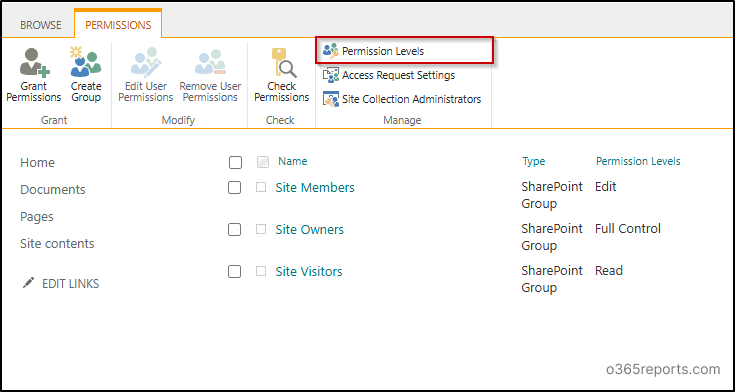
- Click the Settings (⚙️) icon in the top-right corner and select Site permissions.
- Then, select Advanced permission settings. This opens the classic SharePoint permissions management page.
- From the command bar, select Permission Levels.
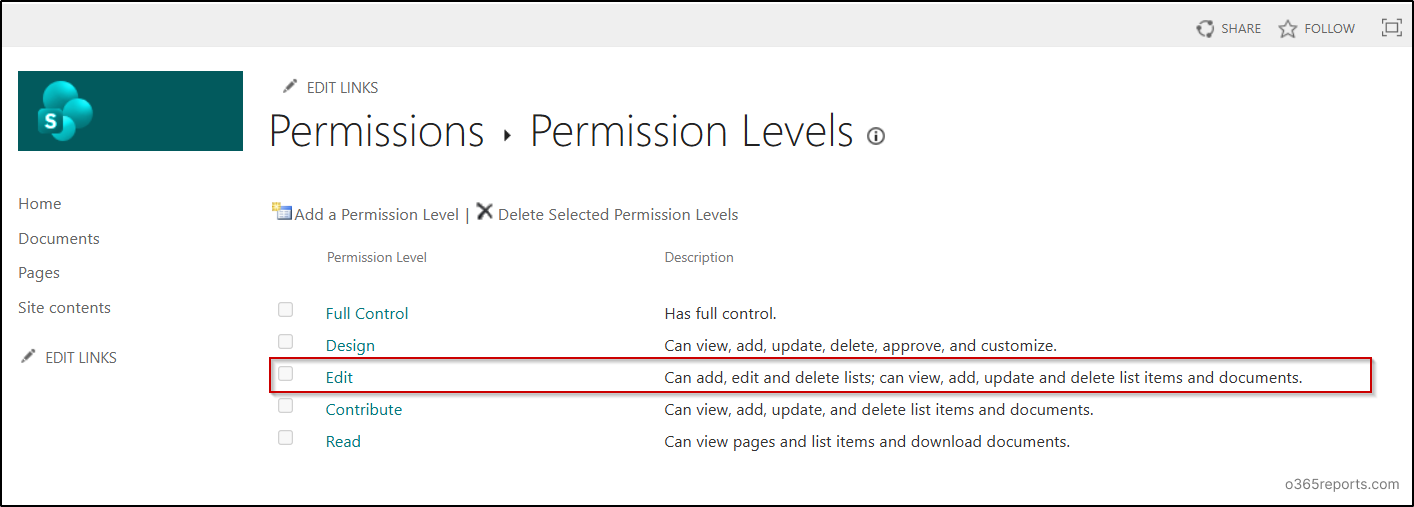
- Instead of creating a permission level from scratch, administrators can copy the existing default permission (Read). This makes the process easier because most permissions are already selected, and you only need to modify the specific permission to block downloads.
- Scroll to the bottom and click Copy Permission Level. This opens a new page where all the permissions from the selected one are automatically copied, allowing you to modify the required ones.
- Give an appropriate Name and Description to the permission level. (For example, you can name it as Read – No Download)
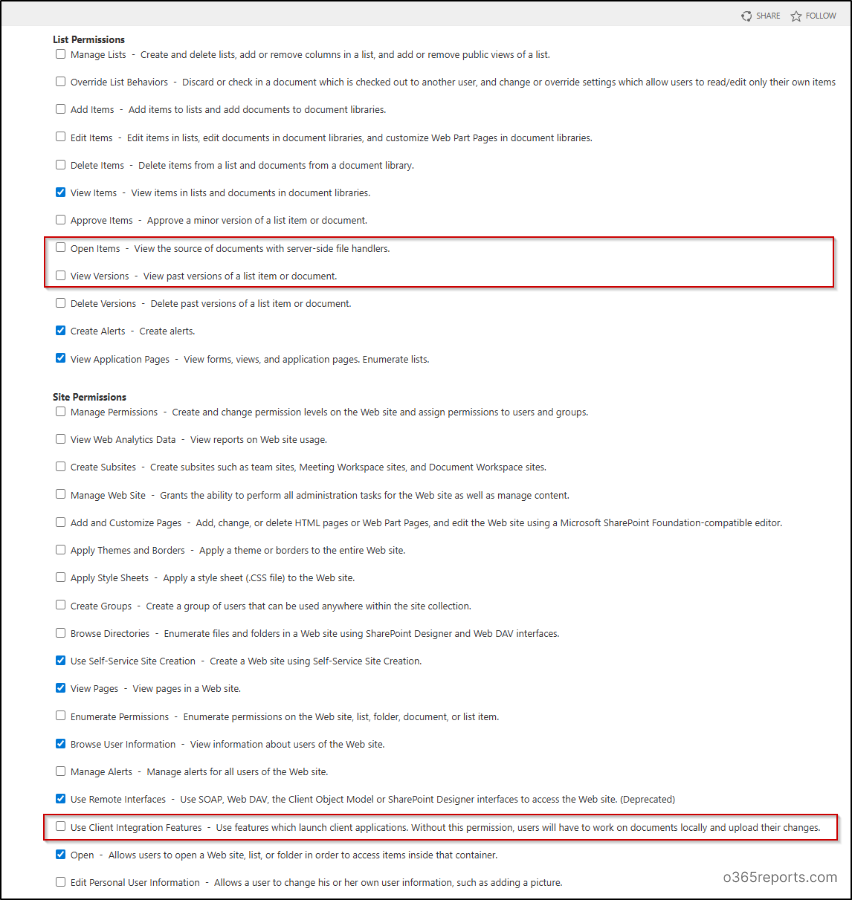
- Now, uncheck:
- Open Items” permission under List Permissions
- Use Client Integration Features” under Site Permissions. When “Open Items” is cleared, the “View Versions” permission is automatically removed as well, since viewing versions requires the ability to open items.
- Click on Create.
After creating “Read – No Download” permission, you can apply the custom permission to the required users or groups.
Permission Level Comparison “Read vs Read – No Download”
With the default Read permission, users can view and download files from the document library, and options such as Download, Open in Desktop App, and Sync are available in the interface.
When the Read – No Download custom permission level is applied,
several actions are no longer available to users, including:
- Downloading files
- Opening documents in desktop applications
- Syncing the library
- Accessing version history
Permission Level Changes “Edit vs Edit – No Download”
With the default Edit permission, users can modify, upload, and manage files in the document library, and options such as Download, Open in Desktop App, and Sync are available in the interface.
When the Edit – No Download custom permission level is applied, the following actions are restricted:
- Downloading files
- Opening documents in desktop applications
- Syncing the library
- Accessing version history
Users can still upload, copy, modify, and manage documents within the library, and edit files directly in the browser.
How to Apply Custom Permission Levels to Users And SharePoint Groups
After creating custom permission levels, the next step is to assign them to the appropriate users or groups. This can be done either through the SharePoint user interface (UI) or using PowerShell for more scalable administration.
- Assign custom permission levels to users or groups
- Assign custom permission levels to default SharePoint Groups
Assign Custom Permission Level to Users and Groups
Custom permission level assignments don’t appear in the Admin Center membership pages, as they are configured directly at the site permission level. Follow the below mentioned steps to assign the custom permission level directly to individual users or to security groups.
- Open the Site.
- Navigate to Settings (⚙️) → Site permissions → Advanced permission settings.
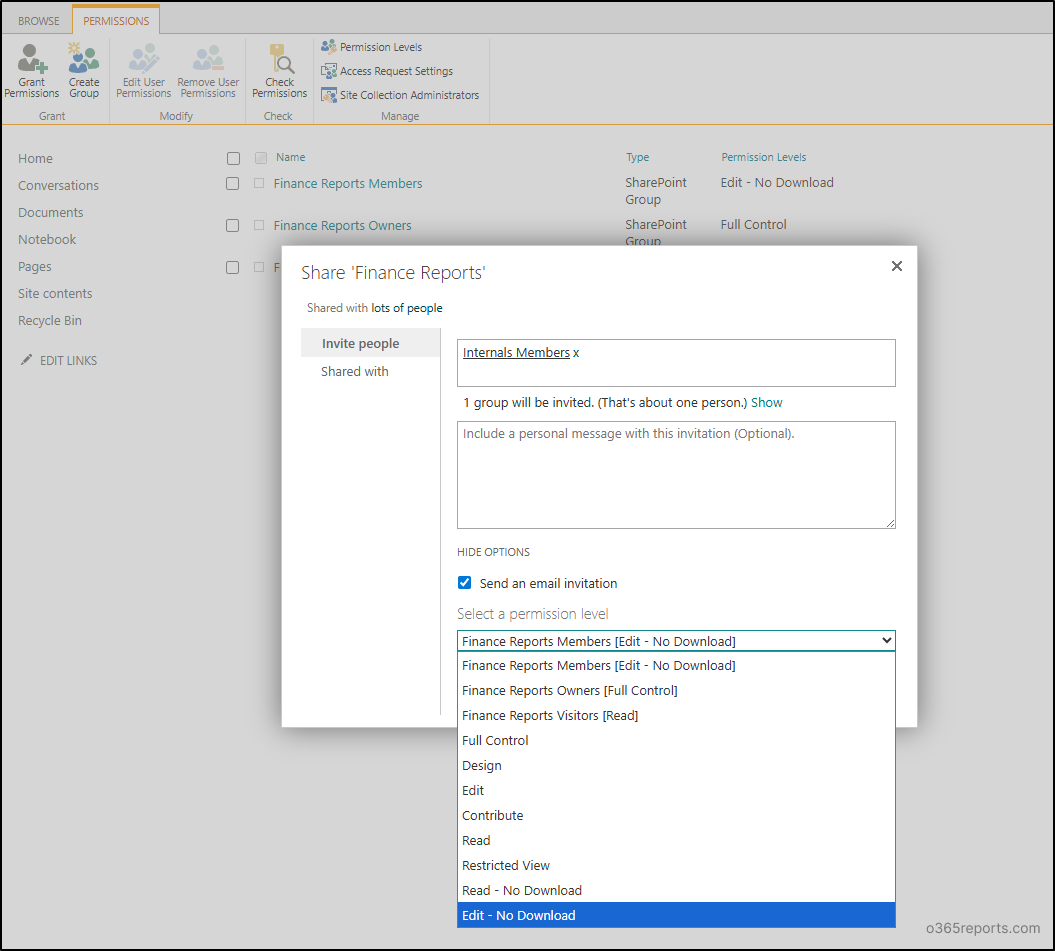
- Click Grant Permissions.
- Under the Invite people field, enter the security group name/users.
- From the Select a permission level drop down, choose the custom permission level.
- Click Share.
Assign Custom Permission Levels to Default SharePoint Groups
Permissions in SharePoint are typically managed through the default site groups such as Owners, Members, and Visitors, rather than assigning access directly to individual users. This approach simplifies permission management and keeps access consistent across the site.
In such cases, the custom permission level can be assigned to these groups. The process varies slightly depending on whether the site is connected to a Microsoft 365 group.
Apply Custom Permission Level to SharePoint Groups in Non–Microsoft 365 Group Connected Sites
In non–Microsoft 365 group connected sites, permissions are managed entirely through SharePoint groups such as Owners, Members, and Visitors. Since these groups exist only within the SharePoint site, administrators can freely modify their permission levels without affecting other services. This allows custom permission levels to be applied directly to a group using the Edit User Permissions option.
- Navigate to the SharePoint site and open Settings (⚙️) → Site permissions.
- Select Advanced permission settings to open the classic permissions management page.
- Select the Site Visitors group (or the group to which you want to assign the new permission level).
- From the command bar, click Edit User Permissions.
- Uncheck the existing permission level (for example, Read).
- Select the newly created custom permission level (such as Read – No Download).
- Click OK to apply the changes.
While the process is straightforward for non-Microsoft 365 group connected sites, the approach changes slightly for Microsoft 365 group connected sites.
Apply Custom Permission Level to SharePoint Groups in Microsoft 365 Group Connected Sites
In Microsoft 365 group connected SharePoint sites, modifying permissions directly for the default SharePoint groups (such as Owners, Members or Visitors) is restricted through the user interface. This limitation exists because these groups are connected to the underlying Microsoft 365 group. The changes at the group level can affect membership across other services such as Teams, Planner, and Outlook.
As a result, the Edit User Permissions option may appear disabled in the SharePoint interface.
For administrators who need to assign a custom permission directly to a SharePoint site group in a Microsoft 365 group connected site, PowerShell is the only way. This method allows administrators to update the permission levels assigned to default groups such as Owners, Visitors or Members while preserving their existing membership.
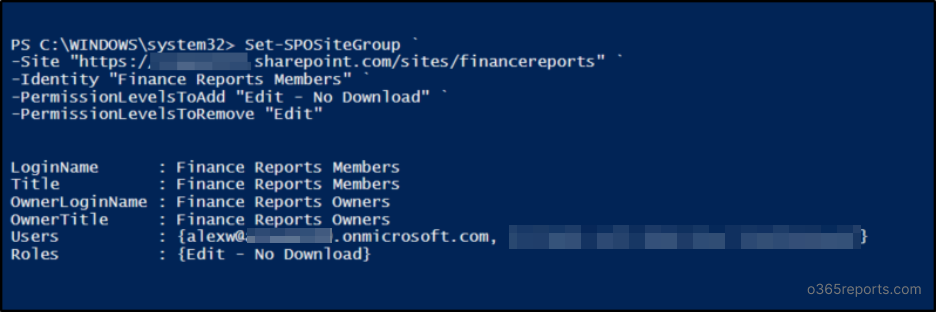
First, connect to the SharePoint Online PowerShell module. Next, assign the custom permission level to the required site group using Set-SPOSiteGroup cmdlet. In scenarios where Site Visitors should be able to view documents but not download them, the Visitors group can be assigned the “Read – No Download“ permission level you created.
Run the below cmdlets and replace <Site URL> with the URL of your SharePoint site and <Site Group> with the name of the SharePoint group (for example: Marketing Visitors)
|
1 |
Set-SPOSiteGroup -Site "<Site URL>" -Identity "<Site Group>" -PermissionLevelsToAdd "Read - No Download" -PermissionLevelsToRemove "Read" |

In some scenarios, administrators may want users, such as team members or contributors, to edit documents while preventing them from downloading copies. In such cases, the Members group can be assigned to the “Edit – No Download” permission level.
|
1 |
Set-SPOSiteGroup -Site "<Site URL>" -Identity "<Site Group>" -PermissionLevelsToAdd "Edit - No Download" -PermissionLevelsToRemove "Edit" |
Important Consideration: When assigning a custom permission level, ensure that the user’s existing permission level is not higher than the new one.
If a user still retains a higher permission level (such as Edit or Full Control), assigning a lower custom permission level will not override those permissions. In such cases, the user may still be able to perform actions that the custom permission level is intended to restrict.
As a SharePoint permission best practice, always review the user’s existing group memberships and remove any higher permission levels before assigning the custom permission level. This ensures that the intended restrictions are applied correctly.
Apply IRM Policies to Restrict SharePoint File Downloads
While custom permission levels can effectively prevent users from downloading files, it is important to understand that these restrictions do not completely eliminate the possibility of data extraction. For example, text can still be copied from files opened in the browser, and users could manually create a copy of the file.
To apply stronger protection policies to documents, especially when dealing with highly sensitive information, organizations can use Information Rights Management (IRM) in SharePoint.
With IRM enabled, administrators can restrict actions such as printing, copying, forwarding, or saving documents locally. These controls help ensure that sensitive information remains protected even if the document is shared outside the SharePoint environment.
To apply IRM in document libraries, it must be enabled at the tenant level first.
- Navigate to the SharePoint Admin Center.
- Open Settings.
- Select Classic settings page.
- Enable Use the IRM service specified in your configuration and click Refresh IRM Settings.
- Select OK to save the configuration.
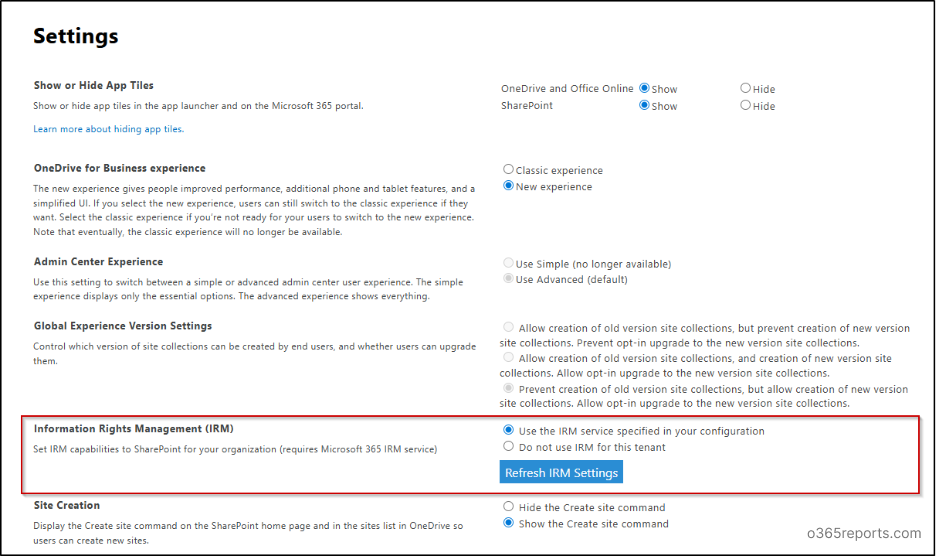
Note: It may take up to one hour for IRM settings to become available within SharePoint libraries.
Enable IRM on a SharePoint Document Library
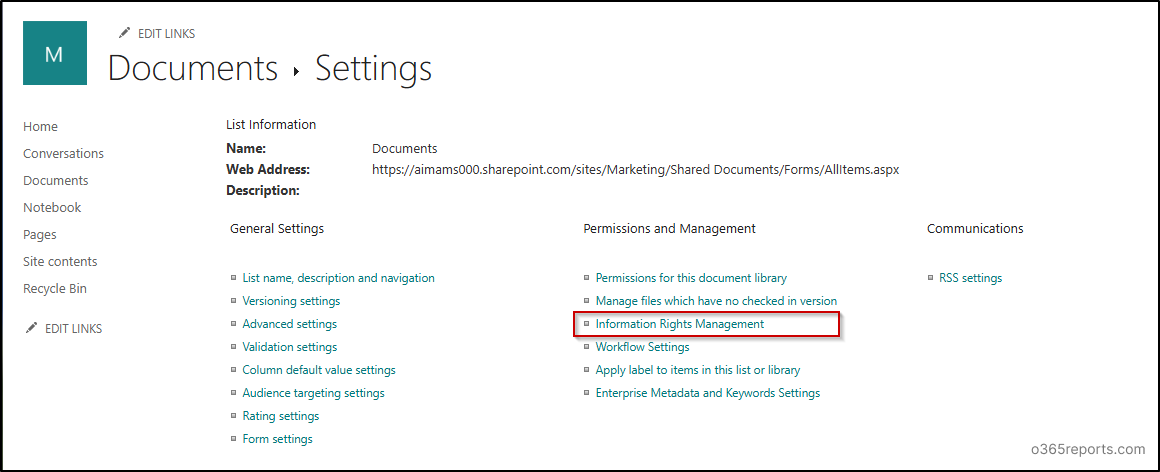
Once IRM is enabled at the tenant level, it can be configured on individual document libraries. It is important to note that IRM can only be applied at the site or document library level, not at the folder or individual document level.
- Navigate to the desired document library.
- Open Settings → Library Settings → More library settings.
- Under the Permission and Management section, select Information Rights Management (IRM).
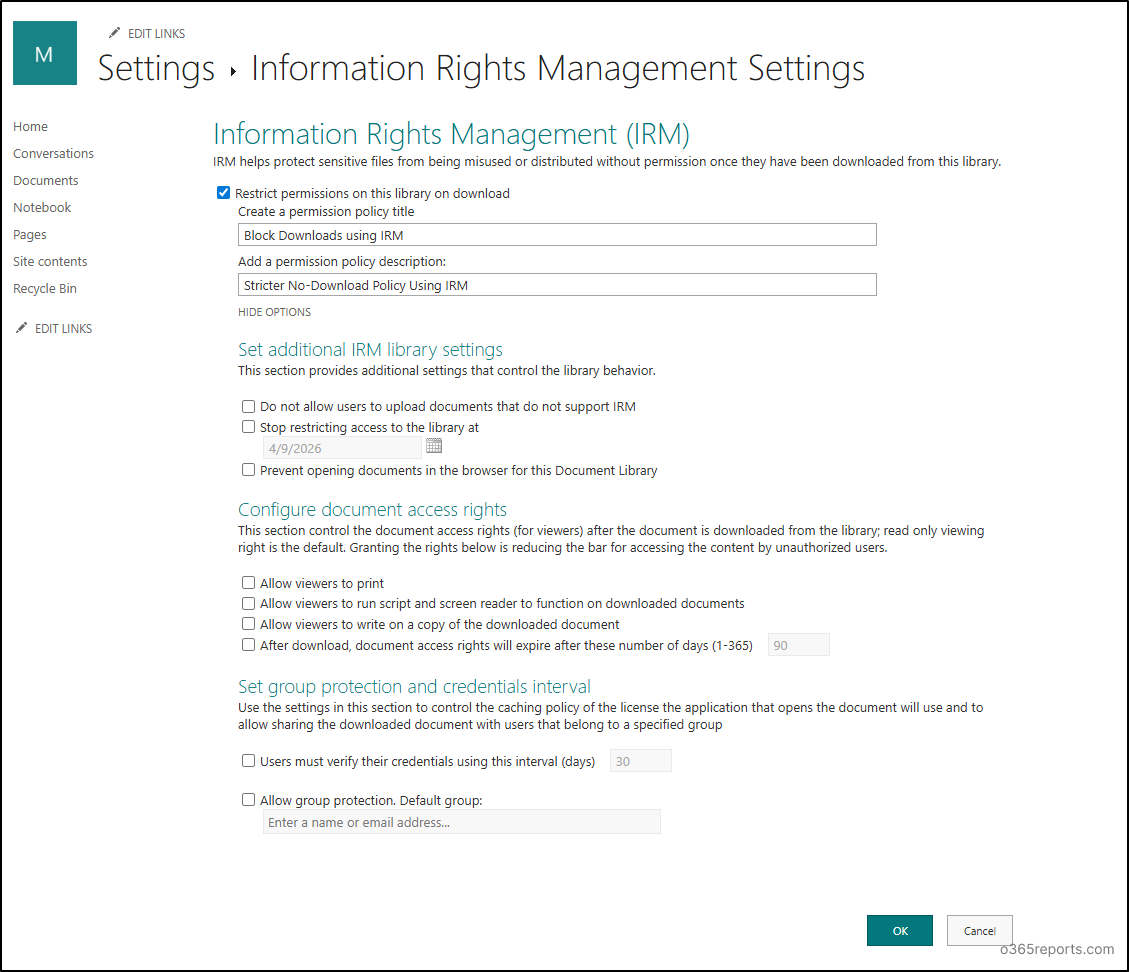
- Enable Restrict permissions on this library on download.
- Enter a Permission Policy Title and Description.
- Select Show options if you want to configure additional configurations such as expiration, allow print/copy, so on.
- Click Ok.
Important: If not any custom permission level is applied to remove the download option, the download option will still appear in the library even if IRM is applied.
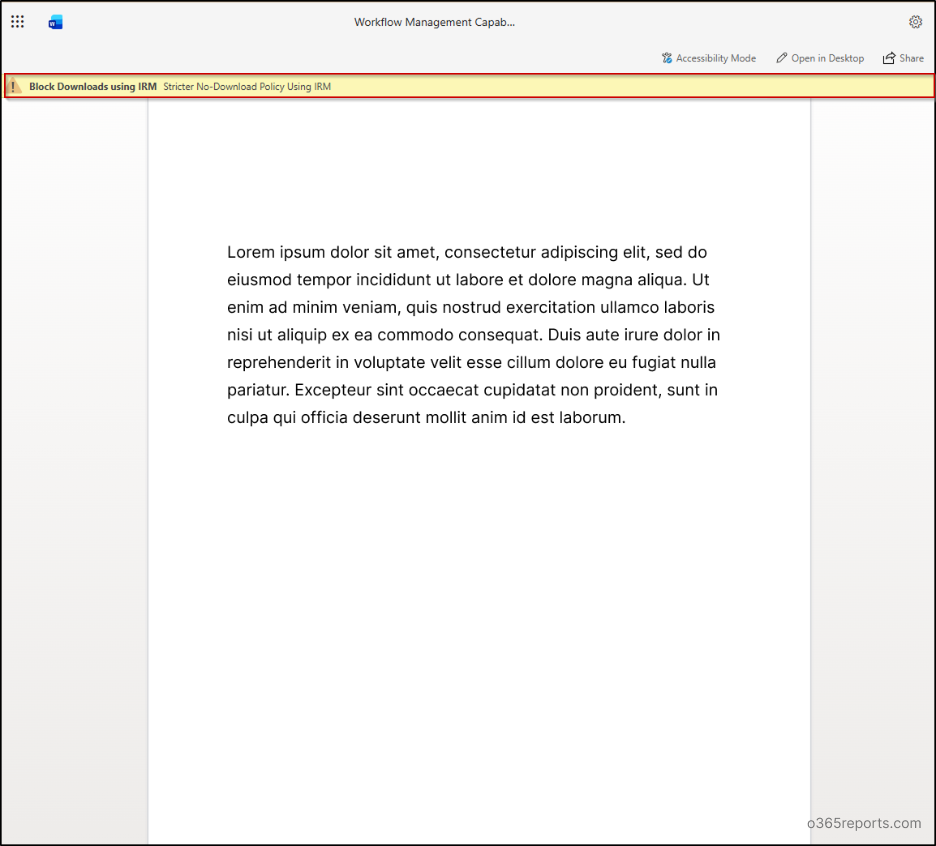
Once the configuration is complete, only authorized users can open the file, and the defined policies remain enforced. The document library is protected by IRM policies, ensuring that document usage restrictions remain in effect. The policy name appears in the banner when the document is opened, showing that IRM protection is applied.
Real Time Example of Blocking Downloads When Read/Edit is Allowed
To verify that the custom permission levels are functioning correctly, testing was performed using different users assigned to specific SharePoint groups.
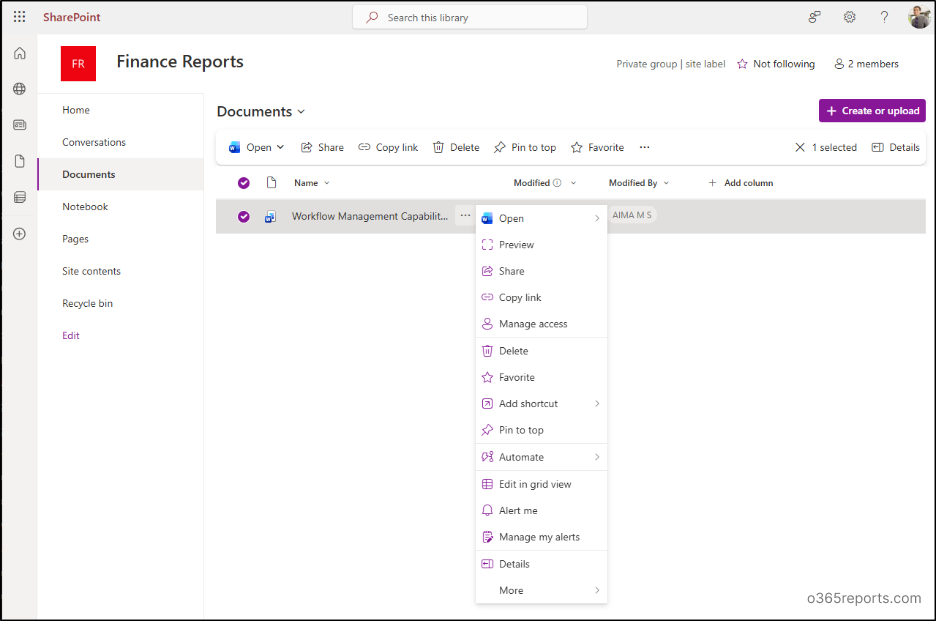
The configuration was first tested with a user named “Alex”, who is part of the Finance Members group. This group has been assigned the Edit (No Download) permission level. Alex can open documents in the browser and make edits as expected. The user can modify files, save changes, and collaborate within the document library without any issues.
However, the Download option is not available when Alex accesses the files.
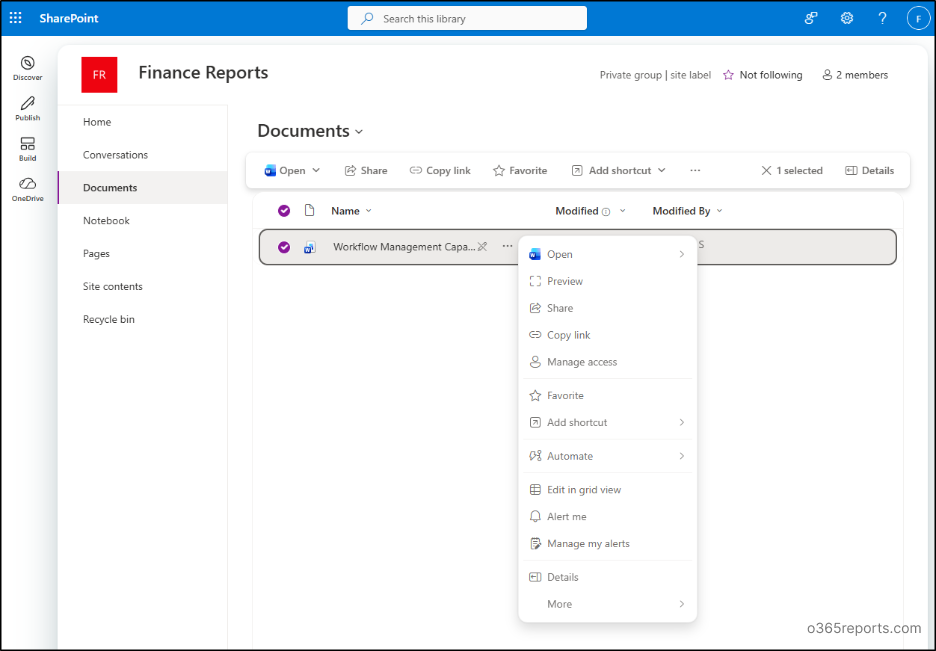
Another test was performed with a user named “Freddy” who is a part of the Finance Visitors group. He has been assigned the Read (No Download) permission level. Freddy is able to open and read documents directly in the browser.
At the same time, Freddy cannot edit the files and also does not have the option to download them, ensuring that the documents remain accessible for viewing only.
That’s it.
I hope this blog helped you gain understanding on how to block file downloads in SharePoint Online. Feel free to reach us through the comments section if you have any queries.


