
Organizations classify and protect files based on confidentiality across enterprise data using sensitivity labels in Microsoft 365. They apply protection directly to documents stored in SharePoint Online and OneDrive for Business. 📄
Depending on the configuration, a label can restrict who opens or edits a file, encrypt content for authorized users, add watermarks/headers, and work with DLP to block risky sharing. This keeps confidential documents protected even after downloading or external sharing.
As files grow across document libraries, tracking sensitivity labels for files becomes difficult. Over time, organizations may lose visibility into unlabeled sensitive files, inconsistent label usage, or critical content missing stronger protection. 🔐In this blog, we’ll explore how to find all SharePoint Online files with sensitivity labels applied.
Why Files with Sensitivity Labels Need Monitoring in SharePoint Online
Monitoring sensitivity labels is important because classification alone does not guarantee data security and compliance. Here are the key reasons why they must be tracked regularly:
- Detect unlabeled sensitive content: Some files may remain unlabeled even when they contain important business data. This often happens when files were uploaded before labeling policies were introduced or when users skip manual labeling.
- Verify correct label usage: Users may handle sensitive information by applying a lower label than required. Monitoring helps identify such classification mismatches. For example, a finance report may be labeled Internal instead of Confidential, leaving it under-protected.
- Confirm auto-labeling works correctly: Many organizations rely on auto-labeling policies to detect sensitive data such as credit cards, tax IDs, or employee records. Regular checks help confirm these policies’ work as expected and highlight rules that need adjustment to ensure confidential information is protected.
- Ensure sensitive files stay in the appropriate location: Monitoring files with sensitive labels helps ensure they are stored in appropriate SharePoint sites and not exposed through less secure locations.
Where to Find Sensitivity Label Information in SharePoint Online
Identifying sensitivity-labeled files in SharePoint Online can be challenging, especially across multiple sites and document libraries. Below are a few ways to check label assignments.
1. View file sensitivity labels using the‘Sensitivity’ column in document libraries:
You can manually check the applied sensitivity label for each file directly in the SharePoint Online document library by adding the Sensitivity column. To do so, open the document library → Add column → Show or hide columns → select Sensitivity → Apply.
❌ This method shows file sensitivity labels, but only if the user has access to the site. Even Global Admins can’t view them unless they are added to the target site, and the ‘Sensitivity’ column must be enabled separately in each document library.
2. Access SharePoint data access governance reports for sensitivity label insights:
You can retrieve sensitivity label details for files using the SharePoint admin center. In the admin center, go to Reports → Data access governance → Sensitivity labels applied to files → View reports, and add the respective report. Then download the report for the required sensitivity label.
⚠️ This method does not provide a consolidated report of all labeled files. Each report shows only site details and the number of files with that sensitivity label, not individual file details. In addition, each report can be generated only once every 24 hours and also requires Microsoft SharePoint Advanced Management license or Copilot license.
3. Search sensitivity-labeled files using Microsoft Purview eDiscovery:
You can find SPO sensitivity-labeled files using Microsoft Purview eDiscovery for legal cases. This is done by running a content search with ‘InformationProtectionLabelId’ (label GUID) as the search condition.
🔐 This method requires label identifiers and access to the eDiscovery Manager role group. Also, standard searches do not decrypt protected files unless you use eDiscovery Premium.
4. Check file sensitivity labelsusing PnP PowerShell:
For precise file-label inspection, PnP provides the ‘Get-PnPFileSensitivityLabel’ cmdlet. Replace <FileRelativeURL> with the server-relative URL of the file you want to inspect in the cmdlet below.
|
1 |
Get-PnPFileSensitivityLabel -Url "<FileRelativeURL>" |
⏳ It returns only the sensitivity label ID and assignment method, so additional steps are required to map the label ID to its display name. While this method gives you results for each file, it requires looping through every file in the respective SPO site to get a complete view.
To overcome the above limitations, we have created a PowerShell script that exports SharePoint file sensitivity label details with advanced filters for easier analysis. ⚡
Download Script: GetSensitivityLabelAppliedSPOFiles.ps1
Script Highlights:
- Exports all SharePoint Online files with sensitivity labels across your environment.
- Automatically checks for the PnP PowerShell module and installs it with your confirmation if it is missing.
- The script can also register an Microsoft Entra ID app for PnP authentication with the required permissions, if needed.
- Supports CSV input to analyze specific sites only.
- Retrieves files with a specific sensitivity label.
- Includes filters for label assignment type such as default, manual, auto assigned, and unknown.
- The script can be executed with an MFA enabled account too.
- The script is scheduler-friendly and compatible with certificate-based authentication (CBA).
Sample Output – SharePoint File Sensitivity Label Report
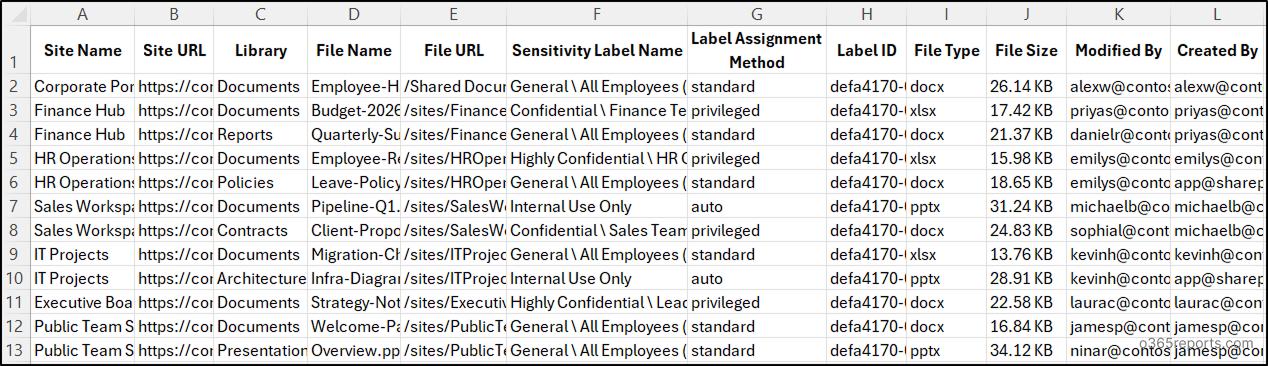
The script scans all sensitivity label–supported file types across all SharePoint Online sites. It exports the site name, site URL, document library, file name, file URL, sensitivity label name, label assignment method, label ID, file type, file size, last modifier, and creator of the file.
The exported sensitivity files report looks like the screenshot below.
Script Execution Methods – SharePoint Online Sensitivity Label Report for Files
- Download the ‘GetSensitivityLabelAppliedSPOFiles.ps1’ PowerShell script provided above.
- Open Windows PowerShell and go to the folder where the script is saved.
- Use any of the suitable execution methods below to run the script.
Note: This script uses PnP PowerShell and requires a Microsoft Entra ID app registration for authentication. Register an app in Entra ID and then assign the required Microsoft Graph delegation permissions:
- Sites.FullControl.All
- InformationProtectionPolicy.Read.All
If you do not want to register an app manually, you can use Method 3, which supports automatic app registration.
Method 1: Execute the script interactively with MFA or non-MFA accounts
|
1 |
./GetSensitivityLabelAppliedSPOFiles.ps1 |
This method prompts for SharePoint tenant’s name and the client ID of the registered Microsoft Entra ID app. You can also pass them using the -SharePointDomainName and -ClientId parameters. The script exports sensitivity label details for files across all accessible SharePoint Online sites.
Method 2: Run the script interactively by explicitly providing credentials.
|
1 |
./GetSensitivityLabelAppliedSPOFiles.ps1 -AdminName "<AdminUPN>" -Password <AdminPassword> -ClientId <ClientId> -SharePointDomainName <SharePointDomainName> |
This method supports only non-MFA accounts. If the admin account has MFA, you’ll need to disable MFA using CA policy to use this method.
Method 3: Run the script by registering an app for PnP authentication.
|
1 |
./GetSensitivityLabelAppliedSPOFiles.ps1 -RegisterAppForPnP |
This method prompts for tenant name and desired app name, then registers a PnP authentication app with the required permissions to run the script.
Method 4: Run the script unattended using certificate-based authentication.
|
1 |
./GetSensitivityLabelAppliedSPOFiles.ps1 -SharePointDomainName <SharePointDomainName> -ClientId <ClientId> -CertificateThumbprint <Thumbprint> |
You can either create self-signed certificate or use one issued by a Certificate Authority (CA). Also ensure that the app has respective application permissions. This method is ideal for automation when scheduling the script through Task Scheduler or Azure Automation for periodic sensitivity label audits.
Points to Remember:
- This script requires PowerShell 7 or higher, as the latest PnP PowerShell versions are only supported on PowerShell 7+.
- During interactive sign-in, if you’re not an owner of certain sites, you won’t be able to retrieve their files’ sensitivity information. These sites will be skipped, and you’ll get no results for such sites.
- To find all SharePoint documents protected by sensitivity labels, regardless of site ownership, use the certificate-based authentication method. Make sure the app registration has the following application-level permissions.
- Microsoft Graph → InformationProtectionPolicy.Read.All
- SharePoint → Sites.FullControl.All
Otherwise, you’ll encounter the error: The status code is “Unauthorized”.
How to Check Sensitivity Label in SharePoint Files Using Script
This script includes practical filters for real-world scenarios to help you analyze sensitivity label usage across SharePoint Online files. Here’s how it improves label monitoring and content protection.
- Get file sensitivity label details for specific sites (Import-CSV)
- Find sensitivity-labeled files in a specific site
- Retrieve SPO files with a specific sensitivity label
- List SharePoint files with default sensitivity labels
- Find SharePoint files with manually assigned sensitivity labels
- Get SharePoint files with auto-assigned sensitivity labels
- Identify files with unknown sensitivity label assignment type
1. Get SharePoint Online File Sensitivity Label Details for Specific Sites
By default, the script scans all SharePoint Online site collections and exports sensitivity label details for all accessible files. To limit the report to selected sites, use the -ImportCsv parameter and provide a CSV file containing only the target site URLs.
This is useful when auditing only business-critical sites such as finance, HR, or legal repositories instead of scanning the entire tenant.
|
1 |
./GetSensitivityLabelAppliedSPOFiles.ps1 -ImportCsv <FilePath>.csv |
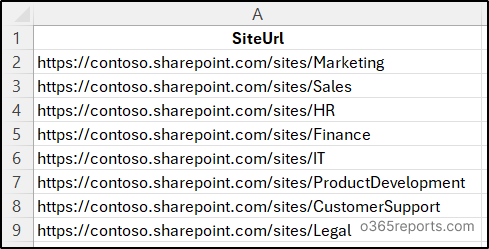
Make sure to replace <FilePath> with the actual CSV file path. The CSV file should have a column header named SiteUrl and list the SharePoint site URLs as shown below.
2. Find All Sensitivity-Labeled Files in a Specific SharePoint Site
When you want to audit sensitivity-labeled files only in a specific SharePoint Online site instead of scanning the entire tenant, you can prefer this approach. For example, during a site-level security review, you may want to verify whether confidential files in one department site are properly labeled.
Run the script with the -Url parameter as shown below. Also, replace <SiteURL> with URL of that specific SharePoint Online site before execution.
|
1 |
./GetSensitivityLabelAppliedSPOFiles.ps1 -Url <SiteURL> |
3. Retrieve SharePoint Online Files with a Specific Sensitivity Label
Suppose if you want to list all files across all sites that have a specific sensitivity label applied, you can use the -LabelName parameter. This is especially useful when removing unwanted labels from publishing policies or during tenant migrations. Administrators can use it to identify files with a specific sensitivity label before moving protected content, as encrypted files may become inaccessible in another tenant.
Here, replace <LableName> with the name of the respective sensitivity label.
|
1 |
./GetSensitivityLabelAppliedSPOFiles.ps1 -LabelName <LableName> |
4. List SharePoint Files with Default Sensitivity Labels
Sensitivity labels may be applied through default settings configured in Microsoft Purview or through document library defaults in SharePoint Online. A document library default label applies only when the existing file label has lower priority, so files that already have a higher-priority label remain unchanged. Finding files with default labels helps verify whether document library settings are working as intended and whether newly uploaded files receive the expected protection.
To identify such files, use the -DefaultLabel parameter along with the execution.
|
1 |
./GetSensitivityLabelAppliedSPOFiles.ps1 -DefaultLabel |
5. Find SharePoint Files with Manually Assigned Sensitivity Labels
Although labels can be applied automatically, users or administrators may manually change sensitivity labels to the files. Reviewing manually assigned labels helps verify whether labeling matches organizational requirements.
Appending the -ManuallyAssignedLabel parameter will return only the files whose sensitivity labels were assigned manually.
|
1 |
./GetSensitivityLabelAppliedSPOFiles.ps1 -ManuallyAssignedLabel |
6. Get SharePoint Files with Auto-Assigned Sensitivity Labels
Sensitivity labels can also be applied automatically when auto-labeling policies detect sensitive content such as card numbers, tax IDs, or personal records in a file. As these files contain sensitive info identified by policy rather than manual review, they should be monitored carefully and stored in appropriate sites.
This also helps validate whether automatic classification rules are actively protecting sensitive files. To find such files in SharePoint Online, use the -AutoAssignedLabel parameter.
|
1 |
./GetSensitivityLabelAppliedSPOFiles.ps1 -AutoAssignedLabel |
7. Identify SharePoint Files with Unknown Sensitivity Label Assignment
In some cases, SharePoint Online may return a sensitivity label assignment type that does not match the commonly known values. These entries usually appear when the service reports an undefined or future assignment type.
To identify such files, you can use the -UnknownLabel parameter.
|
1 |
./GetSensitivityLabelAppliedSPOFiles.ps1 -UnknownLabel |
In addition to the above approaches, you can combine multiple parameters to narrow down the results. For example, use -ManuallyAssignedLabel together with -Url to list files with manually assigned sensitivity labels in a specific SharePoint Online site.
💡 For stronger governance, Microsoft recommends reviewing sensitivity label findings together with SPO site permissions and sharing settings to detect broader data exposure risks.
Get Rich Visibility into SharePoint Sensitivity Labels with AdminDroid
Manual checks and PowerShell scripts help identify sensitivity-labeled files, but they often require repeated execution, CSV exports, and manual analysis. These reports are limited, fragmented, and do not provide organization-wide visibility into label usage across sites.
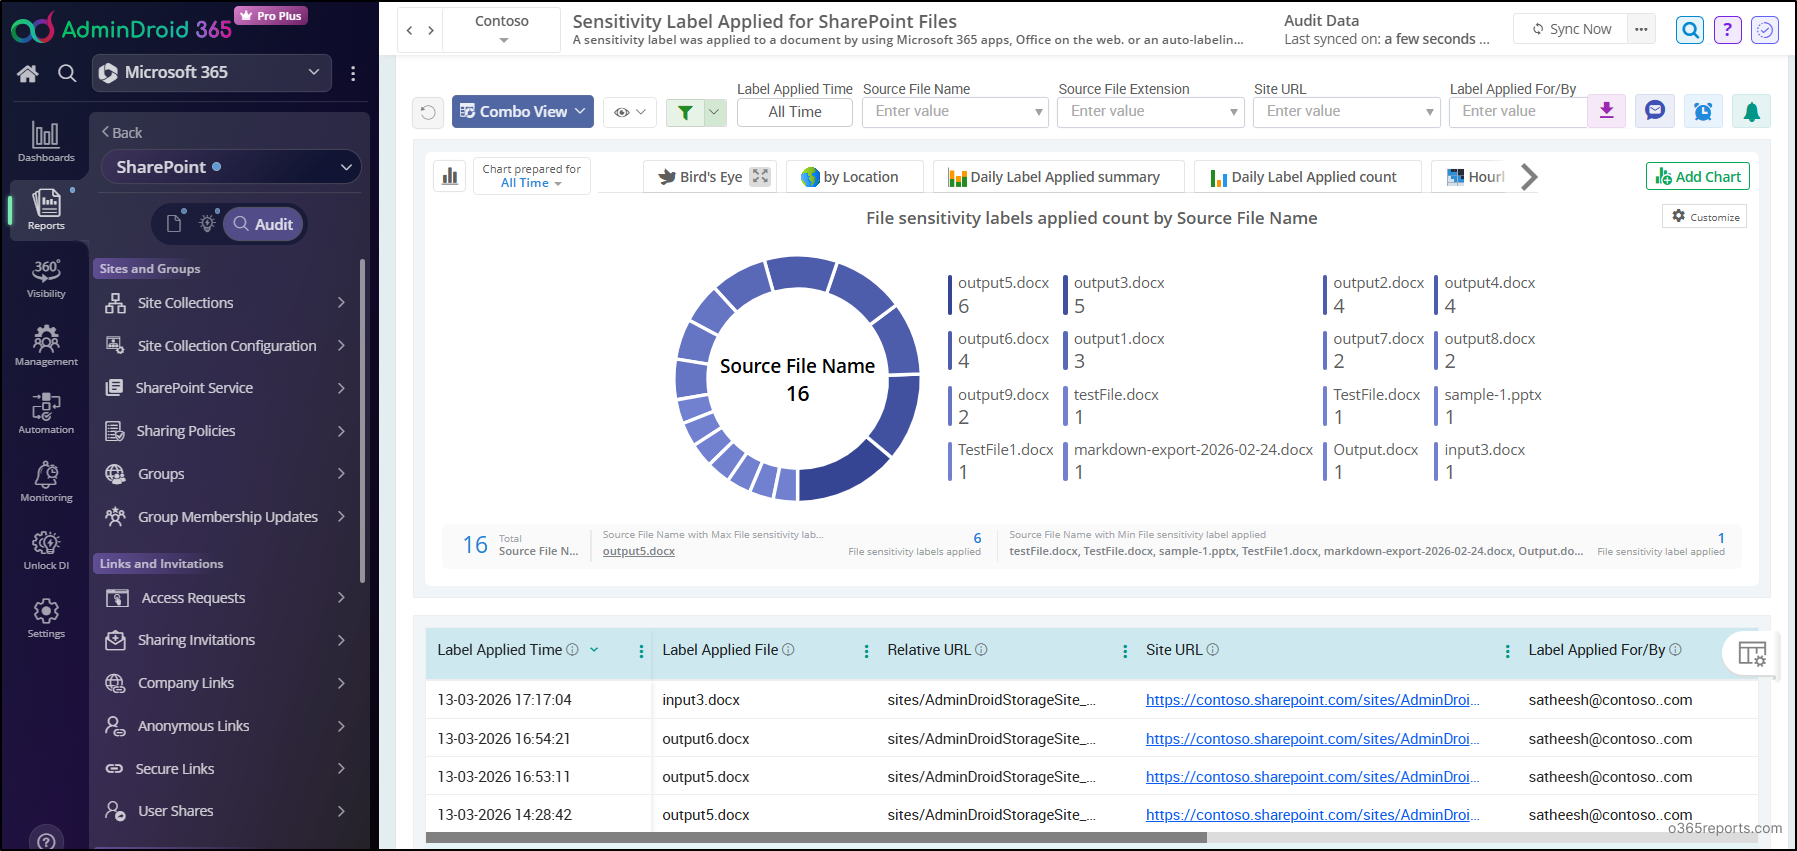
AdminDroid’s SharePoint Online auditing simplifies this with visual-rich reporting for SharePoint sensitivity labels, helping you monitor file classification, label assignment methods, and protection coverage. 📊
Here is a glimpse of real-time reports the tool provides for SharePoint sensitivity label activities:
File-Level Sensitivity Label Reports
- Applied Sensitivity Labels for SharePoint Files
- Changed Sensitivity Labels for SharePoint Files
- Removed Sensitivity Labels for SharePoint Files
Site-Level Sensitivity Label Reports
- Applied Sensitivity Labels for SharePoint Sites
- Changed Sensitivity Labels for SharePoint Sites
- Removed Sensitivity Labels for SharePoint Sites
- SharePoint Site and File Sensitivity Label Mismatches
Beyond sensitivity label tracking, AdminDroid’s SharePoint Online management gives you a centralized way to manage SPO with insights, dashboards, and alerts. With deep visibility into site collections, permissions, usage, access requests, and security activity, it helps detect risks before they become data exposure issues. 🔐
In addition, AdminDroid 365 delivers 3,500+ pre-built reports, 100+ interactive dashboards, and 450+ management actions. It covers all Microsoft 365 services, including SharePoint, Microsoft OneDrive, Microsoft Teams, and more, for complete administrative control.
🚀 Download AdminDroid today to kickstart your 15-day free trial and simplify Microsoft 365 reporting and management.
Wrapping Up
We hope this blog helped you understand different ways to find SharePoint files protected by sensitivity labels. Whether you need a quick check or a filtered audit, these methods can improve visibility into label usage across your environment. If you have any questions, feel free to share them in the comments. Stay tuned for more PowerShell scripting guides!


