Microsoft 365 retention policies and eDiscovery holds are critical for compliance and regulatory requirements. They ensure that organizational data remains protected, preserved, and auditable for the required duration.
However, in certain situations, such as security incidents, privacy obligations, or accidental data exposure, admins must permanently remove specific content without waiting for retention periods to expire. In such cases, standard deletion methods are insufficient.
To address such rare but critical situations, Priority Cleanup in Microsoft Purview provides a controlled, approval-based way to permanently delete sensitive data even when retention policies or holds are in place.
This is currently available in public preview (mid-September), with general availability expected between late December 2025 and early January 2026 (Roadmap ID: 496151).
What is Priority Cleanup in Microsoft Purview
Priority cleanup in Purview is designed for exceptional and time-critical scenarios where delaying deletion is not acceptable.
- It uses a controlled, approval-based process, where designated approvers must be assigned to review and approve each item before deletion.
- Once the required approvals are completed, the data can be deleted even when retention policies, retention labels, or eDiscovery holds are in place.
- This feature applies to Exchange mailboxes, SharePoint Online, and OneDrive for Business.
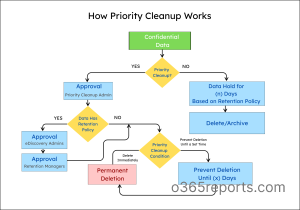
How Priority Cleanup Works in Purview
Before creating a priority cleanup policy, admins should know the location of the data that needs to be deleted. The flowchart below explains the working of the priority cleanup policy.
When Should Admin Use Priority Cleanup
Below are some real-time scenarios where admins can use Microsoft priority cleanup:
1. Data spillage in Microsoft 365
- Sensitive or confidential emails accidentally sent to unauthorized recipients.
- Confidential files stored in OneDrive or SharePoint with broader access than intended.
- Sensitive information shared through Teams messages to where it should not be exposed.
2. Privacy request in Microsoft 365
- Personal data of former employees must be permanently removed to ensure compliance with GDPR and other privacy regulations.
- Sensitive customer data, including ID photocopies and payment details, must be deleted immediately upon a valid privacy request.
- Sensitive content accidentally shared in mailboxes during internal planning for future business initiatives.
In these situations, waiting for retention policies to expire is not practical, which makes priority cleanup the most appropriate option for immediate and controlled data removal.
Note: Priority cleanup is in preview, and its functionality may be refined or updated over time.
Prerequisites for Priority Cleanup
Before configuring priority cleanup policy, ensure the following prerequisites are in place.
- Policy is enabled by default in the tenant. However, you need to check whether it is enabled in the Purview priority cleanup settings.
- Data location and scopes should be clearly identified.
- Admins must be assigned with appropriate priority cleanup roles to create and manage the policy.
- If Exchange is selected for priority cleanup, note that a mailbox must contain at least 10 MB of data in it.
- Ensure Microsoft 365 auditing is enabled at least one day in advance to allow priority cleanup activities to be captured in the audit log.
How to Configure Priority Cleanup in Microsoft Purview
Consider a scenario where an employee accidentally sends an email containing customer agreement or contract information to an unauthorized internal recipient. Although the email can be deleted from the mailbox, retention policies or an active eDiscovery hold ensure it is retained and not permanently deleted.
As long as the data is preserved, it poses an ongoing risk, making priority cleanup essential to permanently delete the email before it creates further risk. The section below explains how to set up a priority cleanup policy in Microsoft Purview to permanently delete data from Exchange mailboxes.
Follow the steps below to create the priority cleanup policy.
Open the Microsoft Purview portal and navigate to Solutions → Data Lifecycle Management → Priority cleanup (preview).
Step 1: Name the priority cleanup policy
- Select + Create a priority cleanup under Priority cleanup policies and enter the name & description for the policy.
- Select Next to move to the “Choose the type of priority cleanup policy to create” page.
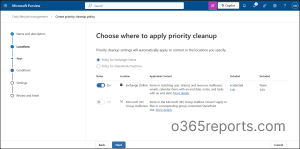
Step 2: Scope-based target location for priority cleanup
- Choose the scope type to define which users or locations the priority cleanup policy should target.
- You can select Adaptive scope type to target users dynamically based on defined attributes or choose Static scope to manually select specific users.
- After selecting the scope type, click Next to continue. The steps below explain both scope options.
Adaptive scope
If you select Adaptive scope, follow these steps:
- On the “Choose adaptive policy scopes and locations” page, click + Add scope and select the required adaptive scopes.
- Under “Choose locations to apply the policy”, select the locations where the policy should apply.
Note: Adaptive scopes must be created in advance before they can be selected.

Static scope
If you select Static scope, follow these steps:
- On the “Choose where to apply Priority Cleanup” page, choose Exchange Online or SharePoint/OneDrive and enable the required locations.
- After enabling the location, include the required users and, if needed, exclude specific users.
Step 3: Prepare conditions for priority cleanup in Purview
Once the scope is selected, the next step is to define the conditions for the priority cleanup policy. These conditions are configured in the next stage, regardless of the scope chosen.
- Select Next after choosing a location to move to the “Tell us what you’re looking for” page, for setting conditions.
- Conditions can be set by using Keyword Query Language(KQL).
In this example, the following KQL query is used to define the condition for the priority cleanup policy:
subject:”Confidential: Project X”
The above query helps to target emails with the subject Confidential: Project X.
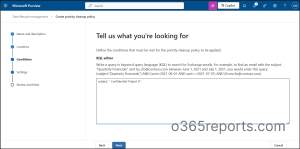
After defining the conditions using the KQL query, click Next to move to the “Choose when content should be deleted” page.
This page lets you decide how the matched content should be deleted. There are two options available. They are:
- Delete items as soon as possible – All items that match the policy conditions will be permanently deleted after the required approvals are completed. This includes items that are protected by retention policies or eDiscovery holds.
- Prevent permanent deletion until a set time – This option keeps the matched items for a specified period and permanently deletes them only after that time has passed. The retention period can be based on when the item was created, last modified, or labeled.
In this example, “Delete items as soon as possible” is selected so that the items will start deleting immediately after the required approvals are completed.
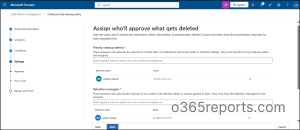
After this, the next step is to assign the admins for the policy. Select Next and navigate to the “Assign who’ll approve what gets deleted” page.
Step 4: Assign admins for priority cleanup policy
Before assigning admins to a priority cleanup policy, ensure the required permissions are in place.
Below are the required roles to be assigned for each type of admin:
| Role | Required Permissions | Role Description |
| Priority Cleanup Admin | Disposition Management, Data Classification List Viewer, Data Classification Content Viewer, Priority Cleanup Admin, Priority Cleanup Viewer | Creates, manages, and approves priority cleanup policies to permanently delete data. |
| Retention Manager | Disposition Management, Data Classification List Viewer, Data Classification Content Viewer, Retention Management | Approves priority cleanup requests for data under retention policies. |
| eDiscovery Admin | Search and Purge, Disposition Management, Data Classification List Viewer, Data Classification Content Viewer | Approves priority cleanup requests for data under active eDiscovery (legal) holds. |
Admins must have specific permissions to create, review, or approve priority cleanup requests. These permissions are typically granted by assigning users to the appropriate role groups in Microsoft Purview.
After the required roles are defined, assign the appropriate users to each required admin role so they can be added as approvers to perform priority cleanup tasks.
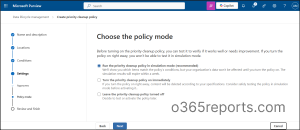
Next, choose how the policy should be run by navigating to the “Choose the policy mode” page.
Step 5: Set the policy mode for priority cleanup
There are three options to set up the policy. They are:
- Run the priority cleanup policy in simulation mode – This helps to check the items that match the conditions. It will not affect the data until the policy is turned on.
- Turn the priority cleanup policy on immediately – This activates the policy right away. Once approved, the selected items start deleting as per the process.
- Leave the priority cleanup policy turned off – Select this if you want to test or enable the policy later.
Step 6: Review the priority cleanup policy in Purview
This is the final step in creating a priority cleanup policy.
- Select Next to navigate to the “Review the policy’s details” page, where you can carefully review the policy configuration.
- Once you acknowledge the potential impact on the data, submit the policy.
- After submission, a Cleanup ID is generated, which you can use to track the policy activity in the Microsoft 365 Audit log.

After the priority cleanup policy is created, it is important to know about the approval process of the data.
Approval Process of Priority Cleanup in Purview
Once the priority cleanup policy is created, the deletion does not start immediately. To prevent unintended or unauthorized deletions, it follows a strict approval process to ensure that permanent deletion is reviewed and authorized by the appropriate administrators.
The Approval policy follows the Two-person rule.
- Each targeted item must be approved by at least one other assigned admin, in addition to the admin who created the policy.
- Only individual users can be assigned as approvers and all policies require approval from a priority cleanup admin before deletion can proceed.
- Retention Manager approval is required for items under retention, and eDiscovery admin approval is required for items on eDiscovery hold.
View All Priority Cleanup Policies Using PowerShell
Earlier, we walked through configuring priority cleanup using the Microsoft Purview portal. In addition to the portal, priority cleanup can also be configured using PowerShell.
First, connect to Security & Compliance PowerShell module.
Then, use the following PowerShell cmdlet to create a priority cleanup policy:
|
1 |
New-RetentionCompliancePolicy -Name "<PolicyName>" -PriorityCleanup -ExchangeLocation All -Enabled $true |
Replace <PolicyName> with the actual policy name.
Next, to view all the priority cleanup policies in your organization, use the following PowerShell cmdlet.
|
1 |
Get-RetentionCompliancePolicy –PriorityCleanup |
The above cmdlet displays all the priority cleanup policies in your organization along with their status.
Once the policy status is identified, to update the priority cleanup policy from Simulation to Enforced state, use the below cmdlet:
|
1 |
Set-RetentionCompliancePolicy -Identity "<PolicyName>" -EnforceSimulationPolicy $true -PriorityCleanup |
Replace <PolicyName> with the actual policy name in the above cmdlet.
Limitations of Priority Cleanup in Purview
Priority cleanup also has specific constraints and behaviors that administrators should be aware of. These limitations help ensure that priority cleanup is used correctly and safely.
The following are some limitations of priority cleanup in Microsoft Purview:
- Microsoft 365 Group mailboxes and group-connected sites are supported for priority cleanup only when using Adaptive scopes.
- Items that are part of an eDiscovery review set cannot be deleted using priority cleanup; only items under an eDiscovery hold are eligible for deletion.
- Even if a priority cleanup policy is deleted, items may still be permanently deleted if the approval process has been completed already.
- Compared to disposition review for retention labels, priority cleanup doesn’t offer customizable notifications, approver escalation, or time-based auto-approval.
- Some KQL properties and conditions supported in eDiscovery are not supported in priority cleanup like SenderAuthor, SubjectTitle, (c:c), and more.
- Items marked as a record or regulatory record cannot be deleted using priority cleanup.
- Mail-enabled security groups are not currently supported for approval process.
A clear understanding of these limitations helps ensure priority cleanup is used correctly and without unintended impact.
Common FAQs that Arise for Purview Priority Cleanup Policy
While configuring priority cleanup policies, admins may have common questions or doubts. The following FAQs address some of those scenarios.
1. How many admins are required to create a priority cleanup policy?
More than one administrator is required, because each priority cleanup role must be assigned to a different person.
2. Can the same admins create and review a priority cleanup policy?
No. An admin who creates the policy cannot be assigned as a reviewer for the same policy.
3. In Exchange Workload, can one admins hold multiple roles in a single priority cleanup policy?
A single user cannot be assigned to more than one administrative role within the same policy.
4. What happens if multiple priority cleanup policies apply to the same data?
When more than one policy applies, the most recently created policy takes priority.
5. What happens if a priority cleanup policy is deleted while some items are under review?
If a priority cleanup policy is deleted while some items are still under review, the deletion process will continue and permanently delete items based on the approvals.
Recommended Practices for Priority Cleanup
Based on these common questions and limitations, the following recommendations can help ensure priority cleanup is used safely and effectively.
- Test KQL queries on a limited data set before applying them broadly to avoid accidental deletions.
- Always create a policy in simulation mode to review the data before turning on the policy.
- Use priority cleanup only for urgent and high-risk scenarios, such as data spillage or privacy requests, rather than for routine cleanup.
- Priority cleanup is enabled by default at the tenant level due to built-in safeguards. If it does not align with your compliance requirements, you can turn off priority cleanup.
How to Turn Off Priority Cleanup Policy
Easily turn off priority cleanup policies at the tenant level by following the steps below.
- Open the Microsoft Purview and navigate to Solutions → Data Lifecycle Management → Priority cleanup (preview).
- Click on Priority cleanup settings in the top-right corner to open the tenant-level configuration.
- Under Configure Priority Cleanup settings for your entire organization, disable the setting and save your changes to turn off priority cleanup.
Note: Existing priority cleanup policies will remain active even after the feature is disabled and cannot be modified. However, existing policies can still be deleted.
Thus, priority cleanup in Microsoft Purview is a powerful feature designed for urgent situations where sensitive data must be deleted quickly. Since deleted data cannot be recovered, priority cleanup should be used cautiously and only when necessary. By understanding its limitations and following best practices, organizations can use priority cleanup safely while remaining compliant.
I hope this blog helps you understand when and how to use priority cleanup. Thanks for reading, and feel free to leave your questions or feedback in the comments.