Imagine starting your Monday morning, opening Outlook, and being greeted by hundreds of unread emails, meeting invites buried under newsletter subscriptions, important client messages lost between internal threads, and follow-ups forgotten in the chaos.
For professionals who rely on Outlook daily, poor email management isn’t just frustrating, it’s a productivity killer. Missed deadlines, delayed responses, and mental fatigue all stem from an overloaded and disorganized inbox.
With the right strategies, you can take control of your inbox, prioritize what matters, and reclaim valuable time every day. Whether you’re managing project communications, client follow-ups, or team updates, this guide will walk you through practical steps to manage emails in Microsoft Outlook efficiently and work smarter.
Best Practices for Organizing Outlook Emails
Microsoft Outlook offers powerful tools to manage your email, but without the right habits in place, even the best features go underused.
To help you stay focused and productive, we’ve rounded up the most effective ways to organize your Outlook inbox. Below are the best practices that will help you take control of your email, reduce noise, and work more efficiently every day.
- Organize emails effectively by creating folders
- Automatically sort emails by creating rules
- Prioritize important emails by using focused inbox
- Flag or pin a message for follow-up and task management
- Create coloured categories to organize emails better
- Archive emails in Outlook without losing important messages
- Use sweep feature to clean up your inbox
- Unsubscribe from unwanted emails to reduce clutter
- Block spam and junk emails to keep your inbox secure
- Manage Outlook emails with Microsoft To Do integration
- Use conditional formatting in Outlook to highlight emails
- Stay focused by ignoring distractions in your inbox
- Configure retention policies to optimize inbox management
1. Organize Emails Effectively by Creating Folders
One of the best practices for managing a clutter-free inbox in Outlook is to organize emails into folders based on categories like project, department, sender, or action required. This not only improves visibility but also makes it easier to retrieve important emails quickly.
Follow these steps to create and manage folders in Microsoft Outlook:
- Open the Outlook and right-click your email account or inbox.
- Now select a ‘New Folder’ option, name the folder and click Enter.
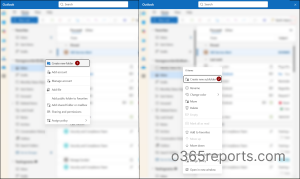
To create a subfolder:
Right click the created folder and select ‘Create new subfolder’ option.
To move emails from your inbox into a new folder:
Click on the emails you want to move and then select the move option from the ‘Home’ tab and click the desired location.
You can also drag and drop the email into a folder, or you can right-click on the mail to ‘Move’. If you find yourself moving similar emails repeatedly, consider managing inbox rules to automatically route them into folders and subfolders. This will save time and reduce clutter.
2. Automatically Sort Emails by Creating Rules
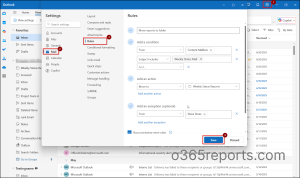
Manually sorting emails can quickly become overwhelming, especially when you’re dealing with high volumes daily. Outlook inbox rules offer a powerful way to automate this process, allowing you to automatically move, flag, categorize, or delete emails based on specific conditions. By setting up rules, you can keep your inbox organized and ensure important messages never get buried. To create rules to sort the incoming emails automatically, follow the below steps.
- Navigate to the Outlook and click the Settings in the upper-right corner.
- In the left pane, go to Mail > Rules.
- Click ‘+ Add new rule’ option and give your rule a name (e.g., Move HR emails).
- Choose the criteria that will trigger the rule such as “From,” “Subject includes,” or “To.”
- Choose what you want Outlook to do when the condition is met, such as “Move to,” “Categorize,” or “Delete.”
- You can specify exceptions to avoid applying the rule to certain emails.
- Click Save to activate it.
3. Prioritize Important Emails by Using Focused Inbox
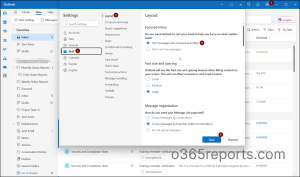
Outlook’s Focused Inbox is a built-in feature that automatically sorts your inbox to surface high-priority emails. It separates your inbox into two tabs Focused and Other to help you stay focused on what matters most. Here’s how to enable and manage emails in Microsoft Outlook step-by-step:
- Click the Settings icon in the upper-right corner of the Outlook screen.
- Navigate to Mail> Layout from the settings menu.
- Choose “Sort messages into Focused and Other” under Focused Inbox section.
- Click Save to apply the changes.
When focused inbox is enabled, your mailbox is divided into Focused and Other tabs at the top. You’ll be notified when new emails arrive in the Other tab, and you can easily switch between tabs at any time to stay updated.
To move emails between focused and other, follow the below steps.
- Right-click any email in Focused or Other.
- Choose:
- Move to Focused or Move to Other inbox.
- You can also choose ‘Always move to Focused’ or ‘Always move to Other’ to automatically send all future emails from a specific sender to your preferred tab.
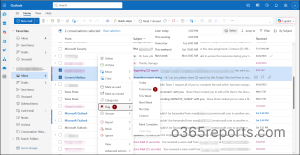
4. Flag or Pin a Message for Follow-Up and Task Management
Flagging & pinning emails helps you prioritize what needs follow-up, set reminders, and keep your inbox aligned with your workflow. Whether you’re using Outlook on the web or desktop, follow these simple steps to stay organized.
- Open Outlook and go to your inbox.
- Locate the email you want to follow up on.
- On top of the outlook, click the flag symbol or right-click an email to flag it on a custom timing.
You can view all flagged emails under the ‘Filter’> ‘Flagged’ on the top of the inbox. You can also use the Search Folder > Create new Search Folder> For Follow Up> Select a type> Flagged for follow-up, set a folder name and click ‘Create’.
To pin an important email in Microsoft Outlook:
Open your inbox, sort emails by Date > Newest on Top using sort option near the Focused/Other tab, then click the Pin icon next to the email you want to keep at the top for easy access.
To set reminders for flagged or pinned emails:
Set reminders for the flagged emails by clicking reminder symbol at the upper pane of the Outlook and set a due date to remind you of the follow up.
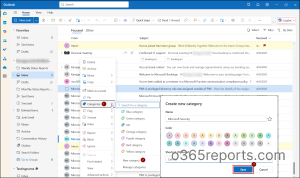
5. Create Coloured Categories to Organize Emails Better
When your inbox fills up with emails from multiple projects, teams, or topics, color-coded categories in Outlook become a simple but powerful way to visually organize everything. These categories help you scan and prioritize emails at a glance without relying solely on folders or flags. You can tag emails, calendar events, and even tasks with consistent colour labels. This is especially helpful if you manage cross-functional responsibilities or switch contexts frequently.
- Open Outlook, right-click any email and click the Categorize option.
- Click ‘New category’ and give a suitable category name, colour, shortcut and click ‘Save’ to apply the changes.
You can also create automating rules to categorize coloured tags when emails are sent from the same sender.
6. Archive Emails Without Losing Important Messages
Archiving is a smart way to clean up your inbox without deleting anything. Archived emails are safely stored and fully searchable, you won’t lose access, but your inbox stays clear. It’s ideal for messages you’ve read and may need later, such as completed conversations or old reports.
With one click, you reduce clutter while retaining everything important. Use Archive for completed tasks, newsletters, or closed threads to keep focus on active conversations. You can access archived mails anytime by clicking the Archive folder in the left pane. You can restore or move them back to the inbox anytime.
To archive an email from your inbox, right-click on it and click the ‘Archive’ option or click the Archive icon on the top toolbar.
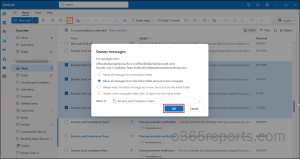
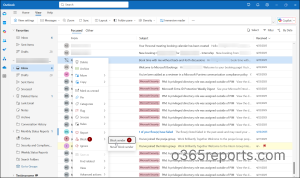
7. Use Sweep Feature to Clean Up your Inbox
Managing recurring emails like newsletters, notifications, or promotions can quickly clutter your inbox. Sweep in Outlook helps you clean up your inbox by moving or deleting emails from specific senders. You can choose to keep only the latest emails and apply the rule to future messages as well. It’s one of the fastest ways to regain control of your inbox with minimal effort.
- Go to Outlook and select a message from the sender you want to sweep.
- Click the Sweep icon on the top toolbar.
- Choose a sweep rule, select ‘Move to’ options and click OK to apply the rule.
8. Unsubscribe from Unwanted Emails to Reduce Clutter
Unwanted emails from newsletters, promotions, or mailing lists can quickly bury important messages in your inbox. One of the most effective ways to reduce clutter is by unsubscribing from senders you no longer find valuable. Regularly cleaning out such noise improves focus and ensures high-priority emails don’t get lost. It’s a simple step that makes your inbox cleaner and more manageable.
- Navigate to your inbox and Click on an unwanted marketing or promotional email.
- Click Unsubscribe button at the top of the message pane (next to the sender’s address). Alternatively, scroll to the bottom of the email to find a standard unsubscribe link in the footer.
- Follow the prompt to confirm your choice. Some senders may redirect you to a website to finalize the action.
Note: If the unsubscribe doesn’t work or the sender keeps emailing, then you can use the Sweep option or alternatively create a Rule to automatically move or delete those emails.
9. Block Spam and Junk Emails to Keep Your Inbox Secure
Spam and junk emails aren’t just annoying they can also pose serious security risks, including phishing attempts and malware. In some cases, attackers send calendar phishing emails that automatically create events in your calendar, increasing the chances of user interaction.Outlook’s built-in filtering and blocking features help you take control by stopping unwanted senders from reaching your inbox. By using these features effectively, you reduce clutter and strengthen your email security. It’s a must-do practice for maintaining a safe and clean inbox.
- Open Outlook, find the spam or suspicious email from your inbox.
- Right-click an email and click Block to stop the sender from contacting you again.
To report an email as junk in Microsoft Outlook:
You can report an email as junk or phishing by right clicking the email > Choose Report > Select either: Junk or Phishing.
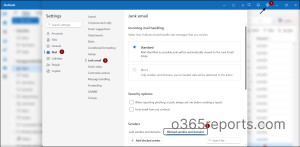
To manage junk email settings in Microsoft Outlook:
Configuring junk email settings helps streamline your inbox by blocking unwanted senders, adding trusted contacts, and minimizing distractions from irrelevant or nuisance emails.
- Go to the settings and click Mail> Junk email.
- In the Junk Email settings page, you can:
- Add Safe Senders and Domains: Emails from these addresses will always reach your inbox.
- Add Blocked Senders and Domains: Emails from these addresses will be automatically sent to Junk.
Note:
By reporting suspicious emails, you not only help Microsoft enhance its spam detection for all users, but also ensure spam emails are filtered more efficiently.
10. Manage Outlook Emails with Microsoft To Do Integration
Keeping track of follow-up emails, tasks, and deadlines can easily overwhelm your inbox. Outlook integrates seamlessly with Microsoft To Do to turn flagged emails into actionable tasks. This creates a unified to-do list across platforms like desktop, mobile, and web helping you manage work efficiently without missing anything. Whether it’s a client request or a reminder to reply, syncing emails with Microsoft To Do keeps your priorities front and center.
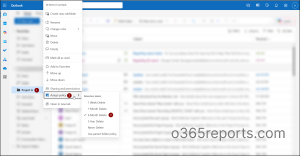
- In Outlook, right-click any email.
- Click the Flag icon to mark it for follow-up or navigate to Advanced option> Create task to open To-do.
- Now, click Manage all tasks, it opens To Do and you can add details like due date, reminders & subtasks.
- Mark it as complete once the follow-up is done.
Note:
All your flagged emails from Outlook appear here as tasks, and importantly, any changes you make in To Do are also reflected in Outlook’s Tasks view and vice versa.
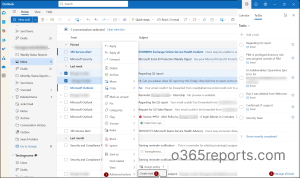
11. Use Conditional Formatting in Outlook to Highlight Emails
When your inbox is packed, important emails can easily get lost in the noise. Conditional formatting in Outlook is a powerful way to make specific emails stand out by automatically changing their font color based on custom rules. Whether you’re tracking client names, flagged keywords, or messages from your manager, this feature helps you spot priority emails instantly.
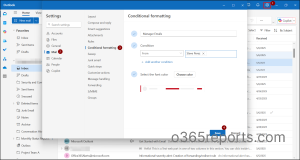
- Open Outlook and click ‘Settings’ at the top pane.
- Click Mail> Conditional formatting.
- Click Add and name your rule. (e.g., Manager Emails or Urgent Clients).
- Click Condition to define the filter.
- Select the font colour to choose how matching emails will appear.
- Click Save to apply the rule.
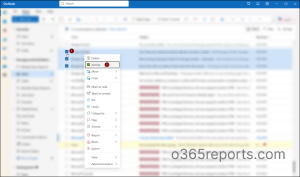
12. Stay Focused by Ignoring Distractions in Your Inbox
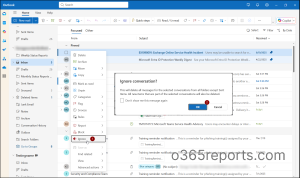
Too many irrelevant threads can quickly turn your inbox into a distraction zone. Outlook’s Ignore conversation feature helps you take back control by automatically deleting entire email threads you no longer need. Instead of manually deleting each message, this feature automatically moves the entire thread and all future replies to Deleted Items. Ideal for noisy email threads you’re looped into but don’t need to monitor like irrelevant team discussions.
- Click ‘Ignore’ by right-clicking on the unwanted email thread or from the delete drop down menu.
- Confirm the prompt by clicking ‘Ok’ to proceed.
Note: This feature deletes both existing and future messages in the thread, so avoid using it on emails you may want to reference later.
13. Configure Retention Policy to Optimize Inbox Management
Configuring retention policies is vital for managing emails in Microsoft Outlook effectively and keeping your inbox organized. These policies automate the lifecycle of your messages, helping you retain important emails and delete outdated ones without manual effort. This reduces clutter, improves search efficiency, and free up storage space. Additionally, retention policies ensure compliance with organizational and legal requirements.
- Right-click the email or folder you want to apply a retention policy.
- Select Assign Policy from the context menu and choose the appropriate retention policy from the list.
Note: If you don’t see the retention policy settings option in Outlook, it may be because your user role assignment policy doesn’t permit it.
We hope this blog helps you discover practical ways to manage emails in Microsoft Outlook inbox more efficiently. Organizing your emails doesn’t have to be overwhelming with smart features like folders, flags, pin, focused inbox, sweep, Microsoft To Do and more. Try out the tips that best suit your workflow and enjoy a cleaner, more focused inbox every day.
How do you manage emails in your Microsoft Outlook inbox? Share your tips or drop any questions below, we’re happy to help and always up for a good inbox hack!


