After making multiple announcements, finally, Microsoft is going to deprecate basic authentication in Exchange Online from Oct 2022 (which was postponed from Oct 2020). So, it’s time to disable basic authentication and upgrade scripts/applications to get an uninterrupted service.
This blog will guide you on disabling basic authentication through various methods and adopting modern authentication to improve the security of your organization. Before disabling basic auth, you must make sure whether your organization is still using basic authentication.
How to Check if Basic Authentication is Enabled?
In the newly created Microsoft 365 tenants (i.e., tenants created after Oct 22, 2019), basic authentication is turned off by default as they have security defaults enabled. To check the basic authentication status,
- Login to Microsoft 365 admin center.
- Click Settings–> ‘Org Settings.’
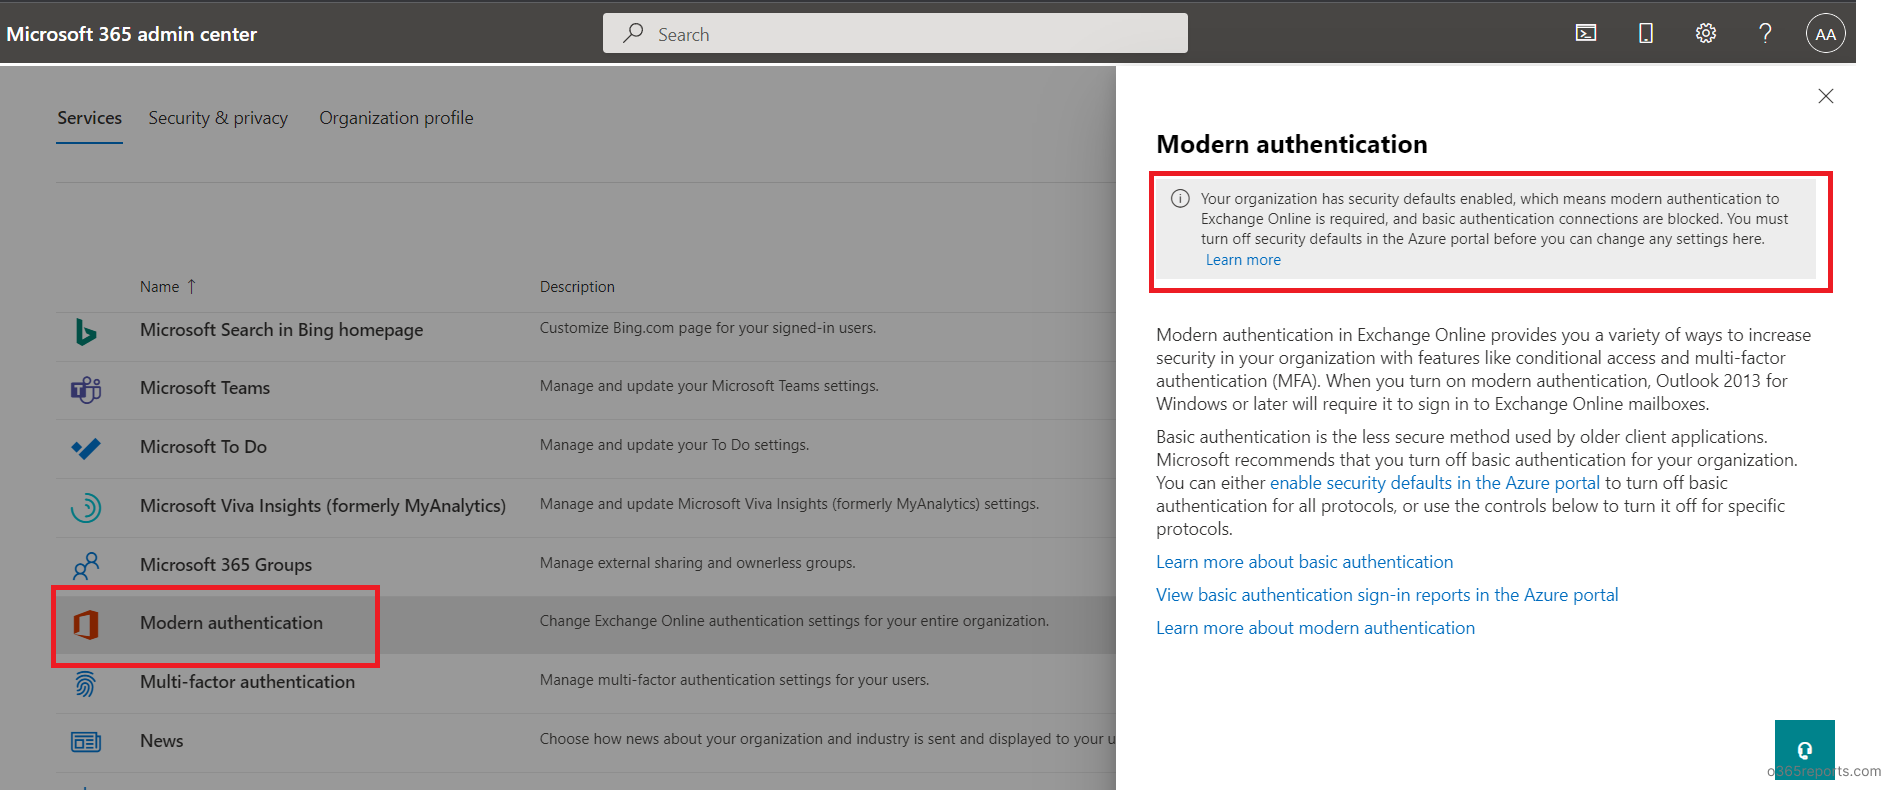
- Select ‘Modern authentication‘ present under the ‘Services‘ tab.
Based on the message displayed, you can conclude whether the modern authentication is forced or the tenant is still using basic authentication.
The below information is shown when a tenant is using modern authentication.
If a tenant is using basic auth, org settings are shown as below.
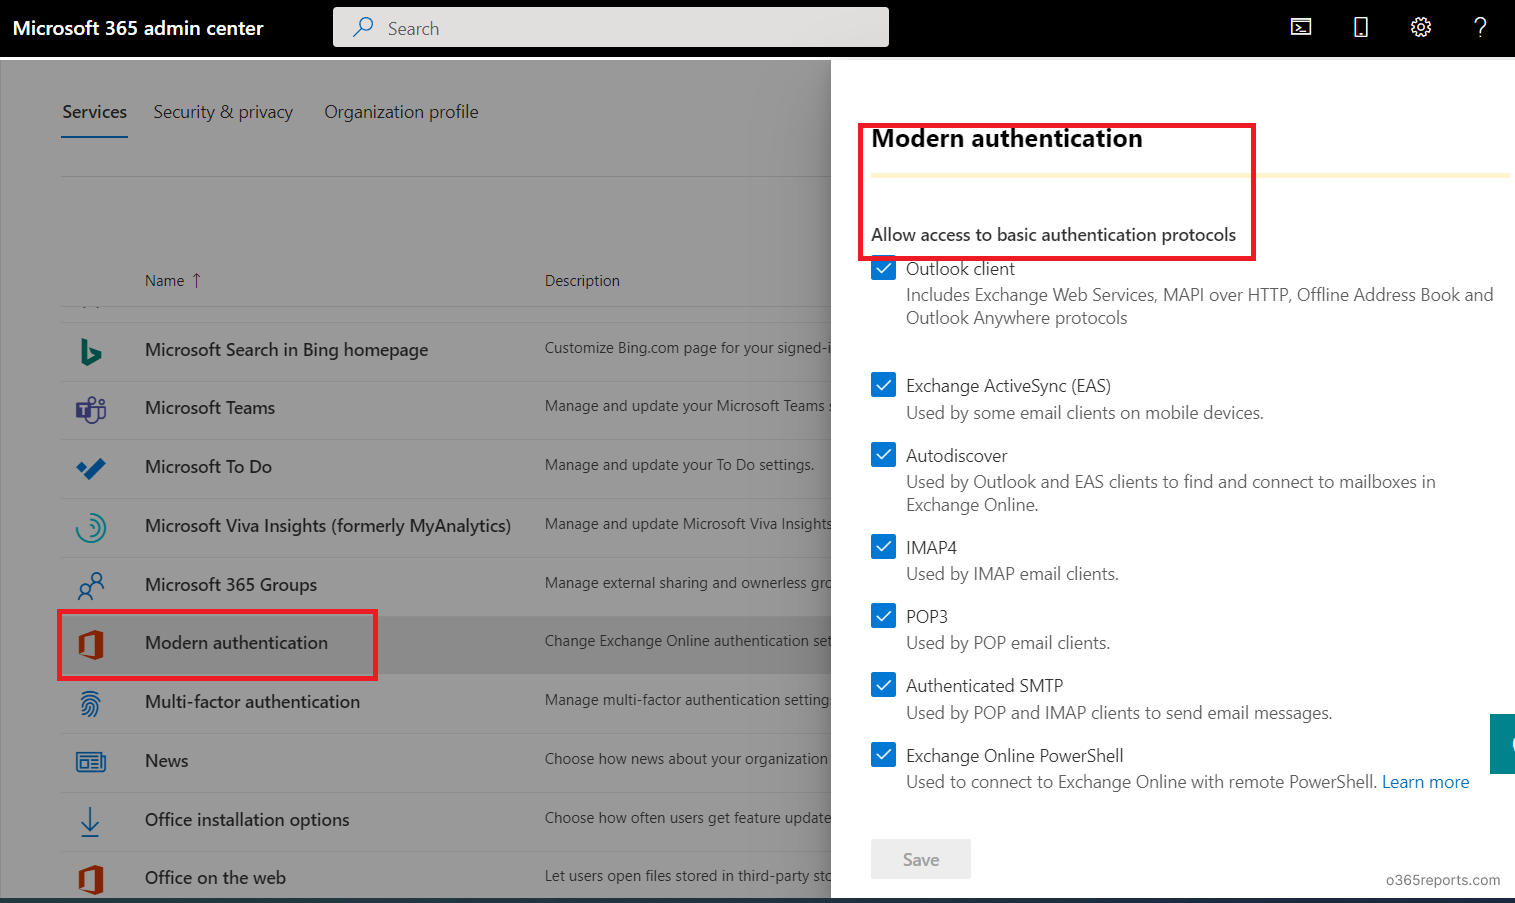
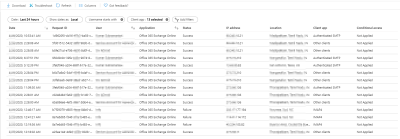
If your tenant allows basic authentication, then you can make use of the basic authentication report available in the Azure AD portal to keep track of the users who still use basic authentication protocols for sign-ins. And before you turn off basic authentication for protocols, you can make sure that these users in your organization aren’t using the basic authentication protocols.
How to Switch from Basic Authentication to Modern Auth?
By blocking basic authentication in your organization, you can enforce modern authentication methods such as QR code authentication and passwordless sign-in for enhanced security. You can choose any of the methods below to disable basic authentication in Microsoft 365.
- Configure Exchange Online authentication policies
- Disable legacy protocols for mailboxes
- Enable Security Defaults
- Block basic authentication using the Conditional Access policies
Note: Before using the Exchange Online PowerShell cmdlets, you must install EXO V2 PowerShell module and connect to Exchange Online PowerShell.
Method 1: Configure Exchange Online Authentication Policies:
Admins can disable basic authentication and allow users to use modern authentication through authentication policies. It involves the following steps.
- Create a new authentication policy.
- Assign the authentication policy to users.
Create New Authentication Policy:
You can use the New-AuthenticationPolicy cmdlet to create authentication policies for your Office 365 organization.
|
1 |
New-AuthenticationPolicy –Name “Block Basic Auth" |
The above example creates the authentication policy ‘Block Basic Auth’ that disables all the basic authentication protocols.
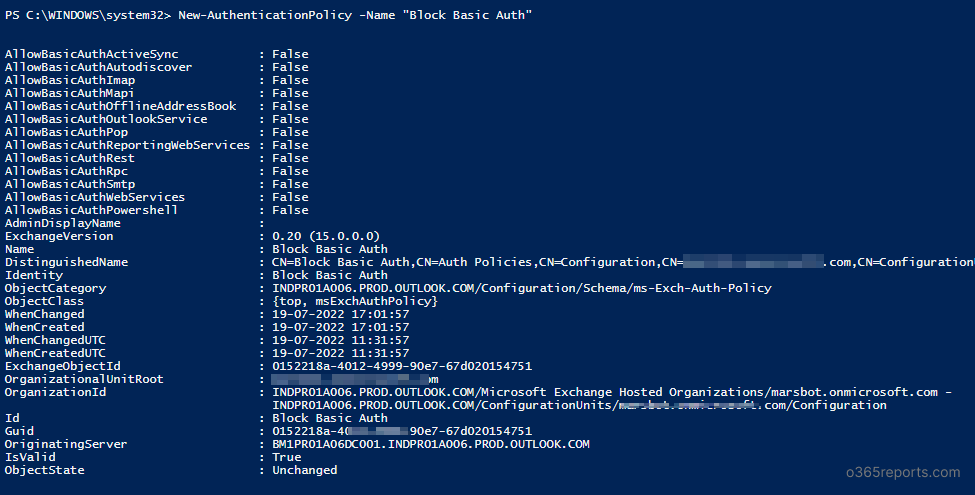
You can also create an authentication policy with protocols exception. For example, the code below will create an authentication policy that allows SMTP auth.
|
1 |
New-AuthenticationPolicy –Name “Allow SMTP Auth" -AllowBasicAuthSMTP |
To view the existing Exchange Online authentication policies, run the Get-AuthenticationPolicy cmdlet.
Assign the Authentication Policy to Users:
Authentication policy can be assigned org-wide or to a specific user. To apply the policy across the organization, execute the following cmdlet.
|
1 |
Set-OrganizationConfig -DefaultAuthenticationPolicy <PolicyName> |
Admins can assign the authentication policy to a specific user by using the Set-User cmdlet.
|
1 |
Set-User –Identity <UPN> -AuthenticationPolicy <Policy Name> |
To block basic authentication for all the Exchange Online mailboxes,
|
1 |
Get-User –ResultSize Unlimited | Set-User –AuthenticationPolicy “Block Basic Auth" |
When you set an authentication policy for users, it will take up to 24 hours to take effect. If you want the policy to take effect within 30 mins, use the following code.
|
1 |
Set-User -Identity <UPN> -STSRefreshTokensValidFrom $([System.DateTime]::UtcNow) |
To get users’ authentication policy using PowerShell, run the below cmdlet.
|
1 |
Get-Recipient -RecipientTypeDetails UserMailbox -ResultSize Unlimited | Get-User | Select DisplayName,AuthenticationPolicy |
Method 2: Disable Legacy Protocols for Mailboxes:
Admins can disable legacy protocols like POP3, IMAP4, Exchange Active Sync, etc., through the Set-CasMailbox cmdlet.
To view the legacy protocol status for a specific mailbox,
|
1 |
Get-CASMailbox -identity <UPN> | Select OwaEnabled,MapiEnabled,EwsEnabled,ActiveSyncEnabled,PopEnabled,ImapEnabled |
To turn off legacy authentication protocols, you can run the below cmdlet.
|
1 |
Set-CasMailbox –Identity <UPN> -PopEnabled $false -ImapEnabled $false -SmtpClientAuthenticationDisabled $true |
To block legacy authentication protocols for all the mailboxes, execute the following code snippet.
|
1 |
Get-Mailbox –ResultSize Unlimited | Set-CasMailbox -PopEnabled $false -ImapEnabled $false -SmtpClientAuthenticationDisabled $true |
This example will disable POP, IMAP, and SMTP for all the mailboxes.
Enable or Disable SMTP Auth in Office 365:
Since Microsoft has added an exception for SMTP AUTH (admins can re-enable SMTP AUTH after the basic auth deprecation), it will be good to know a way to enable or disable SMTP auth based on the organization requirement.
April 2024 Update: The exception is no more! Recognizing the critical importance of strengthening security measures, Microsoft announced the decisive step to deprecate SMTP auth entirely from Client Submission by September 2025.
After Microsoft disables the protocol, admins can re-enable SMTP Auth org-wide using the below cmdlet.
|
1 |
Set-TransportConfig -SmtpClientAuthenticationDisabled $False |
To disable SMTP Auth org-wide,
|
1 |
Set-TransportConfig -SmtpClientAuthenticationDisabled $True |
To enable or disable SMTP Auth for a specific mailbox, you can use the Set-CASMailbox cmdlet.
|
1 |
Set-CasMailbox –Identity <UPN> -SmtpClientAuthenticationDisabled $False |
The above example will enable SMTP Auth settings for a per-mailbox.
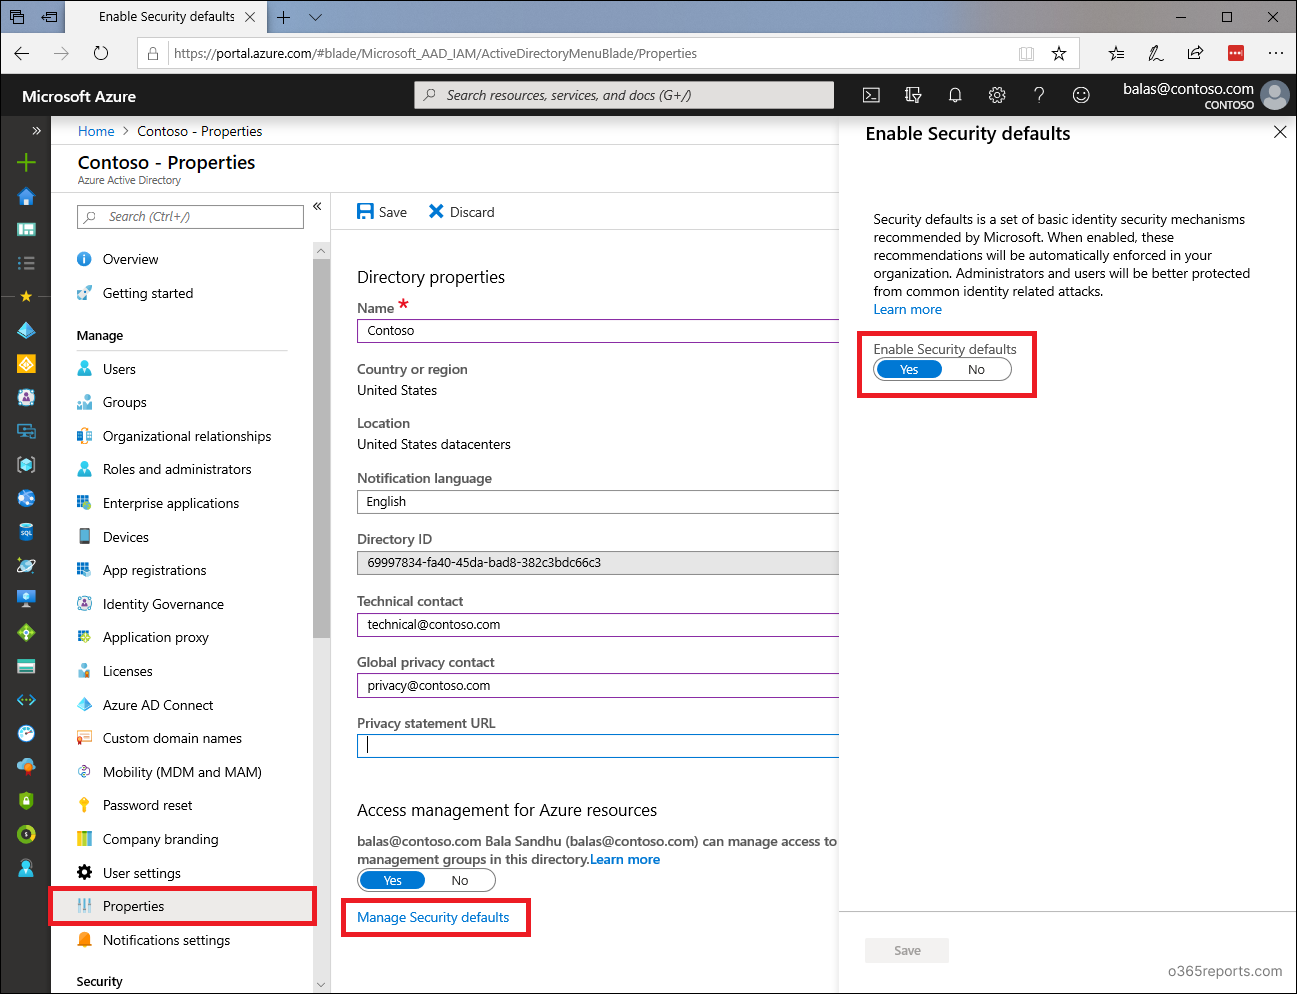
Method 3: Enable Security Defaults:
Admins can enable security defaults to turn off basic authentication for all protocols. To enable security defaults, you can follow the steps below.
- Sign in to the Azure AD admin center.
- Navigate to Azure Active Directory –> Properties.
- Select ‘Manage security defaults.’
- Set the ‘Enable security defaults’ toggle to Yes.
Method 4: Block Basic Authentication using Conditional Access (CA) Policy:
If your organization has Azure AD P1/P2 license, you can block basic authentication through Conditional Access to improve the protection. You can follow the below steps to create a Conditional Access policy to block legacy authentication.
- Sign in to the Azure AD portal.
- Navigate to Azure Active Directory –>Security –> Conditional Access.
- Click ‘New policy’ and create a new policy with the following configurations.
- Name – Provide a name for CA policy
- Assignments – Include–> Select ‘All users’. If you want to add exception to a few users, you can mention them under ‘Exclude’ option.
- Cloud apps or actions – Select ‘All cloud apps’
- Conditions – In ‘Client apps’, set the ‘Configure’ toggle to Yes. And select only the 2 options available under ‘Legacy authentication clients’. (Options under ‘Modern authentication clients’ should be unchecked)
- Grant – Select ‘Block access.’
- Set the ‘Enable Policy’ toggle to ‘On’ and create a policy.
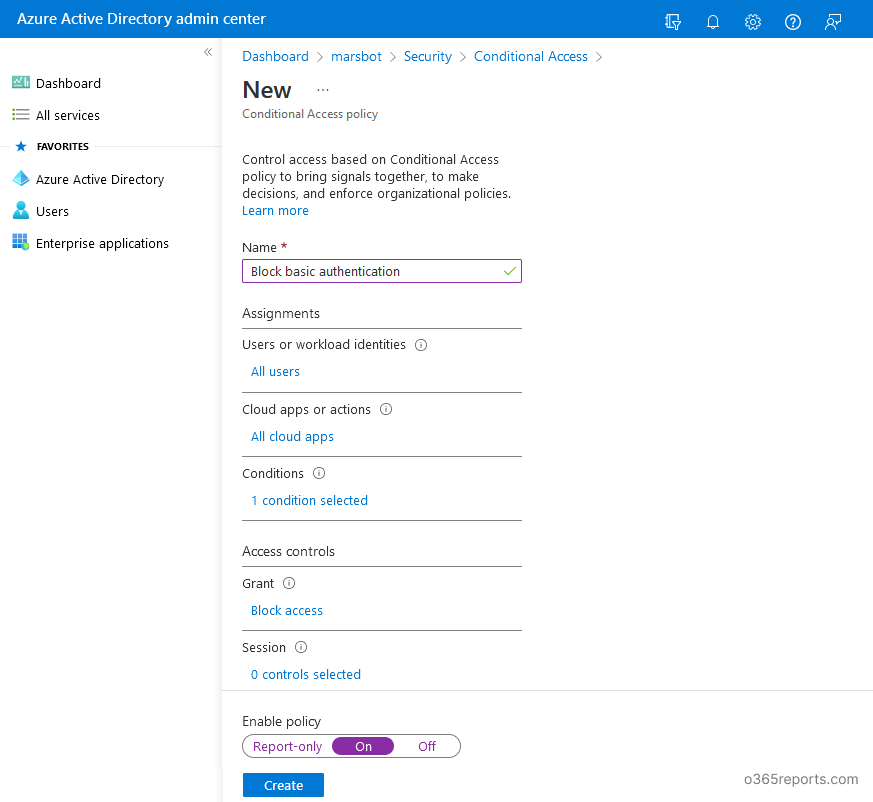
When the users try to authenticate using basic authentication, their access requests will be blocked.
As Password spray attacks are increasing nowadays, it’s better to disable basic authentication and switch to modern authentication instead of waiting for the end of support. In addition to modern authentication, it is recommended to disable the ‘Stay signed in?’ prompt to prevent users from remaining signed in. I hope this blog will help admins turn off basic authentication and secure their Microsoft 365 organization with modern authentication.
