Employees often access work apps like Teams, Outlook, and SharePoint from their personal laptops, phones, and tablets. While this improves productivity, it also raises a critical question: How can you trust personal devices with organizational data? Without proper visibility and control, unmanaged BYOD access can quickly become a security risk. This is where Microsoft Entra registered devices come in.
What is a Microsoft Entra Registered Device?
When a user adds a work or school account to a personal device, Microsoft Entra identifies the device. The device is then registered as a Microsoft Entra Registered Device. This allows the organization to enforce Conditional Access policies, such as requiring MFA to log in or limiting access based on device state, and more.
This approach is ideal for BYOD scenarios because the organization can protect data and enforce security requirements without taking full ownership of the device. During registration, Microsoft Entra creates a device identity that allows the organization to recognize the device and apply access control.
How to Register Devices in Entra?
Users can easily register personal devices with Microsoft Entra. However, before jumping in, device registration is often confused with other device joining methods. Understanding the difference is important to choose the right approach for access and management.
Microsoft Entra supports three ways to add devices to your organization:
|
|
Microsoft Entra Registered Devices | Microsoft Entra Joined Devices | Microsoft Entra Hybrid Joined Devices |
| Definition | Devices are registered in Entra without requiring an organizational account to sign in to the device. | Entra Joined devices require organizational account sign-in at the device level. | Devices are joined to on-premises Active Directory, while user identities are synchronized to Microsoft Entra ID using Microsoft Entra Connect, enabling a hybrid identity. |
| Device Ownership | User-owned(mostly), Organization-owned. | Organization-owned. | Organization-owned. |
| Supported Operating Systems | Windows 10 or later, macOS 10.15 or newer
iOS 15 or newer Android Linux editions: Ubuntu 20.04/22.04/24.04 LTS Red Hat Enterprise Linux 8/9 LTS
|
Windows 10 and Windows 11 (except Home editions), Mac OS. | Windows 11 or Windows 10 except Home editions, Windows Server 2016, 2019, and 2022. |
| Device sign in options | Device local credentials, Password, PIN, Windows Hello, Biometrics | Password, Windows Hello for Business, FIDO | Password, Windows Hello for Business (Windows 10 and above) |
| Features | SSO to cloud resources, Conditional Access when enrolled into Intune, Conditional Access via App protection policy, Enables Phone sign in with Microsoft
app |
SSO to both cloud and on-premises resources, Conditional Access through MDM enrollment and
MDM compliance evaluation, Self-service Password Reset and Windows Hello PIN reset on lock screen |
SSO to both cloud and on-premises resources, Conditional Access through Domain join or through Intune if co-managed, Self-service Password Reset and Windows Hello PIN reset on lock screen
|
Now that we’ve explored the different ways devices can be added to Microsoft Entra and how each method differs, it’s time to focus specifically on Entra Registered devices and the tenant-level settings that control it.
How to Allow Users to Register Personal Devices in Microsoft Entra ID
To let users register their personal devices with Microsoft Entra ID, admins must configure the following tenant-level settings in advance.
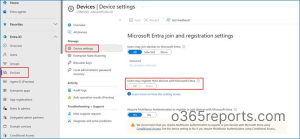
- Log in to the Microsoft Entra Admin Center and navigate to Entra ID → Devices → Device settings.
- Under Microsoft Entra join and registration settings, make sure the option “Users may register their devices with Microsoft Entra” is set to All.
By default, this option is configured as All and may appear greyed out. This is expected when Microsoft Intune or Mobile Device Management for Office 365 is configured, as these services require device registration. - (Optional but recommended) Enable Require Multifactor Authentication to register or join devices with Microsoft Entra.
This ensures users complete MFA before adding a device to the tenant. This setting can be disabled if MFA is already enforced through Conditional Access policies.
With the required tenant settings configured, users can securely access corporate data from their personal devices. Next, let’s walk through how users can register their personal devices as Microsoft Entra Registered devices.
How to Register a Personal Device in Microsoft Entra ID
When users need to access organizational data from their personal devices securely, they can register their devices in Microsoft Entra ID. The registration method depends on the device type and the organization’s access control requirements.
Here are a few methods to register a personal device to Microsoft Entra ID.
Register Personal (BYOD) Mobile Devices in Entra
Since employees often use their mobile devices to access corporate apps and data, securing them as Microsoft Entra registered devices helps enforce access controls. Enrolling these devices in Intune further enables device compliance checks and app protection policies to protect organization data.
To register personal mobile devices in Entra, you can do this using either of the following methods:
- Register mobile devices using Microsoft Authenticator app
- Configure personal mobile devices using Intune company portal
1. Register Mobile Devices using Microsoft Authenticator App
Users can register personal mobile devices with Microsoft Entra ID using the Microsoft Authenticator app to access Teams, Outlook, SharePoint, and more securely. This allows organizations to identify devices and enforce authentication policies while providing users with SSO and MFA.
To register mobile devices using the Microsoft Authenticator app, follow the steps below.
- Download the Microsoft Authenticator app.
- Open the app and, on the Add account screen, select Work or school account, then choose Sign in.
- Select Use another account, enter your work email address and password, and click Continue.
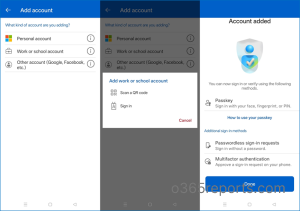
- You will be prompted to approve a push notification and verify your identity using biometric authentication or your device password.
If the push notification doesn’t arrive or the approval fails, fix Microsoft Authenticator app issues before proceeding. Once the sign-in is successful, the work account is added to the Microsoft Authenticator app, and the mobile device is automatically registered in Microsoft Entra ID.
2. Configure Personal Mobile Devices Using Intune Company Portal
To protect corporate data access, personal devices can be enrolled in Microsoft Intune, which automatically registers them as Microsoft Entra registered devices. Intune enables organizations to apply device compliance policies, enforce security settings such as encryption (where supported), and take actions like restricting access or performing a selective wipe if a device is lost or compromised.
- Open the Google Play Store or Apple App Store, search for “Intune Company Portal,” and install the app.
- Launch the app and tap Sign in. Enter your work account credentials and complete the authentication method configured for your account.
- After signing in, follow the on-screen steps to register and enroll your device.
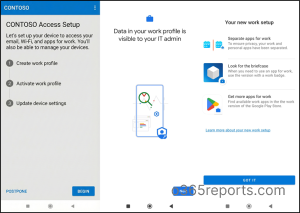
This process establishes a trusted connection with your organization and applies to any required security settings.
Once enrollment is complete, the organization’s approved applications and configurations will be available on the mobile device.
Register a Windows Device in Microsoft Entra
Employees may need to access corporate tools from personal Windows laptops while working remotely or traveling. Registering devices as Microsoft Entra registered devices creates a trusted device identity, enabling secure access controls without requiring full device management.
To register a personal Windows device, follow the steps below:
- Click Start on the Windows device and search for Settings. Navigate to Accounts → Access work or school.
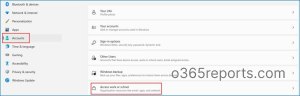
- Select Connect in Add a work or school account.

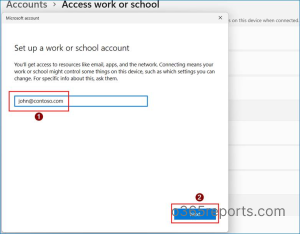
- In the Microsoft sign-in prompt, enter your work credentials and complete the authentication process to register the device with Microsoft Entra.
Once the process is complete, you will see the confirmation prompt shown below.
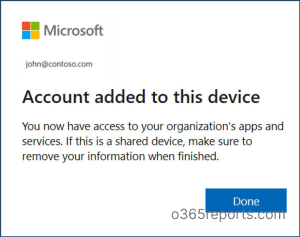
After completing the above step, the personal Windows device is added to Microsoft Entra ID as a registered device, making it visible in the All devices list for monitoring and management.
How to View the Registered Devices Added in Microsoft Entra
By reviewing Entra registered devices, admins can see how many users access organizational data from personal devices and how many devices each user has. Based on this, they can disable non-compliant devices, remove inactive ones, and enforce stricter access and security policies.
To view all the Entra registered devices, follow the steps below:
- Log in to Microsoft Entra Admin Center.
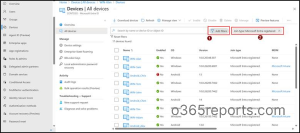
- Navigate to Entra ID → Devices → All devices to view every device registered in your tenant, along with its corresponding join type.
- To filter only Microsoft Entra Registered devices, select Add filter, choose Join Type, and click Apply.
- From the Value dropdown, select Microsoft Entra Registered to display all devices that are registered with Microsoft Entra ID.
How to Prevent Users from Registering Their Own Devices
For organizations handling sensitive data, permitting personal device registration can increase risk. Because BYOD devices are not fully managed, restricting device registration helps ensure access is limited to secure, corporate-controlled devices.
Here are a few methods to restrict personal devices from being added as Microsoft Entra registered devices.
- Restrict personal devices registration using Entra admin center
- Block personal BYOD devices registration using Intune admin center
- Restrict Microsoft Entra registered devices using a Conditional Access policy
1. Restrict Personal Devices Registration using Entra Admin Center
Microsoft Entra allows administrators to control whether users can register personal devices at the tenant level. By disabling this setting, you can prevent users from adding new personal devices to Entra ID while still allowing access from approved and managed devices.
- Sign in to the Microsoft Entra Admin Center.
- Navigate to Entra ID → Devices → Device Settings.
- Check for the option Users may register their devices with Microsoft Entra
- Toggle it to None and Save the settings in order to stop users from registering their personal device as Microsoft Entra registered device in the tenant.
Note: This method applies only when Intune or MDM is not configured. If Intune or MDM is enabled, the device registration setting is set to All and cannot be changed, and it is also greyed out.
2. Restrict Personal Device Enrollment in Intune
An organization may want to allow access to sensitive applications and data only from company-owned laptops and desktops. By blocking personal BYOD devices from registering in Intune through the Admin Center, IT can prevent unmanaged devices from accessing corporate resources, reducing data leakage risks, and ensuring security policy compliance.
At the same time, administrators can create device cleanup rules in Microsoft Intune to keep the managed device list accurate and focused on active endpoints. This helps hide inactive devices from Intune records, since blocking personal BYOD devices only restricts future enrollment and does not remove existing unwanted device entries.
Now, let’s look at how to block personal BYOD devices from registering in Intune:
1. Log in to the Microsoft Intune admin center.
2. Navigate to Devices →Device Onboarding →Enrollment →Device Platform restriction. 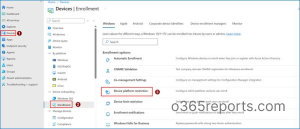 3. Click Create restriction. On the Basics page, enter a name and an optional description, then click Next.
4. On the Platform settings page, set Personally owned devices to Block, and then click Next. 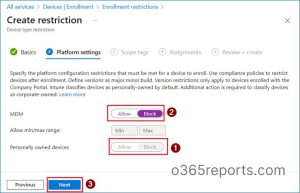 5.On the Scope tags page, select the required scope tag, then click Next. Keep the default scope tag unless you need to restrict visibility of the policy to specific IT teams.
6. On the Assignments page, select Add all users, then click Next. 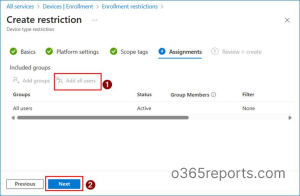 7. On the Review + create page, verify the configuration details and click Create.
 This creates a device platform restriction that prevents users from enrolling or accessing corporate resources from personal Windows devices.
Note: The same approach can be applied to other platforms such as Android, macOS, and iOS.
Additionally, for Windows devices, Microsoft has a setting that allows administrators to control automatic MDM enrollment when users sign in with their work or school account.
3. Restrict Microsoft Entra Registered Devices Using a Conditional Access Policy
To ensure that only trusted and compliant devices can access corporate resources, organizations can use Conditional Access policies. These policies can be configured to block users from registering personal devices with a work account.
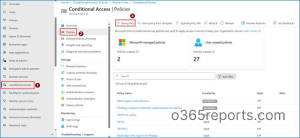
- Sign in to the Microsoft Entra Admin Center.
- Navigate to Microsoft Entra ID → Protection → Conditional Access → Policies.
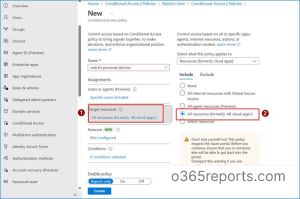
 3. Click New policy and provide a name for the policy.
4. Under Users, select Include → All User.
 5. In Target resources, select all resources.
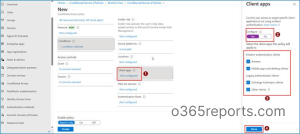
 6. Select Client apps and toggle it to Yes.
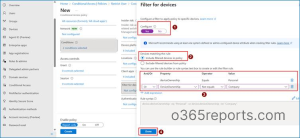
 7. In the filter for devices, select Include filtered devices in policy and select the option as shown in the image.
 8. Under Access controls, go to Grant and select Block access.
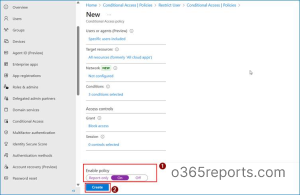
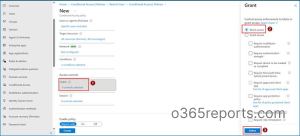 9. Click Select, then set Enable policy to On and Create to enforce the policy.
With this configuration in place, access to corporate resources from personal devices is restricted.
Advantages and Limitations of Microsoft Entra Registered Devices
While BYOD offers flexibility, it also introduces security concerns. Understanding both the benefits and limitations helps organizations decide whether this approach is right for their environment.
Advantages:
- Supports BYOD scenarios: Allows employees to access corporate resources from personal devices without requiring full device management.
- Lightweight device identity: Creates a device identity in Entra for authentication and access evaluation without heavy management overhead.
- Enhanced security controls: Enables multi-factor authentication (MFA), Conditional Access, and app-level protections to secure organizational data.
- Improved visibility: Provides IT with insight into which personal devices are accessing corporate resources, helping monitor and manage risk.
Limitations:
- Dependent on policy enforcement: Security relies primarily on Conditional Access and app-level protections rather than full device management.
- Limited device compliance enforcement: Cannot enforce deep configuration settings or compliance policies on personal devices.
- Not ideal for high-security workloads: May not meet requirements for highly regulated or sensitive data environments where full device control is necessary.
Best Practices for Microsoft Entra Registered Devices
Follow these best practices to keep Entra registered devices secure, compliant, and easy to
manage at scale.
- Integrate with Intune for Compliance and Management
Entra Registered Devices should be paired with Intune compliance policies where appropriate. This enables organizations to enforce device posture checks, such as OS version and security settings. - Apply MFA and Conditional Access Controls
Protect the registration process and access to corporate resources by requiring Multi-Factor Authentication (MFA). Administrators can enforce MFA using Conditional Access policies, ensuring that users complete strong authentication before a device is registered or allowed to access organizational resources. - Monitor Device Inventory and Identity Status
Regularly review the list of registered devices in the Microsoft Entra Admin Center to maintain an accurate device inventory and ensure stale devices are removed. Administrators can also use audit logs to monitor registration events and investigate anomalies. - Combine App Protection Policies with Device Registration
For personal devices, consider using Microsoft’s App Protection Policies (MAM) to protect company data at the app level, even when full device compliance is not enforced.
We hope this blog helped to understand the concept of Microsoft Entra Registered Devices and the different ways they can be configured across various platforms. Thank you for reading, and feel free to reach out to the comments section if you have any questions.