Sometimes, your organization needs to remove a domain, such as when moving it to a different subscription, deleting an unused domain, or cancelling a subscription. If domains are not removed properly, serious issues can arise. For example, an external client might send emails to an old address, or communication may fail because users are still linked to outdated domains. To avoid these pitfalls, it is crucial to remove all custom domains from your Microsoft 365 tenant properly. This not only strengthens security but also ensures consistent collaboration and a smooth user experience across your organization. Let’s walk through the step-by-step process to safely remove custom domains from your Microsoft 365 environment.
How to Delete Custom Domains in Microsoft 365?
We’ve outlined a hunch of scenarios where the removal of the domains is needed. Let’s understand each scenario clearly and know what actions are required for each case.
- Remove custom domain to use with different subscription
- Remove unused custom domains from Microsoft 365
- Remove a Microsoft 365 domain when cancelling your subscription
Case 1: Remove Custom Domain to Use with Different Subscription
Suppose your company initially subscribed to Microsoft 365 Business Standard and configured the domain contoso.com for user accounts and email addresses. Later, you decide to upgrade to the Microsoft 365 E3 plan under a different tenant to gain access to advanced security and compliance features. Since Microsoft doesn’t allow a domain to be verified in more than one tenant at the same time, here comes our need to remove the domain.
Before transferring a domain to another Microsoft 365 subscription, you must first move all users, groups, email aliases, and mailboxes to another domain in the tenant. Otherwise, the domain removal will be blocked until all dependencies are cleared. You must also ensure that the target domain is set as the fallback domain to prevent conflicts while making these changes. Once all objects have been updated, you can safely remove the source domain from Microsoft 365. These steps can be performed either through the Microsoft 365 admin center or by using PowerShell to remove the desired domain from your tenant.
- Move users to another Microsoft 365 domain
- Move groups to another domain in Microsoft 365
- Move your Microsoft 365 account to another domain
- Remove a custom domain from Microsoft 365
Move Users to the Another Microsoft 365 Domain
To get started, you must move all users from the source domain to target domain to ensure uninterrupted access and smooth collaboration across your organization. You can do this either through the Microsoft 365 admin center or using PowerShell to update user accounts to another domain.
Move Users to Target Domain Using Microsoft 365 Admin Center
- Start with sign in to the Microsoft 365 admin center.
- Go to Users → Active users and choose the users you want to move to the target domain.
- Click Change domains at the top of the page. (Note: You must select at least two users at a time to see this option).
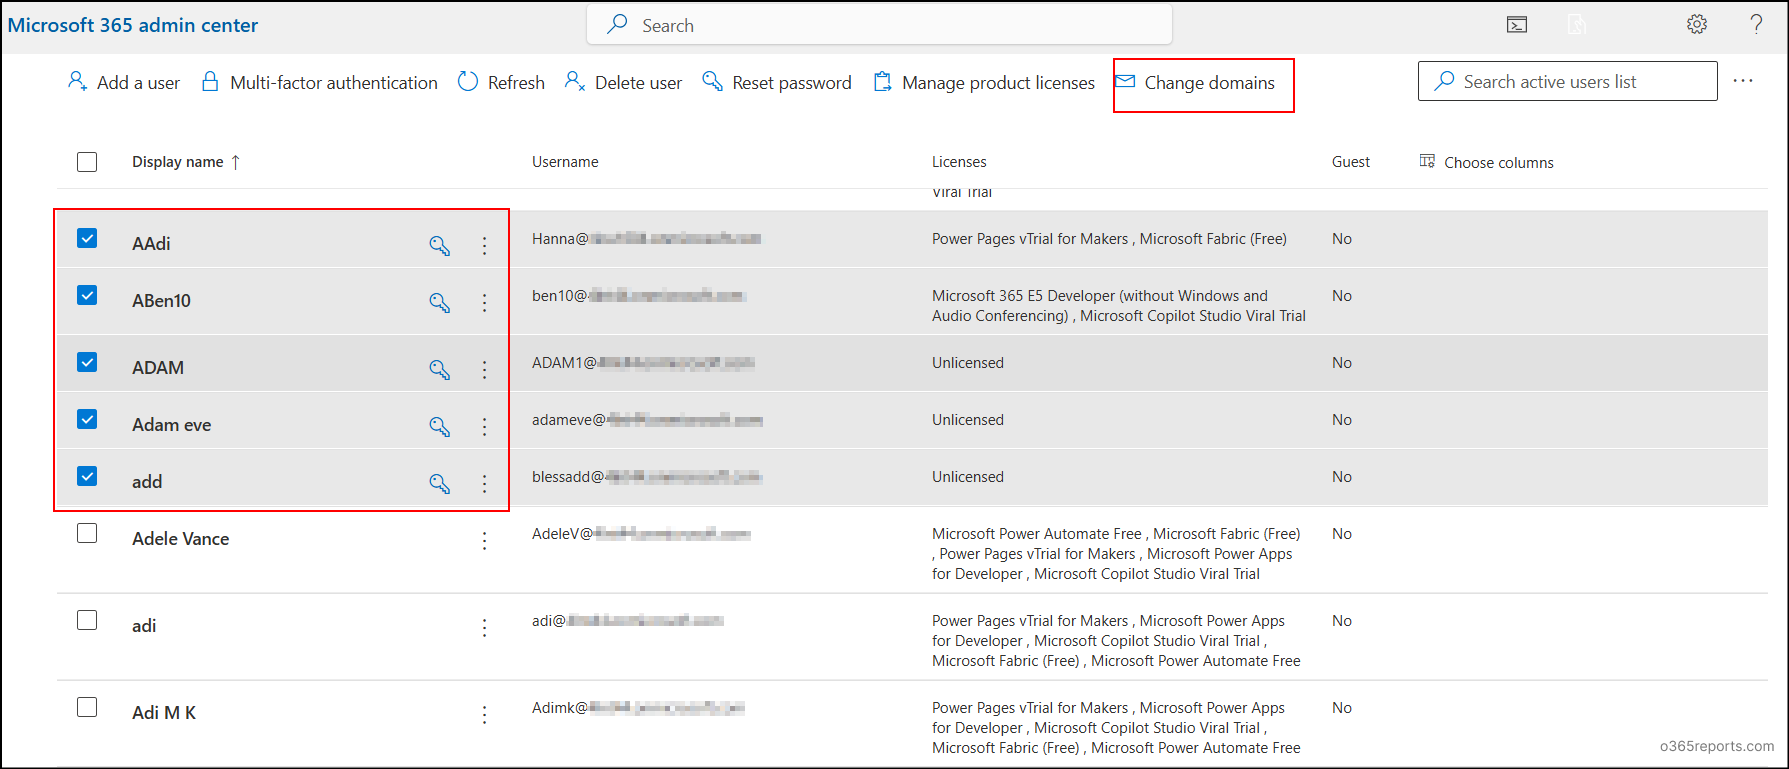
- In the Change domains pane, select the required domain from the dropdown and click Save changes.
Move Users to Required Domain Using PowerShell
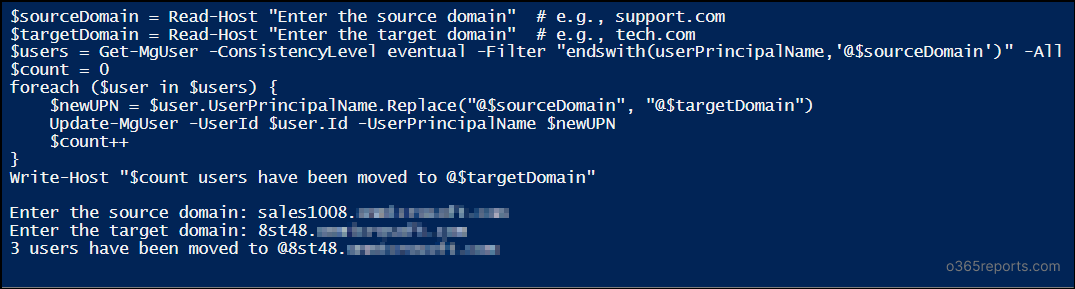
Manually updating each user can be time-consuming for large enterprises. To save time, you can use PowerShell scripts to move multiple users to the target domain quickly and efficiently. To do this, connect to Microsoft Graph PowerShell with the necessary permissions, such as User.ReadWrite.All, Groups.ReadWrite.All and Domain.ReadWrite.All.
|
1 2 3 4 5 6 7 8 9 10 |
$sourceDomain = Read-Host "Enter the source domain" # e.g., support.com $targetDomain = Read-Host "Enter the target domain" # e.g., tech.com $users = Get-MgUser -ConsistencyLevel eventual -Filter "endswith(userPrincipalName,'@$sourceDomain')" -All $count = 0 foreach ($user in $users) { $newUPN = $user.UserPrincipalName.Replace("@$sourceDomain", "@$targetDomain") Update-MgUser -UserId $user.Id -UserPrincipalName $newUPN $count++ } Write-Host "$count users have been moved to @$targetDomain" |
While running the script, you will be prompted to enter the source domain name and the target domain name. Once entered, the script will automatically fetch all users whose accounts are associated with the source domain and move them to the target domain. After the script completes, the selected users will be assigned to the required domain, and their email addresses will automatically update to reflect the change.
Move Groups to Another Domain in Microsoft 365
Once all users have been moved, now you must update your groups to use the same domain where the users have been migrated. To configure this, follow the steps below.
Move Groups to Another Domain Using Microsoft 365 Admin Center
- Navigate to the Active teams and groups page in the Microsoft 365 admin center.
- Select the group you want to update. Under General → Email address, click Edit.
- In the Primary email address section, click the edit icon.
- Click the domain part of the email address, select the required domain from the dropdown list, and click Done.
- If the group has alias email address, you can update their domains using the same method. Repeat these steps for all groups to update them to the required domain.
Move Groups to Target Domain Using PowerShell
To move groups to another domain, first you must connect to the Exchange Online PowerShell. Make sure you are using PowerShell version 5.1 or higher. Once connected, you can use the following script:
|
1 2 3 4 5 6 7 8 9 10 11 12 13 14 15 16 17 18 19 20 21 22 23 24 25 26 27 28 29 30 31 32 |
$sourceDomain = Read-Host "Enter source domain (without @)" $targetDomain = Read-Host "Enter target domain (without @)" $sourceDomain = $sourceDomain.TrimStart("@") $targetDomain = $targetDomain.TrimStart("@") $users = Get-MgUser -All | Where-Object { $_.UserPrincipalName -like "*@$sourceDomain" } $count=0 foreach ($user in $users) { $newUPN = "$($user.UserPrincipalName.Split('@')[0])@$targetDomain" $aliases = @() if ($user.OtherMails) { $aliases = @($user.OtherMails | Where-Object { $_ -match '^[^@\s]+@[^@\s]+\.[^@\s]+$' }) $aliases = $aliases | Where-Object { $_ -ne $newUPN } } if ($aliases -notcontains $newUPN) { $aliases += $newUPN } $aliases = [string[]]$aliases Update-MgUser -UserId $user.Id -UserPrincipalName $newUPN -OtherMails $aliases $count++ } Write-Host "$count user groups have been updated to $targetDomain" $groups = Get-DistributionGroup -ResultSize Unlimited | Where-Object { $_.PrimarySmtpAddress -like "*@$sourceDomain" } $count1=0 foreach ($group in $groups) { $localPart = $group.PrimarySmtpAddress.ToString().Split('@')[0] $newMail = "$localPart@$targetDomain" $proxyAddresses = @($group.EmailAddresses | ForEach-Object { $_.ToString() }) if ($proxyAddresses -notcontains "smtp:$newMail") { $proxyAddresses += "smtp:$newMail" } Set-DistributionGroup -Identity $group.Identity -EmailAddresses $proxyAddresses $count1++ } Write-Host "$count1 distribution groups have been updated to $targetDomain" |
Enter the source domain and target domain once prompted and the script will automatically update the domains of the groups.

Move Your Microsoft 365 Account to Another Domain
After relocating the necessary users and groups, it’s important to switch your own account if it’s still using the domain you plan to remove. This ensures uninterrupted access and avoids conflicts during the domain removal process. Follow the steps below to update your account.
Move Your Own Account Using Microsoft 365 Admin Center
To switch your own account to the Microsoft 365 admin center, follow the steps below:
- On the Active users page, select your account.
- In the profile flyout, navigate to Account → Username and email. Click Manage username and email.
- Under Primary email address and username, click the edit icon.
- From the Domains dropdown, select the domain you want to switch to and click Done. You can also update the domain of any aliases here.
- Sign out and then sign in again with your old password to use your account from the updated domain.
Switch Your Own Account to Another Domain Using PowerShell
To transfer your own account to the target domain efficiently, use the snippet below.
|
1 2 3 4 5 6 |
$sourceDomain = Read-Host "Enter the source domain (e.g., support.com)" $targetDomain = Read-Host "Enter the target domain (e.g., tech.com)" $user = Get-MgUser -UserId "<UserId>" $newUPN = $user.UserPrincipalName.Replace("@$sourceDomain", "@$targetDomain") Update-MgUser -UserId $user.Id -UserPrincipalName $newUPN Write-Output "Updated $($user.DisplayName) to $targetDomain" |
Replace <UserId> with the UPN of your account and the PowerShell snippet moves your own account to the target domain.
Remove a Custom Domain from Microsoft 365
Once all users and groups have been successfully moved, you can proceed to delete the domain using either the Microsoft 365 admin center or PowerShell.
Remove Custom Domain Using Microsoft 365 Admin Center
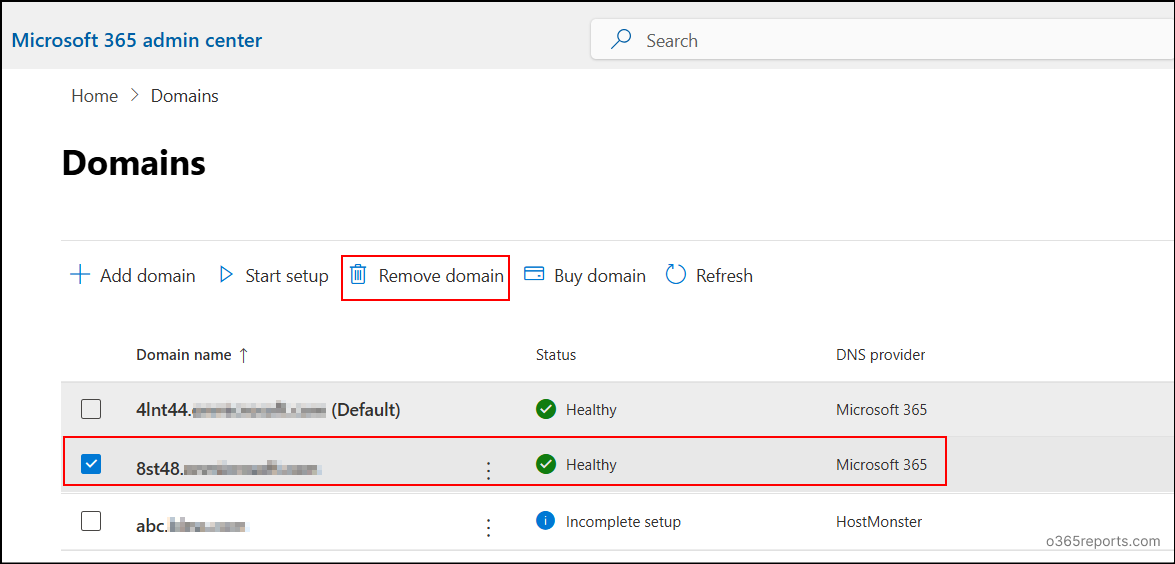
- Go to the Domains page in the Microsoft 365 admin center.
- Select the domain you want to remove and click Remove domain at the top of the page. Once done, the selecting domain will be removed successfully from your tenant.
Remove a Domain from Microsoft 365 Using PowerShell
If you prefer using PowerShell, you can use the below cmdlet to remove the custom domain.]
|
1 |
Remove-MgDomain -DomainId "abc.support.com" |
Tip: You can also rename domain in SharePoint and OneDrive if required.
The removal process typically takes around 5 minutes if the domain isn’t referenced in many places such as security groups, distribution lists, or user accounts. However, if the domain is associated with multiple resources or objects, the process may take several hours or in some cases, up to a full day to complete.
Note: The .onmicrosoft.com domain is the default domain that comes with your Microsoft 365 account, and it cannot be deleted. Only the custom domains that you add to your tenant can be removed.
Case 2: Remove Unused Custom Domains from Microsoft 365
Keeping unused domains in Microsoft 365 makes administration more complex. It can create conflicts when assigning usernames, because old domains still appear in dropdowns. This increases the chance of errors and makes managing users and policies more confusing.
This also introduces security risks, as clients may continue sending emails to old addresses, which could be missed or exploited. Overall, retaining outdated domains can disrupt productivity and increase operational and security challenges.
To prevent such issues, it is essential to delete unused domains, which ensures smooth collaboration and maintains security compliance.
To do this smoothly, you must first move all users, groups, and your own account to the target domain, as explained in the previous section. Once that is complete, you can proceed to remove the unused domain. This ensures smooth collaboration and maintains security compliance.
Case 3: Remove a Microsoft 365 Domain When Cancelling Your Subscription
Suppose your small business may have been using Microsoft 365 Business Basic for professional email and file storage. After a few months, you chose to switch to another email provider and no longer need your Microsoft 365 subscription. Before cancelling the plan, you need to remove your custom domain (for example, contoso.com) so it can be reused in your new service.
In this case, you do not need to move users, groups, or mailboxes because the Microsoft 365 tenant will no longer be used. Once the domain is removed, it can be added directly to the new provider, and all new accounts and services will be set up there independently. The existing Microsoft 365 users and groups will be deactivated or deleted when the subscription is cancelled.
To remove your domain, successfully, you must follow the correct steps depending on who manages your DNS records either your domain registrar or Microsoft 365 itself. Following these steps ensures the domain is properly released and avoids issues when adding it to the new service.
Case 3a: You Switched Your Nameserver (NS) Records to Microsoft 365
When you set up your domain, if you pointed your NS records to Microsoft 365, it means Microsoft is currently managing all your DNS records (like MX, TXT, etc.).
Before removing the domain, you must:
- Set up or update your DNS records (MX, CNAME, etc.) at the new DNS host you plan to use.
- Then, change your NS records from Microsoft 365 back to your new DNS host.
- Only after you change the NS records will any new MX or DNS changes take effect. Until then, they’ll still be controlled by Microsoft 365.
Case 3b: You didn’t Switch Your Nameserver (NS) Records to Microsoft 365
In this setup, your NS records still point to your original DNS host (like GoDaddy, Cloudflare, etc.), not Microsoft 365.
This means you already manage your DNS records outside Microsoft 365.
So, you need to change your MX record at your DNS host and your mail flow updates immediately, so that new emails start going to the new provider right away.
Security Tip: Before switching your email system, inform your users about the planned change. This helps ensure a smooth transition and gives them time to migrate emails or data to the new provider.
Removing a domain in Microsoft 365 doesn’t have to be complicated. Whether you’re moving to a new domain, switching subscriptions, or closing your tenant, handling it correctly ensures everything keeps running smoothly. A proper cleanup keeps your Microsoft 365 environment secure, organized, and ready for the future. Got questions or tips to share? Drop them in the comments below. We’d love to hear from you! Stay tuned for more actionable insights to optimize your Microsoft 365 environment. ✨